Is your car’s air conditioning losing its cool? If your vehicle is more than 6-8 years old and the once refreshing blast of cold air has diminished, the culprit might be low Car Ac Refrigerant levels. Many car owners experience this gradual decline in AC performance, often accompanied by unusual hissing sounds from the vents. Before you rush to an expensive mechanic, consider this: replenishing your car’s AC refrigerant can be a straightforward DIY task, restoring your system’s cooling power and saving you money.
This guide, inspired by a resourceful BHPian’s experience, will walk you through the process of safely and effectively recharging your car’s AC refrigerant. We’ll cover everything from understanding why refrigerant levels drop to the step-by-step instructions for a successful DIY recharge.
Understanding Car AC Refrigerant and Its Importance
Your car’s air conditioning system relies on refrigerant, a specialized chemical compound, to produce that oh-so-welcome cool air on hot days. This refrigerant circulates through a closed system, undergoing phase changes to absorb heat from inside your car and release it outside. Over time, even in a sealed system, refrigerant levels can naturally decrease. This is primarily due to minor leaks that develop as rubber seals and O-rings in hoses and connections age and wear. Damage to components like condenser coils from road debris can also lead to refrigerant leaks.
Think of car AC refrigerant as the lifeblood of your cooling system. When levels are low, the system’s ability to cool is compromised, leading to weak airflow and ineffective temperature reduction inside your vehicle. Recognizing the signs of low refrigerant is the first step towards restoring your AC’s performance.
Signs Your Car AC Refrigerant Might Be Low:
- Reduced Cooling Efficiency: The most obvious sign is a noticeable decrease in the coldness of the air coming from your vents, especially on hot days.
- Hissing Noises: A hissing sound emanating from your dashboard vents can indicate low refrigerant pressure within the system.
- AC Compressor Issues: In some cases, low refrigerant can cause the AC compressor to cycle on and off more frequently or even fail to engage, further reducing cooling.
- Warm Air from Vents: In severe cases of refrigerant loss, your AC might blow warm air instead of cold.
Before proceeding with a recharge, it’s wise to rule out other potential AC system issues. Let’s briefly examine some common components and how to check them.
Preliminary Checks: Ensuring Refrigerant is the Issue
While low refrigerant is a common cause of weakened AC, other components could also be at fault. A quick preliminary check can help you confirm if a refrigerant recharge is the right solution.
- Compressor: Listen for a distinct “click” sound when you engage the AC. This indicates the compressor clutch is engaging. Visually inspect the compressor drive belt for proper tension and condition.
- Evaporator: Check for water leaks inside the car, particularly in the passenger footwell. Excessive condensation or a clogged drain could point to evaporator issues.
- Condenser: Inspect the condenser fins (usually located in front of the radiator) for debris blockage. Gentle cleaning with compressed air can improve airflow.
- Expansion Valve: This component is harder to diagnose without specialized tools, but if other components seem fine, it’s less likely to be the primary issue for gradual cooling decline.
- Blower Motor: Ensure the blower fan operates at different speeds, indicating the blower resistor is functioning correctly.
- Cabin Air Filter: A clogged cabin air filter restricts airflow and reduces AC efficiency. While not directly related to refrigerant, replace it regularly for optimal performance.
If these components appear to be functioning correctly, and your car is experiencing the symptoms of weak cooling, a car AC refrigerant recharge is likely the solution.
Essential Tools and Materials for AC Refrigerant Recharge
To perform a DIY car AC refrigerant recharge, you’ll need a few specialized tools and materials. Investing in these items can save you significant money compared to professional servicing and allows for future AC maintenance.
Tools Required:
-
AC Manifold Gauge Set: This is the core tool for AC work. It consists of gauges to measure low and high-pressure sides of the AC system, control valves, and color-coded hoses.
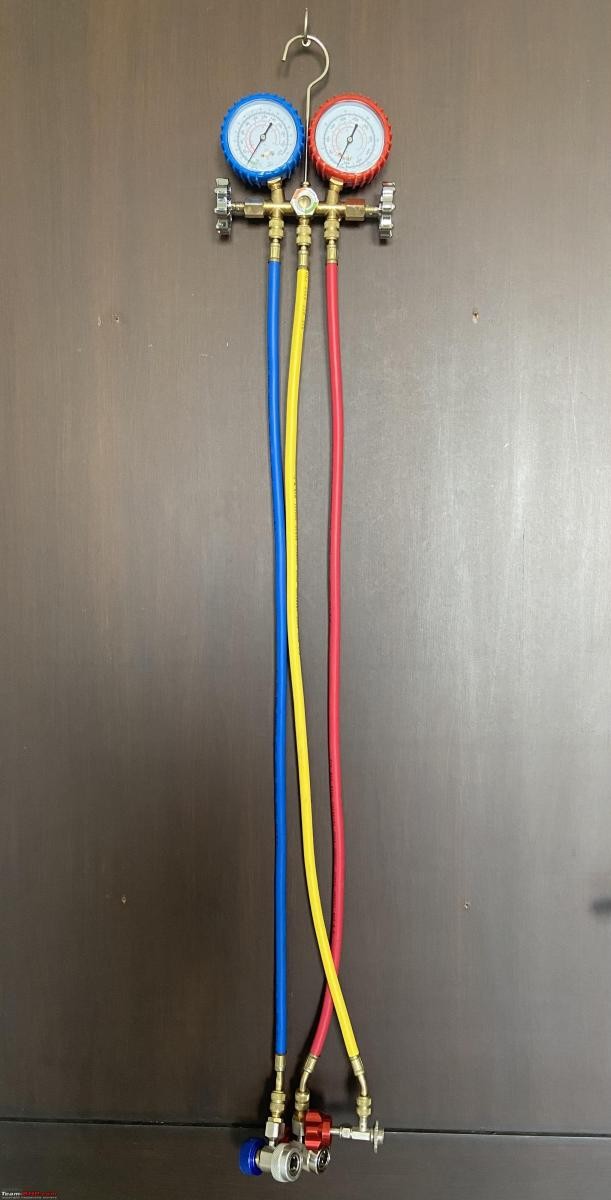 AC Manifold Setup
 -
Probe Thermometer: A thermometer to measure the vent air temperature before and after the recharge, verifying the improvement in cooling performance. A digital multimeter with a temperature probe works perfectly.
Consumables:
-
R-134a Refrigerant Can: R-134a is the standard refrigerant for many modern vehicles. Check your car’s AC system sticker (usually under the hood) to confirm the correct refrigerant type and quantity. A 450g can is generally sufficient for smaller vehicles.
Always verify the refrigerant type specified for your vehicle before purchasing.
Personal Protective Equipment (PPE):
- Safety Goggles: Protect your eyes from refrigerant splashes, which can cause frostbite.
- Nitrile Gloves: Wear gloves to prevent skin contact with refrigerant, which can also cause frostbite.
Understanding the AC Manifold Gauge Set
The AC manifold gauge set is your control center for recharging car AC refrigerant. Let’s break down its components:
-
Manifold Body: Typically made of brass, the manifold houses the pressure gauges and control valves.
-
Pressure Gauges:
- Low-Pressure (LP) Gauge (Blue): Measures pressure on the suction side of the AC system (0-220 psi range).
- High-Pressure (HP) Gauge (Red): Measures pressure on the discharge side of the AC system (0-500 psi range).
-
Control Valves: Valves on the manifold body control the flow of refrigerant. For charging, the low-pressure side valve is used.
-
Gauge Glass: A small window on the manifold that allows you to see the refrigerant flow during charging.
-
Color-Coded Hoses: Three hoses connect the manifold to the car and refrigerant source:
- Blue Hose: Connects to the low-pressure (LP) service port on the car.
- Red Hose: Connects to the high-pressure (HP) service port on the car.
- Yellow Hose: Connects to the refrigerant can for charging or a vacuum pump for system evacuation.
-
Schrader Valve Fittings: Fittings on the hose ends and service ports contain Schrader valves, similar to tire valves, to prevent refrigerant leakage.
-
Quick Couplers: Color-coded quick couplers (blue for LP, red for HP) attach to the car’s service ports. These are designed to prevent accidental connection to the wrong port.
-
Refrigerant Can Valve: A valve with a piercing pin connects the yellow hose to the refrigerant can.
Exercise caution when using the can valve. Ensure it is open before screwing it onto the refrigerant can to prevent accidental refrigerant release.
-
Dummy Ports: Many manifolds include dummy ports on the back for storing hoses when not in use, keeping them clean.
Step-by-Step Guide to Recharging Your Car AC Refrigerant
Now that you have the tools and understand the components, let’s proceed with the car AC refrigerant recharge process. Remember to work in a well-ventilated area and wear safety goggles and gloves throughout the procedure.
-
Initial Temperature Check: Start your car’s engine, set the AC to the coldest setting with the blower fan on high, and measure the air temperature from the vents using your probe thermometer. Note this initial temperature for comparison later.
-
Connect the Manifold Gauge Set:
- Hang the manifold set under the hood, ensuring both manifold valves are closed.
- Attach the refrigerant can valve to the refrigerant can, ensuring the valve is open (handle turned counter-clockwise) before piercing the can.
-
Locate the Service Ports: Identify the low-pressure (LP) and high-pressure (HP) service ports on your car’s AC lines.
- LP Port: Usually on a larger diameter pipe, with a smaller port fitting.
- HP Port: Usually on a smaller diameter pipe, with a larger port fitting.
Remove the dust caps from both ports and keep them in a safe place.
-
Attach Quick Couplers: Connect the blue quick coupler to the LP service port and the red quick coupler to the HP service port. Ensure the quick couplers are in the closed position when connecting.
-
Open Quick Coupler Valves: Gently open the valves on the quick couplers to allow pressure readings to register on the gauges.
-
Engine RPM and Pressure Readings: Have an assistant start the engine and increase the RPM to approximately 1500 RPM. Observe the pressure readings on both gauges.
-
Ambient Temperature and Pressure Chart: Measure the ambient temperature outside your vehicle. Compare your gauge readings to a R-134a pressure-temperature chart to assess your system’s refrigerant level.
Example: At 28°C ambient temperature, the LP gauge should ideally read between 45-50 psi, and the HP gauge between 190-230 psi. Lower readings, especially on the HP side, indicate low refrigerant.
-
Prepare for Refrigerant Charging: Put on safety goggles and nitrile gloves. Screw the refrigerant can valve onto the refrigerant can, piercing the can. Back off the valve slightly to allow refrigerant to flow.
-
Purge Air from Yellow Hose: Loosen the yellow hose connection at the manifold slightly to purge any air from the hose until refrigerant starts to escape. Then, tighten the connection securely.
-
Charge the System: Slowly open the low-pressure (LP) side valve on the manifold to begin charging the system with refrigerant. Observe the refrigerant flow through the gauge glass. Charge in short bursts, monitoring the HP gauge.
-
Monitor Pressure Gauges: Watch the HP gauge reading as you charge. Refer to the pressure-temperature chart and your ambient temperature to determine the target HP reading (e.g., 190-230 psi at 28°C). Charge intermittently until the HP gauge reaches the desired range. Avoid overcharging, as it can damage the system.
-
Final Temperature Check: Close the LP manifold valve, let the system stabilize for a few minutes, and measure the vent air temperature again. It should be significantly colder than the initial reading.
-
Disconnect and Secure: Turn off the engine, close the quick coupler valves, and carefully disconnect the manifold hoses from the service ports. Replace the dust caps on the service ports. Store your tools and remaining refrigerant safely.
When to Seek Professional AC Service
While recharging your car AC refrigerant can be a successful DIY fix for gradual cooling loss, certain situations warrant professional attention:
- Persistent Leaks: If you find yourself needing to recharge frequently, it indicates a significant leak that needs professional diagnosis and repair.
- Compressor or Component Issues: If preliminary checks reveal problems with the compressor or other AC components, professional service is required.
- Uncertainty or Lack of Tools: If you are uncomfortable with the DIY process or lack the necessary tools, it’s best to consult a qualified AC technician.
Conclusion: Enjoy Cool Comfort Again
Recharging your car AC refrigerant is a rewarding DIY task that can restore your vehicle’s cooling performance and save you money. By understanding the system, using the right tools, and following these steps carefully, you can effectively revitalize your ride and enjoy comfortable driving even on the hottest days. Remember to prioritize safety and consult a professional if you encounter complex issues or are unsure about any step in the process. Keep your car cool and enjoy the drive!
Disclaimer: This guide is for informational purposes only. The author is not an HVAC professional and assumes no liability for any damage or injury resulting from following these instructions. Perform DIY tasks at your own risk and always prioritize safety. Consult a qualified technician if you are unsure about any part of the process.