Car scratches are an inevitable nuisance for vehicle owners. Whether it’s a minor brush against a bush or a more noticeable key mark, these blemishes can detract from your car’s appearance and value. The good news is, you don’t always need to rush to a professional body shop for every scratch. Many scratches can be effectively removed at home with the right techniques and products. This guide will walk you through various methods to tackle car scratches, from light surface imperfections to deeper, more stubborn marks, helping you restore your car’s pristine look.
Understanding the Depth of the Scratch
Before you reach for any scratch removal product, it’s crucial to assess the severity of the scratch. Not all scratches are created equal, and treating a deep scratch like a minor one will only lead to frustration. There are typically three main types of car scratches:
- Clear Coat Scratches: These are the most superficial, affecting only the clear top layer of your car’s paint. They often appear as fine, hairline marks and are usually the easiest to fix. You can often identify them by running your fingernail lightly across the scratch; if your nail doesn’t catch, it’s likely a clear coat scratch.
- Base Coat Scratches: These scratches go deeper, penetrating the clear coat and reaching the color base coat layer. They are more noticeable than clear coat scratches and might catch your fingernail slightly.
- Primer or Metal Deep Scratches: These are the most severe type, going through the clear coat, base coat, and even reaching the primer or bare metal. These scratches are very visible, often wide, and your fingernail will definitely catch. Repairing these often requires more extensive work, but it’s still possible to improve their appearance at home.
Knowing the type of scratch you’re dealing with will dictate the best approach and products to use.
DIY Methods for Light Surface Scratches
For those minor clear coat scratches that are just surface-level annoyances, several DIY methods can be surprisingly effective. These methods primarily involve using polishing compounds and scratch removers.
Using Scratch Removal Products
Many over-the-counter scratch removal products are designed to buff out light scratches. These products often contain mild abrasives that gently level the clear coat around the scratch, making it less visible.
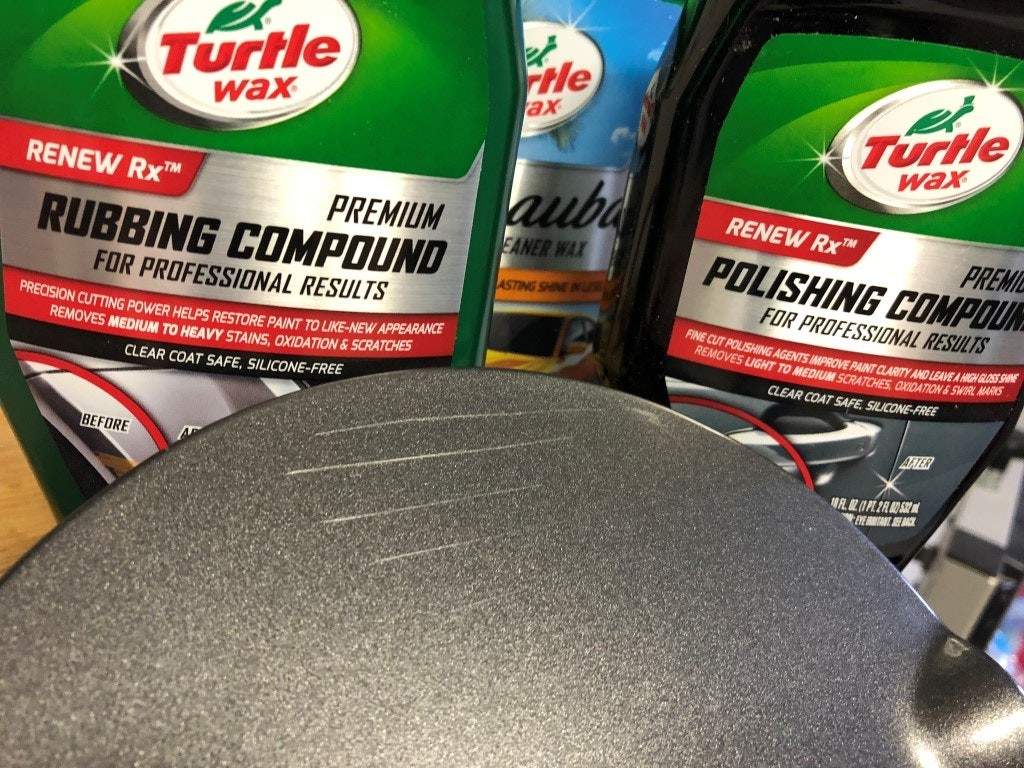
One popular category is light-duty scratch removers. In a test conducted on various scratch removal products, Turtle Wax products, including Rubbing Compound, Polishing Compound, Scratch & Swirl Remover, and Carnauba Liquid Wax, were evaluated. These products, applied by hand with a cloth, showed some effectiveness in minimizing the appearance of very light surface scratches when viewed from a distance. However, under closer inspection and in most lighting conditions, even minor scratches remained noticeable.
To use these types of products:
- Clean the area: Thoroughly wash and dry the scratched area to remove any dirt or debris.
- Apply the compound: Apply a small amount of scratch remover or polishing compound to a clean microfiber cloth.
- Buff the scratch: Using circular motions, gently rub the compound into the scratch. Apply firm but not excessive pressure.
- Wipe away residue: Use a clean microfiber cloth to wipe away any excess product and inspect the results.
- Repeat if necessary: For slightly deeper clear coat scratches, you may need to repeat the process a few times.
- Wax the area: After removing the scratch, apply a coat of car wax to protect the area and enhance the shine.
Stepping Up the Game: Machine Polishing for Moderate Scratches
For scratches that are a bit more stubborn and don’t disappear with hand-applied compounds, using a machine polisher can significantly improve results. Machine polishers provide more consistent and powerful buffing action, making them more effective at leveling the clear coat and diminishing the appearance of moderate scratches.
Meguiar’s Ultimate Compound, Polish, and Liquid Wax, when tested by hand, offered only marginally better results than the Turtle Wax products for light scratches. However, the game changed when a machine polisher was introduced.
The Meguiar’s DA Power System, a rotary polishing system that attaches to a standard drill, demonstrated markedly improved results. This system utilizes an orbital motion, ensuring more even coverage and effectively working the polishing compound into the scratch. With the power of the DA system, lighter scratches became virtually invisible, while moderate scratches showed significant improvement.
To use a machine polisher effectively:
- Clean the area: As with hand application, start with a clean and dry car surface.
- Apply compound to pad: Apply a small amount of polishing compound to the polishing pad of your machine polisher.
- Polish the scratch: Using light to medium pressure, move the polisher in overlapping passes over the scratched area. Keep the polisher moving to avoid overheating the paint.
- Wipe and inspect: Wipe away residue with a microfiber cloth and assess the scratch.
- Repeat or switch to polish: If the scratch is still visible, repeat the polishing process or switch to a finer polish for a smoother finish.
- Wax for protection: Finish with a coat of wax to protect the polished area.
Sanding for Deeper Scratches: When More Abrasive Action is Needed
For scratches that penetrate beyond the clear coat and into the base coat, or for deeper clear coat scratches that polishing alone can’t handle, sanding becomes necessary. Sanding is a more aggressive approach that physically removes a thin layer of clear coat to level out the scratch. It might sound intimidating, but when done carefully, it can effectively eliminate more noticeable scratches.
The 3M Trizact Precision Scratch Kit is designed specifically for this purpose. This kit utilizes a sanding process followed by compounding and polishing, all with drill attachments. The system involves wet sanding the scratched area by hand with specialized sandpaper, then using drill attachments to apply rubbing compound and polish.
Using the 3M Trizact system in tests showed significant improvement on moderate scratches after sanding. While sanding initially dulled the paint, creating a hazy matte finish, subsequent buffing with the included compound and polish restored the shine. Light scratches were completely removed, and moderate scratches became almost invisible. Even deeper scratches showed noticeable improvement, although they might still be somewhat visible.
If you’re considering sanding, keep these points in mind:
- Wet Sanding is Key: Always wet sand to reduce friction and heat buildup, which can damage the paint. Use water with a drop of car soap as a lubricant.
- Use Fine Grit Sandpaper: Start with very fine grit sandpaper (like 3000 grit or higher) to minimize the risk of creating further scratches. The 3M Trizact kit provides sandpaper specifically designed for this.
- Sand Lightly: Apply very light pressure when sanding. The goal is to gently level the clear coat, not to aggressively remove paint.
- Keep the Area Wet: Ensure the sanding area remains wet throughout the process.
- Follow with Compounding and Polishing: Sanding will always leave a dull finish. You must follow up with a rubbing compound and then a polish to restore the shine. Machine polishing is highly recommended after sanding.
Dealing with Very Deep Scratches
For the deepest scratches that reach the primer or even bare metal, simply polishing or even sanding might not be enough to completely remove them. In these cases, you might need to consider filling the scratch with touch-up paint or a filler before sanding and polishing. This process involves:
- Cleaning and preparing the scratch: Thoroughly clean the scratch and surrounding area.
- Applying touch-up paint or filler: Carefully apply touch-up paint that matches your car’s color into the scratch, or use a specialized automotive filler like Bondo for wider, deeper scratches. Apply in thin layers, allowing each layer to dry completely.
- Leveling the fill: Once the paint or filler is dry and slightly raised above the surrounding paint, carefully wet sand it down with very fine grit sandpaper until it’s level with the surrounding paint.
- Polishing: After sanding, use a polishing compound and machine polisher to restore the shine and blend the repaired area seamlessly with the rest of the paint.
- Waxing: Protect your work with a coat of wax.
Conclusion
Getting rid of car scratches at home is achievable with the right approach and understanding of the scratch type. For minor clear coat scratches, hand-applied scratch removers and polishing compounds can work wonders. For moderate scratches, machine polishing offers a significant step up in effectiveness. And for deeper scratches, sanding, and potentially filling, can bring about remarkable improvements.
Remember to always start with the least aggressive method and progressively increase abrasiveness as needed. With patience and the right techniques, you can keep your car looking its best and effectively manage those annoying scratches without breaking the bank at a professional body shop.