Creating a Batmobile Car for a Pinewood Derby race is an ambitious and rewarding project. Inspired by the iconic vehicle of the Dark Knight, this guide will walk you through the process of crafting a unique Batmobile Pinewood Derby car that’s sure to turn heads. While this design leans towards visual appeal and might not strictly adhere to every Pinewood Derby rule (especially for Cub Scouts), it’s a fantastic project for adult open class races or simply for the joy of building an awesome miniature Batmobile. Follow these step-by-step instructions to bring your own Batmobile car to life.
Disclaimer: Please be aware that this Batmobile car design is intended for open class adult races or display and may not meet all official Cub Scout Pinewood Derby regulations regarding size and weight. It’s also a complex build, better suited for adults or older children with adult supervision. This guide reflects the steps taken during the original build, but some steps might be more logically ordered differently. Read through the entire process before you start to avoid potential hiccups.
Getting Started: Template and Wood Preparation for Your Batmobile
The foundation of any great Batmobile car is a solid plan and the right materials. Begin by utilizing a template to guide your carving. You can try sketching your own Batmobile design or download a pre-made template online. A downloadable template is available here to assist you in drawing your Batmobile car design. Alternatively, you can print the image below on standard 8.5 x 11 paper, which should yield a template close to the correct size. Note that this Batmobile car design is larger than a standard Pinewood Derby block, requiring a custom wood block.
For the wood, pine is recommended as it’s easier to carve than harder woods, although hardwoods can be used if you’re comfortable with more challenging shaping. Scrap pine 1×6 lumber works perfectly.
Cut the pine board into two strips, each 2.75 inches wide, using a table saw. Maintaining a width of 2.75 inches or less is crucial to prevent your Batmobile car from overlapping into adjacent lanes on the race track, which could lead to disqualification.
From these strips, select three 9-inch sections using a miter saw. Choose the best, knot-free sections for a smoother carving process.
Apply wood glue evenly between the three sections and clamp them firmly together. Careful gluing is essential to avoid gaps that could weaken the structure during carving. If gaps do occur, re-glue the sections as needed.
This assembled block will be the starting point for carving your Batmobile car. Its larger size compared to a standard Pinewood Derby block allows for the Batmobile’s distinctive shape.
Transferring the Batmobile Silhouette and Initial Cuts
Now, transfer the Batmobile silhouette from your template onto the wood block. Cover the back of your paper template with chalk or pencil. Pencil is generally more visible on light wood. Alternatively, cut out the silhouette and trace directly around it.
Position the template on the wood block and secure it.
Trace the Batmobile silhouette outline firmly with a pencil.
The chalk outline will transfer to the wood, though pencil is more visible on pine.
Enhance the visibility of the outline by tracing over the chalk with a pencil.
Use a band saw to make the initial cuts along the traced Batmobile shape. These cuts don’t need to be perfect at this stage, as further shaping will refine the form. Cutting slightly outside the lines provides flexibility for later shaping.
The roughly cut Batmobile silhouette from a top view, showing the extra wood left for shaping.
Creating the Track Slot and Side Profile Cut
A crucial step, ideally done earlier: create the track slot underneath the Batmobile car. Use a table saw to cut a slot for the race track, allowing the wheels to protrude. Multiple passes with the saw will create a slot approximately 3/8 inches deep. This depth ensures the car’s lower portions clear the track by about 1/8 inch, enhancing the Batmobile car’s ground-hugging appearance.
The slot width should match the standard Pinewood Derby car width of 1.75 inches.
Verify the slot width by test-fitting a standard Pinewood Derby block.
With the top silhouette complete, focus on the side view. Cut out the side view template and align it with the side of your roughly shaped Batmobile car.
Trace the side silhouette onto the wood, adapting to the already carved top shape.
Visualize and project the lines to ensure accurate tracing on the contoured surface.
Cut the side silhouette using the band saw. The Batmobile car is now starting to take a recognizable form.
Shaping and Detailing the Batmobile Car
Before detailed carving, transfer key lines from the side view template to the sides of the Batmobile car for reference.
Repeat the process for the top surface, marking out key features.
Visualize the final shape and identify areas for wood removal. For example, define the central jet engine intake while shaping the fenders to curve downwards. Use a coping saw to start removing wood for the fender curves, working towards the center jet intake.
Continue cutting to fully release the fender section, revealing the basic fender shape.
The Batmobile car with the initial fender shaping complete, showcasing the emerging form.
A front view showing both fenders roughly shaped and the central jet engine intake area defined. Further refinement is needed for final shaping of both fenders and the intake.
For removing larger sections or creating deeper contours, use a drill bit. This example shows starting to remove wood from the top dome section of the Batmobile.
A chisel can further refine the shape after drilling, getting closer to the desired contours.
The result after drilling and chiseling – a rougher, but more defined shape.
For detailed shaping, a rotary tool like a Dremel with a high-speed cutter bit is invaluable. This allows for precise removal of wood and finer detailing.
The Batmobile car with more refined shaping on the dome and jet engine intake, showing increased detail.
Use a coping saw again to roughly shape the rear fins of the Batmobile.
The rear fins in a rough, initial shape, ready for further refinement.
The Batmobile car starting to resemble its iconic form with the main shaping progressing.
Continue shaping and refining the Batmobile car, using reference images to guide you. Focus on removing wood to achieve the desired contours and details.
Axle Slots and Wheel Wells for Batmobile Car
Cutting axle slots is best done early on a square block. Due to shaping being done already, ensuring perfectly square axle slots becomes challenging, potentially impacting the car’s straight-line performance. Use a hacksaw to carefully cut the axle slots, using a square to mark them. Level and consistent depth for front and rear slots are crucial.
After hacksawing, make adjacent cuts and use a chisel to remove wood and create the initial wheel well openings.
The Batmobile car with initial wheel well openings and axle slots.
Refine the wheel wells into circular openings using a hand router with a flat bit. Carefully follow pencil markings for circular shapes. Achieving perfect circles by hand is difficult, so work slowly and carefully.
Set the router bit depth to match the thickness of the lower hanging wood section of the Batmobile.
The routed wheel wells, not perfectly circular but functional and visually acceptable, especially after painting.
Sanding and Finishing Your Batmobile Car
Continue shaping and refine the Batmobile car until you achieve the desired form. Begin sanding with coarse grit sandpaper. A detail power sander is very useful for smoothing curves and surfaces.
For hard-to-reach areas like between the rear fins, resort to hand sanding or “finger sanding”.
After coarse sanding, switch to finer grit sandpaper for a smoother finish. The wood grain of the Batmobile car is now beautifully smooth and almost paint-ready.
Painting and Final Assembly of the Batmobile
Prepare for painting. Mask off the wheel contact points with tape, thinking it might reduce friction against potentially sticky paint. However, durable outdoor spray paint may offer less resistance than raw pine wood. Consider this when deciding whether to mask the wheel contact areas.
The Batmobile car ready for a primer coat or two.
Primer fills imperfections and provides a good surface for the final glossy spray paint.
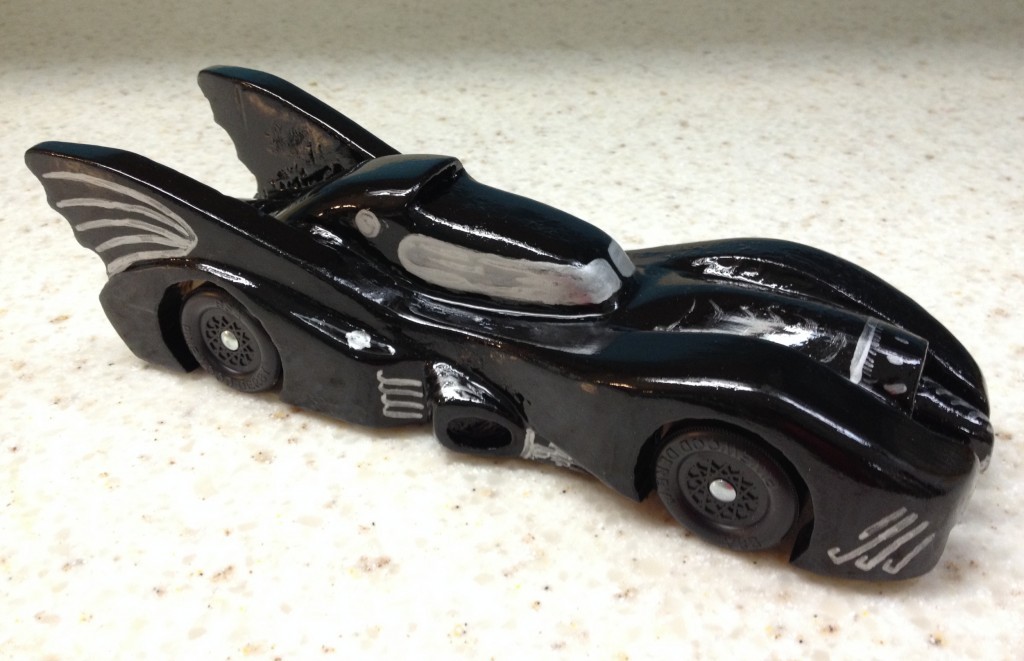
The painted Batmobile car. The finish is not perfectly smooth, partly due to applying the second coat of paint too soon. A single smooth coat might have been optimal.
The Batmobile looks even better with wheels installed. The axle slots needed widening with pilot holes, which might have led to slight misalignment.
Adding painted details enhances the Batmobile car’s realism and resemblance to the iconic vehicle.
This Batmobile car project, spanning a couple of weekends, was a fun and educational experience combining creativity, artistry, and woodworking skills. Despite not being a top racer, the visual appeal of the Batmobile car was a significant achievement. We hope these instructions and photos inspire and assist you in your own Batmobile car build or similar creative projects. Enjoy the process of building your unique Batmobile car!