Is removing tint from car windows something you’re considering? Whether you’re dealing with bubbling, fading, or simply want a change, understanding the process is key. This CARS.EDU.VN guide provides a comprehensive look at removing auto window tint, exploring both DIY methods and the benefits of professional service. Learn effective strategies for tint removal and discover valuable insights on automotive care. We’ll also touch on vehicle customization and auto maintenance, ensuring you make informed decisions for your car.
1. DIY vs. Professional Window Tint Removal: Which Is Right for You?
Removing car window tint can seem like a straightforward task, but it often involves more than meets the eye. While DIY methods might appear cost-effective initially, potential pitfalls can lead to more significant expenses down the line. Understanding the nuances of both DIY and professional removal can help you make an informed decision.
1.1 The Allure of DIY Tint Removal
Many car owners are drawn to the DIY approach for removing window tint due to the perceived cost savings and the satisfaction of handling the project themselves. The availability of online tutorials and readily accessible tools further fuels this interest.
Cost Savings: The most apparent benefit of DIY tint removal is the potential to save money on labor costs. Instead of paying a professional, you only need to invest in the necessary tools and materials, which can be significantly cheaper.
Personal Satisfaction: For some, the act of working on their car is a rewarding experience. DIY tint removal offers a sense of accomplishment and control over the outcome, allowing individuals to customize their vehicle to their exact preferences.
Flexibility: DIY projects offer flexibility in terms of scheduling and pace. You can work on the tint removal at your convenience, without being constrained by appointment times or deadlines.
1.2 The Pitfalls of DIY Tint Removal
Despite the initial appeal, DIY tint removal comes with its own set of challenges and risks. These can range from damaging your car’s windows to personal injury.
Risk of Damage: One of the most significant concerns with DIY tint removal is the potential for damaging your car’s windows. Improper techniques or the use of incorrect tools can lead to scratches, cracks, or even shattered glass, resulting in costly repairs. According to a study by the National Glass Association, the average cost to replace a car window can range from $200 to $500, depending on the make and model of the vehicle.
Time and Effort: Removing window tint can be a time-consuming and labor-intensive process, especially for those without prior experience. What may seem like a quick weekend project can quickly turn into a frustrating and drawn-out ordeal.
Uneven Results: Achieving a smooth, even removal can be challenging with DIY methods. Streaks, residue, and adhesive buildup are common issues that can detract from the appearance of your windows and require additional effort to correct.
Safety Concerns: DIY tint removal often involves working with sharp tools, such as razor blades and heat guns, which can pose safety risks if not handled properly. Cuts, burns, and exposure to harmful chemicals are potential hazards that should not be overlooked. Always use personal protective equipment (PPE) like gloves and eye protection.
1.3 The Expertise of Professional Window Tint Removal
Opting for professional window tint removal offers several advantages, including expertise, specialized equipment, and peace of mind. While it may come at a higher upfront cost, the benefits often outweigh the risks associated with DIY methods.
Experience and Skill: Professional window tint technicians possess the knowledge, skills, and experience to remove tint safely and effectively. They understand the nuances of different tint films and adhesives and use proven techniques to minimize the risk of damage.
Specialized Equipment: Professionals have access to specialized tools and equipment designed specifically for window tint removal. These tools, such as heat guns, steamers, and adhesive removers, allow them to work efficiently and achieve superior results.
Time Savings: Hiring a professional can save you significant time and effort. They can complete the tint removal quickly and efficiently, allowing you to focus on other tasks.
Warranty Protection: Many professional window tint services offer warranties on their work, providing added peace of mind. If any issues arise after the removal, you can rely on the professionals to address them promptly and effectively.
Cost Justification: While professional window tint removal may seem more expensive initially, it can be a cost-effective option in the long run. By avoiding the risks of DIY damage and ensuring a high-quality result, you can save money on potential repairs and replacements. Consider it an investment in your vehicle’s longevity and appearance.
1.4 Making the Right Choice
The decision of whether to tackle window tint removal as a DIY project or hire a professional depends on your individual circumstances, skill level, and risk tolerance. If you’re confident in your abilities and willing to invest the time and effort, DIY may be a viable option. However, if you prioritize safety, quality, and convenience, enlisting the services of a professional is likely the better choice. Remember, CARS.EDU.VN is here to provide you with the information you need to make the best decision for your car and your peace of mind.
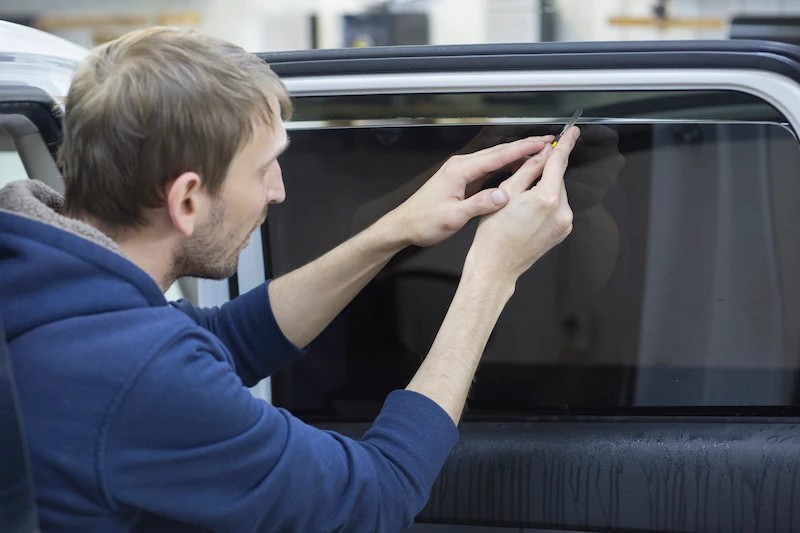
2. Step-by-Step Guide: How to Remove Window Tint Yourself
If you’ve decided to go the DIY route, it’s essential to follow a precise procedure to ensure a safe and effective removal. Here’s a detailed guide to help you navigate the process:
2.1 Gathering the Necessary Tools
Before you start, gather all the necessary tools and materials. Having everything on hand will streamline the process and prevent unnecessary delays. Here’s a comprehensive list:
- Heat Gun or Fabric Steamer: This tool is crucial for loosening the adhesive bond between the tint film and the window. A heat gun provides focused heat, while a fabric steamer offers a gentler approach.
- Razor Blade or Scraper: A sharp razor blade or scraper is essential for lifting the edges of the tint film and peeling it away from the window. Choose a high-quality blade to minimize the risk of scratching the glass.
- Spray Bottle: A spray bottle filled with soapy water or adhesive remover is used to soften the adhesive residue and make it easier to remove.
- Cleaning Solution: A glass cleaner or isopropyl alcohol is necessary for cleaning the window after the tint film has been removed. This will help remove any remaining residue and ensure a streak-free finish.
- Microfiber Cloths: Soft, lint-free microfiber cloths are ideal for wiping down the window and removing residue without scratching the glass.
- Safety Glasses: Protect your eyes from debris and chemical splashes by wearing safety glasses throughout the tint removal process.
- Gloves: Wear gloves to protect your hands from cuts, chemicals, and heat.
- Face Mask: A face mask will help prevent you from inhaling debris particles and fumes from the adhesive remover.
- Drop Cloth or Plastic Sheeting: Cover the surrounding area with a drop cloth or plastic sheeting to protect it from drips, spills, and debris.
2.2 Preparing the Work Area
Choose a well-ventilated area for removing the window tint. An outdoor space or a garage with the door open is ideal. This will help dissipate any fumes from the adhesive remover and prevent the buildup of dust and debris.
Cover the surrounding area with a drop cloth or plastic sheeting to protect it from drips, spills, and debris. This will make cleanup much easier once the project is complete.
Protect the interior of your car by covering the seats, dashboard, and door panels with plastic sheeting or old towels. This will prevent any damage from chemicals or sharp tools.
2.3 Heating the Tint Film
The key to successful tint removal is to loosen the adhesive bond between the film and the window. This is best accomplished by applying heat to the tint film using a heat gun or fabric steamer.
Set the heat gun to a low setting to avoid overheating the glass. Hold the heat gun a few inches away from the window and move it back and forth in a sweeping motion. Focus on the edges of the tint film, as this is where the adhesive bond is typically strongest.
If using a fabric steamer, hold the nozzle a few inches away from the window and direct the steam onto the tint film. The steam will penetrate the film and soften the adhesive.
Continue applying heat or steam until the edges of the tint film begin to lift away from the window. This may take several minutes, depending on the type of tint film and the strength of the adhesive.
2.4 Peeling Off the Tint Film
Once the edges of the tint film have begun to lift, use a razor blade or scraper to gently peel the film away from the window. Start at one corner and work your way across the window, peeling the film off in a slow, steady motion.
Be careful not to apply too much pressure, as this could scratch the glass. If the tint film is difficult to remove, apply more heat or steam to loosen the adhesive.
As you peel off the tint film, try to keep it in one piece to minimize the amount of adhesive residue left behind.
2.5 Removing Adhesive Residue
After the tint film has been removed, you’ll likely be left with a significant amount of adhesive residue on the window. This residue can be difficult to remove, but with the right techniques and tools, it can be done.
Spray the adhesive residue with soapy water or adhesive remover. Allow the solution to soak for several minutes to soften the adhesive.
Use a razor blade or scraper to gently scrape away the adhesive residue. Be careful not to scratch the glass. If the residue is particularly stubborn, apply more solution and allow it to soak for a longer period of time.
Wipe the window clean with a microfiber cloth to remove any remaining residue.
2.6 Cleaning the Window
Once all the adhesive residue has been removed, clean the window with a glass cleaner or isopropyl alcohol. This will remove any remaining streaks or smudges and leave the window sparkling clean.
Spray the window with the cleaning solution and wipe it down with a clean microfiber cloth. Be sure to reach all corners and edges of the window.
Inspect the window for any remaining residue or streaks. If necessary, repeat the cleaning process until the window is completely clean.
2.7 Final Inspection
After cleaning the window, take a moment to inspect your work. Check for any remaining residue, scratches, or imperfections. If you notice any issues, address them promptly to ensure a professional-looking result. With patience and attention to detail, you can successfully remove window tint yourself and restore your car’s windows to their original clarity. Remember, CARS.EDU.VN is your resource for all things automotive, providing expert guidance and valuable insights to help you maintain and customize your vehicle.
3. The Cost of Professional Tint Removal Services
When considering professional window tint removal, understanding the associated costs is essential for budgeting and making an informed decision. The price of professional tint removal can vary depending on several factors, including the type of vehicle, the number of windows to be serviced, and the complexity of the removal process.
3.1 Average Pricing Structure
Generally, professional tint removal services charge per window or offer a package price for the entire vehicle. Here’s a breakdown of the average pricing structure:
- Side Windows: Removing tint from side windows typically costs around $30 to $60 per window. This price may vary depending on the size and shape of the window, as well as the type of tint film used.
- Rear Window: The rear window is often more expensive to service due to its larger size and curvature. Removal costs for the rear window can range from $80 to $150 or more.
- Windshield: Removing tint from the windshield is the most complex and costly task. Due to the windshield’s size and the intricate curves, professional removal can cost between $100 and $250.
- Full Vehicle Package: Many professional tint shops offer a package price for removing tint from all windows on the vehicle. This can be a more cost-effective option if you plan to remove tint from multiple windows. Full vehicle packages typically range from $200 to $500, depending on the vehicle type and the complexity of the removal process.
3.2 Factors Influencing Cost
Several factors can influence the cost of professional tint removal services:
- Vehicle Type: The size and shape of the vehicle’s windows can affect the removal cost. Larger vehicles with more windows may incur higher charges.
- Tint Film Type: The type of tint film used can also impact the cost. Some films are more difficult to remove than others, requiring more time and effort from the technician.
- Adhesive Strength: The strength of the adhesive used to apply the tint film can also affect the removal cost. If the adhesive is particularly strong, it may require more specialized techniques and equipment to remove the tint without damaging the glass.
- Condition of Tint: The condition of the tint film can also play a role in the cost. Old, brittle tint films may be more difficult to remove and require extra care to avoid damaging the window.
- Geographic Location: The cost of professional tint removal services can vary depending on your geographic location. Prices may be higher in urban areas with higher labor costs.
- Shop Reputation: The reputation and experience of the tint shop can also influence the cost. Established shops with experienced technicians may charge more for their services, but they also offer greater assurance of quality and professionalism.
3.3 Obtaining a Quote
To get an accurate estimate of the cost of professional tint removal services, it’s best to obtain a quote from several different tint shops. When requesting a quote, be sure to provide the following information:
- Vehicle Make and Model: This will help the shop determine the size and shape of the windows.
- Number of Windows to Be Serviced: Specify how many windows you want to have the tint removed from.
- Type of Tint Film (If Known): If you know the type of tint film used, provide this information to the shop.
- Condition of Tint: Describe the condition of the tint film, including any bubbling, peeling, or fading.
3.4 Potential Additional Costs
In some cases, additional costs may be incurred during the tint removal process. These may include:
- Adhesive Removal: If the adhesive residue is particularly stubborn, the shop may charge an additional fee for adhesive removal.
- Window Repair: If the window is damaged during the tint removal process, you may need to pay for repairs.
- New Tint Installation: If you plan to have new tint installed after the removal, the shop may offer a package deal that includes both services.
It’s important to discuss these potential additional costs with the tint shop before authorizing the work.
By understanding the average pricing structure, the factors that influence cost, and the potential additional expenses, you can budget effectively for professional tint removal services and ensure a satisfactory outcome. Remember to consult CARS.EDU.VN for more tips and insights on automotive maintenance and customization.
4. Reasons to Replace Your Car’s Window Film
Replacing your car’s window film isn’t just about aesthetics; it’s a practical decision that can significantly impact your driving experience and the longevity of your vehicle’s interior. Here are several compelling reasons to consider replacing your car’s window film:
4.1 Improved Aesthetics
Over time, window film can fade, bubble, or peel, detracting from the overall appearance of your vehicle. Replacing the old film with a new, high-quality product can instantly enhance your car’s aesthetics, giving it a fresh, clean look.
Color Enhancement: New window film can restore the original color and vibrancy of your windows, making your car look newer and more well-maintained.
Uniform Appearance: Replacing all the window film at once ensures a uniform appearance across all windows, eliminating any mismatched shades or imperfections.
Customization Options: When replacing your window film, you have the opportunity to choose a different tint level or color that better suits your personal style and preferences.
4.2 Enhanced UV Protection
One of the primary functions of window film is to block harmful ultraviolet (UV) rays from the sun. Over time, however, the UV-blocking properties of the film can degrade, leaving you and your car’s interior vulnerable to damage. Replacing the window film ensures that you continue to receive optimal UV protection.
Protection from Skin Damage: UV rays can cause sunburn, premature aging, and even skin cancer. Replacing your car’s window film with a UV-resistant product can help protect you and your passengers from these harmful effects.
Prevention of Interior Fading: UV rays can also cause the interior of your car to fade and crack. Replacing your window film can help preserve the appearance and value of your vehicle by blocking these damaging rays.
Heat Reduction: Some window films are designed to block infrared (IR) rays, which are responsible for much of the sun’s heat. Replacing your window film with a heat-reducing product can help keep your car cooler in the summer, reducing the need for air conditioning and saving you money on fuel.
4.3 Increased Privacy and Security
Window film can also provide increased privacy and security by making it more difficult for outsiders to see into your car. Replacing your window film with a darker tint can deter theft and protect your valuables from prying eyes.
Reduced Glare: Window film can reduce glare from the sun and headlights, improving visibility and reducing eye strain while driving.
Shatter Resistance: Some window films are designed to hold shattered glass together in the event of an accident, reducing the risk of injury from flying debris.
Theft Deterrence: By making it more difficult to see into your car, window film can deter potential thieves from targeting your vehicle.
4.4 Compliance with Regulations
In many jurisdictions, there are regulations regarding the allowable tint levels for car windows. Replacing your window film ensures that you comply with these regulations and avoid potential fines or penalties.
Legal Tint Levels: Replacing your window film gives you the opportunity to ensure that your tint levels are within the legal limits for your area.
Professional Installation: When replacing your window film, it’s important to have it installed by a professional to ensure that it meets all applicable regulations.
4.5 Advanced Technology
Window film technology is constantly evolving, with new products offering improved performance and features. Replacing your old window film with a newer, more advanced product can provide you with superior UV protection, heat reduction, and privacy.
Ceramic Films: Ceramic window films offer excellent heat rejection and UV protection without significantly reducing visibility.
Spectrally Selective Films: Spectrally selective window films block infrared rays while allowing visible light to pass through, providing excellent heat reduction without making the windows too dark.
Hybrid Films: Hybrid window films combine the benefits of multiple technologies, such as ceramic and metallic, to provide a balanced combination of performance and features.
Replacing your car’s window film is a worthwhile investment that can enhance your driving experience, protect your car’s interior, and improve your vehicle’s overall appearance. Whether you’re looking to improve aesthetics, enhance UV protection, increase privacy, or comply with regulations, replacing your window film is a smart choice. For more information on window film replacement and other automotive maintenance tips, consult CARS.EDU.VN.
5. Choosing a Window Tint Film: Factors to Consider
Selecting the right window tint film for your car involves more than just picking a shade. Several factors influence the film’s performance, longevity, and suitability for your needs. Understanding these factors will help you make an informed decision that maximizes the benefits of window tinting.
5.1 Tint Darkness and Legal Regulations
The darkness of window tint is measured by Visible Light Transmission (VLT), which indicates the percentage of visible light that passes through the film. Different states have different regulations regarding the allowable VLT levels for car windows.
Front Windshield: Most states prohibit tinting the front windshield below the AS-1 line, which is typically marked on the windshield.
Front Side Windows: Many states have specific VLT requirements for the front side windows, typically ranging from 30% to 70%.
Rear Side and Rear Windows: Some states allow darker tint levels for the rear side and rear windows than for the front windows.
Compliance: It’s crucial to comply with your state’s tint regulations to avoid fines or penalties. Check your local laws before selecting a window tint film.
5.2 Material and Technology
Window tint films are made from various materials and incorporate different technologies to achieve specific performance characteristics.
Dyed Films: These are the most basic and affordable type of window tint. They block sunlight through the use of dyes, but they are not as effective at reducing heat and UV rays as other types of films.
Metallic Films: Metallic films contain tiny metallic particles that reflect sunlight and heat. They are more effective at reducing heat and UV rays than dyed films, but they can interfere with electronic signals, such as those from GPS devices and mobile phones.
Carbon Films: Carbon films use carbon particles to block sunlight and heat. They offer excellent heat rejection and UV protection without interfering with electronic signals.
Ceramic Films: Ceramic films are the most advanced and expensive type of window tint. They use ceramic particles to block sunlight and heat, providing superior performance compared to other types of films. Ceramic films also offer excellent UV protection and do not interfere with electronic signals.
5.3 Heat Rejection and UV Protection
One of the primary benefits of window tinting is its ability to reduce heat and UV rays. Look for films that offer high heat rejection and UV protection to maximize these benefits.
Total Solar Energy Rejected (TSER): TSER is a measure of the total amount of solar energy that the film blocks, including heat, visible light, and UV rays. Look for films with high TSER values for optimal heat rejection.
UV Rejection: Choose films that block 99% or more of harmful UV rays to protect yourself and your car’s interior from damage.
5.4 Glare Reduction
Window tint can also reduce glare from the sun and headlights, improving visibility and reducing eye strain while driving.
Visible Light Reflected (VLR): VLR is a measure of the amount of visible light that the film reflects. Look for films with low VLR values to minimize glare.
5.5 Durability and Warranty
Choose a window tint film that is durable and comes with a good warranty to ensure that it will last for years to come.
Film Thickness: Thicker films are generally more durable and resistant to scratches and damage.
Warranty Coverage: Look for films with warranties that cover fading, bubbling, peeling, and other defects.
5.6 Brand Reputation and Reviews
Consider the reputation and reviews of the brand when choosing a window tint film. Look for brands that are known for producing high-quality, reliable products.
Online Reviews: Read online reviews from other customers to get an idea of the film’s performance and durability.
Professional Recommendations: Ask for recommendations from professional window tint installers. They can provide valuable insights based on their experience with different brands and products.
By considering these factors, you can choose a window tint film that meets your specific needs and provides optimal performance, protection, and longevity. Always remember that CARS.EDU.VN is a valuable resource for automotive information and guidance.
6. Maintaining Your Car Windows After Tint Removal
After successfully removing the tint from your car windows, proper maintenance is essential to ensure their clarity and longevity. Here are some tips on how to keep your car windows in top condition:
6.1 Regular Cleaning
Regular cleaning is the key to maintaining the clarity of your car windows. Dirt, dust, and grime can accumulate on the surface of the glass, reducing visibility and detracting from the overall appearance of your vehicle.
Frequency: Clean your car windows at least once a week, or more often if needed.
Cleaning Solution: Use a glass cleaner specifically designed for automotive use. Avoid using household cleaners, as they may contain harsh chemicals that can damage the glass or leave streaks.
Cleaning Tools: Use a soft, lint-free microfiber cloth to clean your car windows. Avoid using paper towels, as they can leave lint and streaks.
Cleaning Technique: Spray the glass cleaner onto the microfiber cloth, not directly onto the window. Wipe the window in a circular motion, then dry with a clean, dry microfiber cloth.
6.2 Avoiding Abrasive Cleaners
Abrasive cleaners can scratch and damage your car windows, reducing their clarity and value. Avoid using abrasive cleaners, such as scouring pads, steel wool, and harsh chemicals.
Safe Alternatives: Stick to glass cleaners specifically designed for automotive use and soft, lint-free microfiber cloths.
6.3 Protecting from Scratches
Scratches can detract from the appearance of your car windows and reduce their visibility. Take steps to protect your car windows from scratches.
Avoid Contact with Sharp Objects: Be careful not to scratch your car windows with sharp objects, such as keys, rings, and tools.
Park in Safe Areas: Park your car in areas where it is less likely to be scratched by other vehicles or objects.
Repair Scratches Promptly: If your car windows do get scratched, repair them promptly to prevent further damage.
6.4 Inspecting for Damage
Regularly inspect your car windows for damage, such as cracks, chips, and scratches. Addressing damage promptly can prevent it from worsening and requiring costly repairs.
Frequency: Inspect your car windows at least once a month.
Professional Inspection: Consider having your car windows professionally inspected by a qualified technician to identify any hidden damage.
6.5 Addressing Damage Promptly
If you discover any damage to your car windows, address it promptly. Small cracks and chips can quickly spread and require the entire window to be replaced.
Repair vs. Replacement: Depending on the severity of the damage, you may be able to repair the window instead of replacing it. Repairing a window is typically less expensive than replacing it.
Professional Repair: Have your car windows repaired or replaced by a qualified technician to ensure that the job is done correctly.
6.6 Maintaining Weather Stripping
Weather stripping is the rubber seal that surrounds your car windows. It helps to keep out water, wind, and noise. Properly maintaining your weather stripping can help to extend the life of your car windows.
Cleaning: Clean your weather stripping regularly with a mild soap and water solution.
Lubrication: Lubricate your weather stripping with a silicone-based lubricant to keep it pliable and prevent it from drying out and cracking.
Replacement: Replace your weather stripping if it becomes damaged or worn.
By following these maintenance tips, you can keep your car windows in top condition and enjoy clear visibility and a pristine appearance for years to come. Remember, CARS.EDU.VN is your trusted resource for all things automotive, providing expert advice and valuable information to help you care for your vehicle.
7. Frequently Asked Questions (FAQ) About Removing Window Tint
Here are some frequently asked questions about removing window tint from car windows:
1. Can I remove window tint myself, or should I hire a professional?
While DIY removal is possible, professional removal is recommended to avoid damaging the glass or causing injury.
2. What tools do I need to remove window tint myself?
You’ll need a heat gun, razor blade, scraper, spray bottle, cleaning solution, safety glasses, gloves, and a face mask.
3. How much does professional window tint removal cost?
Professional removal typically costs $30-$60 per side window, $80-$150 for the rear window, and $100-$250 for the windshield.
4. What is the best way to remove adhesive residue after removing window tint?
Use an adhesive remover like isopropyl alcohol, ammonia solution, or nail polish remover.
5. What are the risks of removing window tint myself?
Risks include scratching or breaking the windows, cutting yourself with sharp tools, and inhaling harmful chemicals.
6. How long does it take to remove window tint?
DIY removal can take several hours, while professional removal is typically much faster.
7. Can I reuse window tint after removing it?
No, window tint cannot be reused after removal.
8. What should I do if I damage my car window while removing tint?
Contact a professional glass repair service to assess and repair the damage.
9. How can I prevent damage to my car windows during tint removal?
Use the correct tools and techniques, work slowly and carefully, and consider hiring a professional.
10. Where can I find a reputable window tint removal service?
Search online directories, ask for referrals from friends or family, or check with local automotive shops.
Conclusion: Expert Advice on Window Tint Removal from CARS.EDU.VN
Removing window tint from your car requires careful consideration and the right approach. Whether you opt for a DIY method or seek professional assistance, understanding the process and potential pitfalls is crucial. At CARS.EDU.VN, we’re committed to providing you with expert advice and comprehensive resources to make informed decisions about your car care needs.
Remember, proper preparation, the right tools, and a steady hand are essential for successful DIY tint removal. However, for guaranteed results and to avoid potential damage, entrusting the job to professionals is often the best choice.
Need help finding a reliable window tint service or further advice on car maintenance?
Visit CARS.EDU.VN today for a wealth of information and resources to keep your vehicle in top condition. You can also contact us at 456 Auto Drive, Anytown, CA 90210, United States or via Whatsapp at +1 555-123-4567. Let cars.edu.vn be your trusted partner in automotive care.