Spray painting your car at home might seem like a daunting task, typically left to professionals. However, with the right preparation, tools, and techniques, achieving a respectable paint job in your own garage is absolutely possible. If you’re looking to refresh your car’s appearance, fix minor blemishes, or even undertake a complete color change, understanding the process of spray painting is the first step. This guide will walk you through everything you need to know about spray painting a car yourself, ensuring you get a finish you can be proud of.
Essential Tools and Materials
Before you even think about picking up a spray gun, gathering the right materials is paramount. Using quality products and having everything readily available will make the process smoother and significantly improve your results. Here’s a comprehensive list of what you’ll need to spray paint your car effectively:
- Automotive Paint: This is not the time to skimp. Invest in high-quality automotive paint designed for car exteriors. Consider single-stage or a base coat/clear coat system depending on your desired finish and experience level. For color matching, locate your car’s paint code on the door placard or consult your manufacturer. You can find a variety of automotive paints at retailers like AutoZone.
- Primer: Automotive primer is crucial for paint adhesion and a smooth, even base. It also helps with corrosion protection.
- Clear Coat: If using a base coat system, a clear coat is essential. It adds depth, gloss, and vital protection to the color coat.
- Spray Gun: For a professional-looking finish, a quality spray gun is a worthwhile investment. HVLP (High Volume Low Pressure) spray guns like the Vaper HVLP Gravity Feed Air Spray Gun available at AutoZone, are popular for DIYers as they minimize overspray and provide good control.
- Sandpaper and Sanding Blocks: A range of grits is necessary, from coarser grits (around 400) for removing old paint and imperfections to finer grits (800-1500 and even finer) for achieving a super smooth surface before painting and between coats. Sandpaper is readily available at AutoZone in various grits.
- Masking Tape and Plastic Sheeting: Protect areas you don’t want painted with high-quality masking tape and plastic sheeting.
- Tack Cloth: This sticky cloth is indispensable for removing dust and debris right before painting, ensuring a clean surface for optimal paint adhesion.
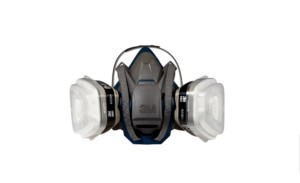
- Respirator Mask: Your health is non-negotiable. A respirator mask, like those sold at AutoZone, is essential to protect you from harmful paint fumes and particles.
- Safety Glasses, Gloves, and Coveralls: Complete your personal protective equipment (PPE) with safety glasses, gloves, and a full-body coverall to keep paint off your skin and out of your eyes.
- Clean Rags: Have plenty of clean rags on hand for wiping surfaces and cleaning up any spills.
- Clean Water and Soap: Basic car washing soap and clean water are the starting point for surface preparation.
Safety First: Preparation and Precautions
Spray painting involves working with chemicals and tools that can be hazardous if not handled correctly. Prioritizing safety is crucial before you even begin preparing your car.
- Ventilation is Key: Spray paint fumes are toxic and flammable. Always work in a well-ventilated area, ideally outdoors or in a garage with open doors and windows and fans to circulate air. This helps disperse fumes and prevents the buildup of harmful vapors.
- Protective Gear is Non-Negotiable: Never spray paint without proper protective gear. A respirator mask is crucial to prevent inhalation of paint fumes and airborne particles. Safety glasses protect your eyes from paint splatter and debris. Gloves prevent skin contact with paints and solvents, and coveralls protect your clothing and skin.
- Fire Safety: Many automotive paints and solvents are flammable. Keep a fire extinguisher rated for chemical fires nearby in case of accidents. Ensure there are no open flames or sources of ignition in your work area.
Step-by-Step Car Preparation
A flawless paint job is 90% preparation. Skipping steps here will lead to a less than satisfactory finish. Let’s assume any major bodywork and dent repair has already been completed.
- Thoroughly Wash the Car: Begin by washing your car meticulously with soap and water to remove all dirt, grease, wax, and contaminants. Rinse thoroughly and allow the car to dry completely. Any residue left on the surface can interfere with paint adhesion.
- Sanding for a Smooth Surface: Sanding is essential to create a surface that paint can properly adhere to and to smooth out any existing imperfections. Start with coarser grit sandpaper (around 400 grit) to remove old paint layers and address imperfections. Gradually move to finer grits (800 to 1500 and even higher for show-car finishes) to refine the surface, eliminating sanding marks and creating an ultra-smooth base for paint.
- Rust Removal is Critical: Address any rust spots immediately. Rust will continue to spread under new paint if not properly treated. Sand down rust spots to bare metal using progressively finer grits. Apply a rust inhibitor or converter to prevent future corrosion.
- Masking Off Areas You Don’t Want Painted: Use high-quality masking tape and plastic sheeting to carefully cover all areas you don’t want to paint, such as windows, trim, lights, badges, and tires. Take your time with masking to ensure crisp paint lines and prevent overspray.
Mastering Spray Painting Techniques
The application technique is just as important as the materials you choose. Practice and patience are key to achieving a professional-looking spray paint job.
- Paint Selection and Preparation: Choose the right type and color of automotive paint. For color matching, locate your car’s paint code. Ensure you understand whether you’re using a single-stage or a base coat/clear coat system and follow the manufacturer’s instructions for mixing and thinning the paint if necessary.
- Practice Makes Perfect: Before spraying your car, practice your technique on a piece of cardboard or scrap metal. This allows you to get a feel for the spray gun, adjust the spray pattern and air pressure, and practice your strokes. Experiment until you achieve a consistent, even spray pattern without runs or dry spots.
- Consistent Overlapping Strokes: The key to even coverage is maintaining a consistent distance from the surface (usually around 6-10 inches, check paint instructions), moving the spray gun at a steady speed, and using overlapping strokes. Overlap each stroke by about 50% to ensure uniform paint application and avoid stripes or uneven coverage.
- Three Stages of Painting:
- Apply Primer: Apply 2-3 thin, even coats of primer using overlapping strokes. Allow each coat to dry completely according to the primer’s instructions before lightly sanding with fine-grit sandpaper (e.g., 400-600 grit). After sanding, use tack cloth to remove any remaining dust.
- Apply the Base Coat (Color Coat): Apply multiple thin layers of your base coat, again using consistent, overlapping strokes. Typically, 2-3 coats are sufficient for good color coverage, but follow the paint manufacturer’s recommendations. Allow each coat to flash dry (partially dry) before applying the next.
- Apply the Clear Coat: If using a base coat/clear coat system, apply 2-3 coats of clear coat in thin, even layers, using the same overlapping technique. Clear coat adds gloss, depth, and protection to the base coat. Allow each coat to flash dry before applying the next.
Strictly adhere to the paint manufacturer’s recommended drying times between coats and for the final cure. These times are crucial for proper paint adhesion and finish quality.
Troubleshooting Common Painting Issues
Even with careful preparation and technique, issues can arise, especially for beginners. Knowing how to troubleshoot common problems is essential.
- Paint Runs: Runs or sags occur when too much paint is applied in one area, causing it to drip or run. If you get a run, don’t panic. Allow the paint to dry completely. Then, carefully sand down the run with fine-grit sandpaper until it’s level with the surrounding paint. Clean the area and reapply paint in thin coats.
- Paint Drips: Similar to runs, drips are excess paint accumulating and drying unevenly. Remove drips with a scraper or razor blade carefully before they fully dry. If already dry, sand them down and repaint.
- Dust and Contamination: Dust and debris are the enemy of a smooth paint job. Ensure your workspace is as clean as possible. Use a tack cloth before each coat of paint to remove dust particles. Consider lightly misting the floor with water to minimize airborne dust.
- Overspray: Overspray is paint that drifts beyond the intended area. Maintain a consistent distance and angle with your spray gun to minimize overspray. Avoid painting outdoors on windy days.
- Uneven Texture (Orange Peel): Orange peel is a textured, uneven paint finish resembling the skin of an orange. It’s often caused by incorrect spray gun settings, improper paint thinning, or spraying too close or too far from the surface. Practice your spray technique and adjust gun settings as needed. Orange peel can often be reduced by color sanding and polishing after the paint is cured.
- Temperature and Humidity: Extreme temperatures and high humidity can affect paint drying times and finish quality. Paint in mild temperatures (ideally between 60-80°F or 15-27°C) and avoid painting in high humidity or direct sunlight.
Achieving a Professional Finish
The final steps are crucial for taking your DIY spray paint job from good to great.
- Drying and Curing Time: Allow the paint to dry and cure completely according to the manufacturer’s instructions. Curing is different from just drying; it’s the process where the paint fully hardens and achieves its maximum durability. This can take anywhere from a few days to several weeks depending on the paint system and ambient conditions.
- Polishing and Buffing: Once the paint is fully cured, use a polishing compound and a buffer to remove minor imperfections, swirl marks, and orange peel, and to enhance the shine and gloss of the paint. Start with a mild compound and gradually increase aggressiveness if needed.
- Careful Reassembly: After polishing, carefully remove all masking tape and plastic sheeting. Reassemble any parts you removed from the car, such as trim, lights, or mirrors.
Selecting the correct type and color of automotive paint is essential for a successful car spray painting project.
By meticulously following these steps, from preparation to finishing, and taking your time, you can achieve a surprisingly professional-quality spray paint job on your car at home. Remember that practice and patience are your best allies. For all the supplies and tools you need, from automotive paint to spray guns, visit your local AutoZone.
FAQ: Can You Spray Paint a Car?
Can I spray paint my car if I’ve never done it before?
Yes, spray painting a car for the first time is achievable, but practicing on scrap materials beforehand is highly recommended to get comfortable with the process and techniques.
What kind of paint is best for spray painting a car?
Automotive-specific paints are essential. Consult your car’s manufacturer for the exact paint code and choose between single-stage or base coat/clear coat systems based on your needs and experience.
How can I fix uneven or streaky spray paint on my car?
Lightly sand the uneven areas with fine-grit sandpaper to smooth them out. Then, apply additional thin coats of paint, ensuring proper overlap and consistent spray technique.
Do I really need a spray booth to paint my car?
While a spray booth isn’t strictly necessary for DIY projects, it provides a controlled, dust-free environment that significantly improves paint finish and minimizes contamination. For home DIY, a clean, well-ventilated garage can suffice, but take extra care to minimize dust.
How long does car paint take to fully dry and cure after spray painting?
While the paint might be dry to the touch within 24-48 hours, it typically takes two to four weeks for automotive paint to fully cure and reach its maximum hardness and durability. Avoid waxing or heavy handling during the curing process.