Car Paint Repair is essential for maintaining your vehicle’s appearance and value, and CARS.EDU.VN is here to guide you through every step of the process with expert advice and solutions. Whether you’re dealing with minor scratches, peeling paint, or more extensive damage, understanding your options and taking prompt action can prevent further deterioration and keep your car looking its best. Discover professional techniques and cost-effective DIY methods to restore your car’s pristine condition, ensuring long-lasting protection and aesthetic appeal, with color matching expertise and paint protection film tips.
1. Understanding Car Paint Damage
Identifying the type and extent of car paint damage is the first step toward effective repair. Damage can range from minor blemishes to significant issues, each requiring a different approach.
1.1 Types of Car Paint Damage
- Scratches: Varying from light surface scratches to deep scratches that penetrate the paint layers.
- Peeling or Cracked Paint: Often caused by sun exposure, poor resprays, or impact damage, leading to the clear coat deteriorating.
- Scrapes: Typically found on bumpers due to contact with curbs or other obstacles.
- Dents: Physical indentations that may or may not involve paint damage.
- Paint Chips: Small areas where paint has chipped off, common on door edges, hoods, and front bumpers.
- Fading Paint: Loss of color and shine due to prolonged exposure to sunlight and environmental factors.
- Rust: Corrosion that occurs when moisture and oxygen react with the metal underneath the paint.
- Water Spots: Mineral deposits left behind after water evaporates, causing unsightly marks on the paint surface.
- Bird Droppings: Can etch into the paint if not removed promptly due to their acidic nature.
- Swirl Marks: Fine scratches in the paint’s clear coat, often caused by improper washing or polishing techniques.
1.2 Factors Contributing to Paint Damage
- Environmental Exposure: Sunlight, UV rays, extreme temperatures, and weather conditions.
- Physical Contact: Scratches from keys, accidental bumps, and road debris.
- Chemical Exposure: Acid rain, bird droppings, tree sap, and industrial fallout.
- Improper Maintenance: Poor washing techniques, abrasive cleaning products, and lack of waxing.
1.3 Assessing the Severity of the Damage
- Surface Scratches: These only affect the clear coat and can often be buffed out.
- Deep Scratches: These penetrate the clear coat and color coat, requiring more extensive repair.
- Peeling Paint: This indicates significant damage to the clear coat and may require respraying.
- Rust: This needs immediate attention to prevent further corrosion and structural damage.
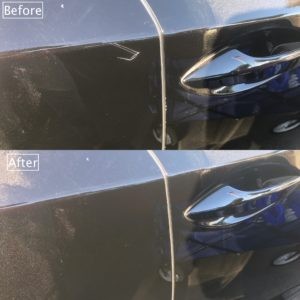 Nissan Door Handle Scratch Repair
2. Essential Tools and Materials for Car Paint Repair
Having the right tools and materials is crucial for achieving a professional-quality car paint repair. Here’s a comprehensive list of what you’ll need:
2.1 Cleaning Supplies
- Car Wash Soap: A pH-balanced soap designed to clean without stripping wax.
- Microfiber Wash Mitt: Soft and gentle to avoid scratching the paint.
- Two Buckets: One for soapy water and one for rinsing.
- Detailing Clay: Removes embedded contaminants from the paint surface.
- Clay Lubricant: Ensures the clay bar glides smoothly without scratching.
- Glass Cleaner: For cleaning windows and mirrors.
- Wheel Cleaner: Specifically formulated to remove brake dust and grime from wheels.
2.2 Sanding and Surface Preparation
- Sandpaper: Various grits (e.g., 400, 800, 1500, 2000, 3000) for different stages of sanding.
- Sanding Block: Provides a flat, even surface for sanding.
- Masking Tape: Protects surrounding areas from accidental damage.
- Masking Paper or Plastic Sheeting: For larger areas that need protection.
- Grease and Wax Remover: Cleans the surface to ensure proper adhesion of repair materials.
- Tack Cloth: Removes any remaining dust or particles before painting.
2.3 Paint Repair Products
- Primer: Provides a base for the paint to adhere to and helps prevent rust.
- Touch-Up Paint: Matching the exact color code of your car’s paint.
- Clear Coat: Protects the paint and provides a glossy finish.
- Rubbing Compound: For removing scratches and imperfections.
- Polishing Compound: For refining the paint and enhancing gloss.
- Wax or Sealant: Protects the paint from environmental damage and UV rays.
2.4 Application Tools
- Touch-Up Brushes: Small brushes for applying touch-up paint.
- Spray Gun: For applying primer, paint, and clear coat evenly.
- Aerosol Cans: Convenient for smaller jobs and DIY repairs.
- Mixing Cups and Sticks: For accurate mixing of paints and clear coats.
- Lint-Free Cloths: For wiping and polishing surfaces.
- Buffing Pads: Foam or microfiber pads for use with a polisher.
2.5 Safety Gear
- Respirator: Protects against inhaling harmful fumes.
- Gloves: Prevents skin contact with chemicals and paints.
- Eye Protection: Safety glasses or goggles to protect your eyes.
- Ventilation: Ensure a well-ventilated workspace to avoid concentrating fumes.
2.6 Optional Tools
- Heat Gun: Speeds up the drying process.
- Paint Thickness Gauge: Measures the thickness of paint layers for accurate sanding.
- Detailing Swabs: For precise application in hard-to-reach areas.
- Inspection Light: Helps identify imperfections in the paint.
3. Step-by-Step Guide to Car Paint Scratch Repair
Repairing scratches on your car paint can restore its appearance and prevent further damage. Here’s a detailed guide to help you through the process:
3.1 Preparation
- Wash the Area: Thoroughly clean the area around the scratch with car wash soap and water. Rinse and dry completely.
- Inspect the Scratch: Determine the depth of the scratch. If it disappears when wet, it’s likely a surface scratch. If it remains visible, it’s a deeper scratch.
- Gather Your Supplies: Assemble the necessary tools and materials, including sandpaper (various grits), rubbing compound, polishing compound, touch-up paint, clear coat, and application tools.
- Mask the Area: Use masking tape to protect the surrounding paint from accidental damage during sanding and application.
3.2 Sanding (for Deeper Scratches)
- Wet Sanding: Soak a piece of 2000-grit sandpaper in water for a few minutes. Gently sand the scratch using light, even pressure. Keep the area wet while sanding.
- Feathering: Sand slightly beyond the scratch to blend the edges and create a smooth transition.
- Clean the Area: Rinse the area thoroughly and dry with a lint-free cloth.
- Repeat if Necessary: If the scratch is still visible, repeat the sanding process with a higher grit sandpaper (e.g., 3000-grit).
3.3 Applying Touch-Up Paint
- Shake the Paint: Thoroughly shake the touch-up paint to ensure proper mixing.
- Apply Thin Coats: Use a fine-tipped brush to apply thin, even coats of touch-up paint to the scratch. Allow each coat to dry completely before applying the next.
- Build Up the Paint: Apply multiple thin coats until the paint is level with the surrounding surface.
- Allow to Dry: Let the touch-up paint dry completely, usually for several hours or overnight.
3.4 Applying Clear Coat
- Clean the Area: Ensure the area is clean and dry before applying clear coat.
- Apply Thin Coats: Apply thin, even coats of clear coat to the painted area. Allow each coat to dry completely before applying the next.
- Blend the Edges: Feather the edges of the clear coat to blend seamlessly with the surrounding paint.
- Allow to Dry: Let the clear coat dry completely, usually for several hours or overnight.
3.5 Buffing and Polishing
- Wet Sanding (Optional): If necessary, wet sand the clear coat with 3000-grit sandpaper to remove any imperfections or orange peel.
- Rubbing Compound: Apply a small amount of rubbing compound to a foam buffing pad. Buff the area using a circular motion to remove scratches and imperfections.
- Polishing Compound: Apply a small amount of polishing compound to a foam polishing pad. Polish the area using a circular motion to enhance the gloss and shine.
- Wax or Sealant: Apply a coat of wax or sealant to protect the paint and enhance its appearance.
3.6 Final Inspection
- Inspect the Repair: Carefully inspect the repaired area to ensure the scratch is no longer visible and the paint is smooth and even.
- Clean the Area: Wipe the area with a clean microfiber cloth to remove any residue.
- Remove Masking Tape: Carefully remove the masking tape, being careful not to damage the surrounding paint.
Following these steps will help you effectively repair scratches on your car paint, restoring its appearance and protecting it from further damage. If you’re unsure about any step, consult a professional at CARS.EDU.VN for assistance.
4. How to Fix Peeling Car Paint
Peeling car paint is a common issue, especially on older vehicles or those frequently exposed to the sun. Here’s how to address it:
4.1 Assessment
- Identify the Affected Areas: Determine the extent of the peeling paint.
- Check for Rust: Look for any signs of rust underneath the peeling paint.
4.2 Preparation
- Gather Supplies: Sandpaper (various grits), masking tape, primer, touch-up paint, clear coat, and application tools.
- Clean the Area: Wash the area thoroughly with car wash soap and water.
4.3 Sanding
- Remove Loose Paint: Use coarse-grit sandpaper to remove all loose and peeling paint.
- Feather the Edges: Use finer-grit sandpaper to feather the edges of the remaining paint, creating a smooth transition.
- Sand the Area: Sand the entire area to create a uniform surface for the primer.
4.4 Priming
- Apply Primer: Apply a thin, even coat of automotive primer to the sanded area.
- Allow to Dry: Let the primer dry completely according to the manufacturer’s instructions.
- Sand Lightly: Lightly sand the primed surface with fine-grit sandpaper to smooth out any imperfections.
4.5 Painting
- Apply Base Coat: Apply thin, even coats of touch-up paint to the primed area.
- Allow to Dry: Let each coat dry completely before applying the next.
- Blend the Paint: Blend the new paint with the surrounding paint for a seamless finish.
4.6 Clear Coat
- Apply Clear Coat: Apply thin, even coats of clear coat to the painted area.
- Allow to Dry: Let each coat dry completely before applying the next.
- Buff and Polish: Buff and polish the area to enhance the gloss and shine.
4.7 Final Steps
- Wax the Area: Apply a coat of wax to protect the new paint.
- Inspect the Repair: Ensure the repaired area blends seamlessly with the surrounding paint.
5. Repairing Car Bumper Scrapes
Bumper scrapes are common, but they can be effectively repaired with the right techniques:
5.1 Cleaning
- Wash the Bumper: Clean the bumper thoroughly with car wash soap and water.
- Remove Debris: Remove any dirt, debris, or loose paint from the scraped area.
5.2 Sanding
- Sand the Scrape: Use medium-grit sandpaper to sand the scraped area, removing any rough edges.
- Feather the Edges: Feather the edges of the sanded area with fine-grit sandpaper.
5.3 Filling (If Necessary)
- Apply Body Filler: If the scrape is deep, apply a thin layer of automotive body filler to fill the gap.
- Sand the Filler: Once the filler is dry, sand it smooth with fine-grit sandpaper.
5.4 Priming
- Apply Primer: Apply a thin, even coat of automotive primer to the repaired area.
- Allow to Dry: Let the primer dry completely according to the manufacturer’s instructions.
5.5 Painting
- Apply Base Coat: Apply thin, even coats of touch-up paint to the primed area.
- Allow to Dry: Let each coat dry completely before applying the next.
- Blend the Paint: Blend the new paint with the surrounding paint for a seamless finish.
5.6 Clear Coat
- Apply Clear Coat: Apply thin, even coats of clear coat to the painted area.
- Allow to Dry: Let each coat dry completely before applying the next.
- Buff and Polish: Buff and polish the area to enhance the gloss and shine.
5.7 Final Steps
- Wax the Area: Apply a coat of wax to protect the new paint.
- Inspect the Repair: Ensure the repaired area blends seamlessly with the surrounding bumper.
6. Addressing Car Dents with Paint Damage
Dents with paint damage require a combination of dent repair and paint restoration techniques:
6.1 Dent Removal
- Paintless Dent Repair (PDR): If the paint is intact, consider PDR to push the dent out without damaging the paint.
- Traditional Dent Repair: If the paint is damaged, traditional dent repair methods involving body filler and sanding may be necessary.
6.2 Surface Preparation
- Sand the Area: Sand the damaged area to create a smooth surface for the repair.
- Apply Body Filler: If necessary, apply a thin layer of automotive body filler to fill any remaining imperfections.
- Sand the Filler: Once the filler is dry, sand it smooth with fine-grit sandpaper.
6.3 Priming
- Apply Primer: Apply a thin, even coat of automotive primer to the repaired area.
- Allow to Dry: Let the primer dry completely according to the manufacturer’s instructions.
6.4 Painting
- Apply Base Coat: Apply thin, even coats of touch-up paint to the primed area.
- Allow to Dry: Let each coat dry completely before applying the next.
- Blend the Paint: Blend the new paint with the surrounding paint for a seamless finish.
6.5 Clear Coat
- Apply Clear Coat: Apply thin, even coats of clear coat to the painted area.
- Allow to Dry: Let each coat dry completely before applying the next.
- Buff and Polish: Buff and polish the area to enhance the gloss and shine.
6.6 Final Steps
- Wax the Area: Apply a coat of wax to protect the new paint.
- Inspect the Repair: Ensure the repaired area blends seamlessly with the surrounding panel.
7. Correcting Car Paint Chips
Paint chips can be unsightly and lead to rust if not addressed promptly. Here’s how to fix them:
7.1 Cleaning
- Wash the Area: Clean the area around the paint chip with car wash soap and water.
- Remove Debris: Remove any loose paint or debris from the chip.
7.2 Preparation
- Gather Supplies: Touch-up paint, fine-tipped brush, clear coat, and rubbing compound.
- Clean the Chip: Use a wax and grease remover to clean the chip thoroughly.
7.3 Applying Touch-Up Paint
- Apply Thin Coats: Use a fine-tipped brush to apply thin, even coats of touch-up paint to the chip.
- Allow to Dry: Let each coat dry completely before applying the next.
- Build Up the Paint: Apply multiple thin coats until the paint is level with the surrounding surface.
7.4 Clear Coat
- Apply Clear Coat: Apply a thin, even coat of clear coat to the painted area.
- Allow to Dry: Let the clear coat dry completely according to the manufacturer’s instructions.
7.5 Blending and Polishing
- Wet Sand (Optional): If necessary, wet sand the clear coat with fine-grit sandpaper to smooth out any imperfections.
- Rubbing Compound: Apply rubbing compound to a foam pad and buff the area to blend the repair.
- Polishing Compound: Apply polishing compound to a foam pad and polish the area to enhance the gloss.
7.6 Final Steps
- Wax the Area: Apply a coat of wax to protect the new paint.
- Inspect the Repair: Ensure the repaired area blends seamlessly with the surrounding paint.
8. Professional Car Paint Repair Services
When the damage is extensive or beyond your DIY capabilities, professional car paint repair services are the best option:
8.1 Body Shops
- Comprehensive Repairs: Body shops offer a wide range of services, including collision repair, dent removal, and paint restoration.
- Advanced Techniques: They use advanced techniques and equipment to ensure high-quality repairs.
- Color Matching: Body shops have the expertise to match your car’s paint color accurately.
- Quality Assurance: Professional body shops provide warranties for their work, ensuring peace of mind.
8.2 Mobile Repair Technicians
- Convenient Service: Mobile repair technicians come to your location, saving you time and hassle.
- Cost-Effective: They offer competitive pricing for minor repairs, such as scratches, chips, and bumper scrapes.
- Quick Turnaround: Mobile technicians can often complete repairs in a few hours.
8.3 Paintless Dent Repair (PDR) Specialists
- Non-Invasive: PDR is a non-invasive technique that removes dents without damaging the paint.
- Cost-Effective: PDR is a cost-effective solution for minor dents and dings.
- Quick Repairs: PDR can often be completed in a short amount of time.
9. Cost Considerations for Car Paint Repair
Understanding the costs associated with car paint repair is essential for budgeting and making informed decisions:
9.1 Factors Affecting Cost
- Type of Damage: Scratches, dents, peeling paint, and rust each require different repair methods, affecting the overall cost.
- Extent of Damage: The size and severity of the damage will influence the amount of materials and labor required.
- Type of Vehicle: Luxury and specialty vehicles may have higher repair costs due to specialized paint and parts.
- Repair Method: DIY repairs are generally less expensive than professional services, but they require time and skill.
- Location: Labor rates and material costs can vary depending on your geographic location.
9.2 DIY Repair Costs
- Materials: Touch-up paint, sandpaper, rubbing compound, and polishing compound can cost between $50 and $200.
- Tools: Basic tools like masking tape, microfiber cloths, and application brushes are relatively inexpensive.
- Time: DIY repairs require time and effort, which should be factored into the overall cost.
9.3 Professional Repair Costs
| Type of Repair | Average Cost |
|---|---|
| Scratch Repair | $150 – $800 |
| Dent Removal | $100 – $500 |
| Bumper Repair | $200 – $1000 |
| Full Paint Job | $3000 – $10000 |
| Paint Chip Repair | $50 – $200 |
| Peeling Paint | $500 – $3000 |
| Rust Repair | $200 – $2000 |
9.4 Insurance Coverage
- Comprehensive Coverage: Comprehensive insurance may cover paint damage caused by vandalism, hail, or other non-collision events.
- Collision Coverage: Collision insurance may cover paint damage resulting from accidents.
- Deductibles: Be aware of your deductible, as you will need to pay this amount before your insurance covers the remaining costs.
- Claim Impact: Filing a claim may affect your insurance premiums in the future.
10. Preventing Car Paint Damage
Prevention is always better than cure. Here are some tips to help prevent car paint damage:
10.1 Regular Washing
- Wash Your Car Regularly: Wash your car at least every two weeks to remove dirt, grime, and contaminants.
- Use Car Wash Soap: Use a pH-balanced car wash soap to avoid damaging the paint.
- Two-Bucket Method: Use the two-bucket method to prevent dirt from scratching the paint.
10.2 Waxing and Sealing
- Apply Wax Regularly: Apply a coat of wax or sealant every three to six months to protect the paint from UV rays and environmental damage.
- Choose the Right Wax: Choose a wax that is appropriate for your car’s paint type and climate.
10.3 Parking Considerations
- Park in the Shade: Park in the shade whenever possible to protect the paint from direct sunlight.
- Avoid Tight Spaces: Avoid parking in tight spaces where your car may be scratched or dented.
- Use a Car Cover: Use a car cover to protect your car from the elements when parking outdoors.
10.4 Driving Habits
- Drive Carefully: Avoid driving too close to other vehicles to prevent stone chips and scratches.
- Avoid Construction Zones: Avoid driving through construction zones where debris may damage your car’s paint.
10.5 Environmental Protection
- Remove Bird Droppings: Remove bird droppings promptly to prevent them from etching into the paint.
- Clean Tree Sap: Clean tree sap and other sticky substances as soon as possible.
- Protect from Acid Rain: If you live in an area with acid rain, consider using a protective coating on your car’s paint.
10.6 Paint Protection Film (PPF)
- Apply PPF: Consider applying paint protection film to high-impact areas, such as the hood, front bumper, and side mirrors.
- Professional Installation: Have PPF installed by a professional to ensure proper application and coverage.
FAQ: Car Paint Repair
1. How do I identify the correct paint code for my car?
You can usually find your car’s paint code on a sticker located in the door jamb, glove compartment, or engine bay. Consult your owner’s manual for specific locations.
2. Can I use household cleaners to wash my car?
No, household cleaners can damage your car’s paint. Use a pH-balanced car wash soap specifically designed for automotive finishes.
3. How often should I wax my car?
Wax your car every three to six months to protect the paint from UV rays and environmental damage.
4. What is the best way to remove bird droppings from my car?
Remove bird droppings as soon as possible using a soft cloth and car wash soap. Avoid scrubbing, as this can scratch the paint.
5. Is it worth it to repair minor scratches on my car?
Yes, repairing minor scratches can prevent them from worsening and protect your car’s paint from rust and corrosion.
6. Can I use a touch-up pen to fix deep scratches?
Touch-up pens are best for small chips and surface scratches. Deep scratches may require more extensive repair methods.
7. What is paintless dent repair (PDR)?
PDR is a non-invasive technique that removes dents without damaging the paint. It is suitable for minor dents and dings where the paint is intact.
8. How much does it cost to repaint a car?
The cost to repaint a car can range from $3000 to $10000, depending on the size, type of vehicle, and the quality of paint used.
9. What is clear coat, and why is it important?
Clear coat is a transparent layer applied over the base coat to protect the paint and provide a glossy finish. It is essential for preserving the paint’s appearance and durability.
10. How can I prevent fading of my car’s paint?
Park in the shade, use a car cover, and apply wax regularly to protect your car’s paint from UV rays and environmental damage.
Maintaining your car’s paint is essential for preserving its appearance and value. Whether you choose to tackle minor repairs yourself or seek professional assistance, CARS.EDU.VN is here to provide the guidance and resources you need. Remember, regular maintenance and prompt attention to damage can keep your car looking its best for years to come.
Are you struggling to find reliable car paint repair services or unsure about the best way to maintain your vehicle’s appearance? Visit CARS.EDU.VN today for detailed guides, expert advice, and trusted service recommendations. Let us help you keep your car in pristine condition. Contact us at 456 Auto Drive, Anytown, CA 90210, United States, Whatsapp: +1 555-123-4567, or visit our website at cars.edu.vn for more information.