Is your car’s air conditioning not blowing as cold as it used to? If your vehicle is over 6-8 years old and the AC’s cooling performance has gradually declined, a likely culprit is low Car Refrigerant levels. Like many car owners, you might be experiencing reduced cooling efficiency over time. A common symptom is a subtle hissing sound from the vents, indicating your AC system might need a refrigerant top-up.
Fortunately, if there are no major issues with your AC system components, recharging the car refrigerant can be a straightforward DIY task. This guide, inspired by a hands-on experience, will walk you through the process of restoring your car’s AC to its former cooling glory.
Disclaimer
Please note, this guide is for informational purposes only and based on personal experience. I am not a certified HVAC technician. Proceed with caution and prioritize safety. If you are uncomfortable with any step, consult a professional.
Understanding the Need for Car Refrigerant Recharge
When your car’s AC system isn’t performing optimally, it’s natural to wonder why. Before jumping to conclusions about major repairs, consider the car refrigerant level. Even in a sealed system, refrigerant loss is a common occurrence over time. This happens because the rubber seals and O-rings in the hoses and connections can degrade, leading to slow leaks. Damage to metal lines or the condenser from road debris can also cause refrigerant leaks. Sometimes, even the Schrader valves on the service ports can be a source of minor leaks.
If your car is getting older and the AC is noticeably weaker, a low car refrigerant level is a prime suspect. In many cases, simply recharging the system can bring back the cold air you expect. It’s worth investigating, especially if you, like many, have never had your AC refrigerant recharged. However, it’s also essential to be mindful of potential leaks in the system before proceeding with a recharge.
To diagnose the issue effectively, a basic check of the AC system components is advisable:
- Compressor: Verify it engages when the AC button is pressed. You should hear a distinct click from the relay. Visually inspect the compressor drive belt for any issues. Listen for unusual noises from the compressor pulley or bearing.
- Evaporator: Generally reliable, but check for signs of blockage. Water accumulation in the footwell or a clogged drain could indicate problems. Inspect for frost buildup through the cabin air filter cavity (though this is less common with refrigerant issues).
- Condenser: Ensure it’s free of debris and not excessively dirty. Regular compressed air cleaning can help maintain condenser efficiency. Avoid harsh alkaline cleaners that could damage the fins.
- Expansion Valve: Typically located outside the firewall. Unless there are specific symptoms pointing to it, it’s usually assumed to be functioning.
- Blower Motor: Confirm it operates at different speeds. This rules out issues with the blower resistor.
- Cabin Air Filter: Check its condition. A clogged filter can reduce airflow and perceived cooling. Replace it if necessary. Regularly using recirculation mode can help keep the filter cleaner for longer.
If these components appear to be working correctly, the next logical step is to check the car refrigerant levels. Low refrigerant is a frequent cause of diminished AC performance, especially in older vehicles.
Tools You’ll Need for a Car AC Refrigerant Recharge
To recharge your car’s AC refrigerant, you’ll need a few specialized tools:
-
AC Manifold Gauge Set: This is the core tool for AC work. It allows you to connect to your car’s AC system, read the pressures, and control the refrigerant flow.
 AC Manifold Gauge Set
 -
Probe Thermometer: A probe thermometer is essential for measuring the vent air temperature before and after the recharge. This helps you objectively assess the improvement in cooling. A digital multimeter with a temperature probe function also works well.
Alt Text: Digital probe thermometer used to measure air temperature, essential for car AC refrigerant recharge DIY.
Consumables Required
-
R-134a Refrigerant Can: You’ll need a can of R-134a refrigerant. A 450g can is usually sufficient for most hatchbacks and smaller sedans. Check your car’s specification sticker for the correct refrigerant type and quantity.
Alt Text: Can of R-134a car refrigerant, a consumable required for AC recharge, showing product label and specifications.
Locate the sticker in your engine bay or under the hood to confirm the refrigerant type and capacity for your specific vehicle. This sticker is crucial for using the correct car refrigerant.
Alt Text: Vehicle sticker indicating the type and quantity of car AC refrigerant required for the system, located in the engine bay.
Personal Protective Equipment (PPE)
Safety is paramount when working with refrigerants. Always use the following PPE:
- Safety Goggles: Protect your eyes from refrigerant splashes.
- Nitrile Gloves: Refrigerant can cause frostbite on contact with skin. Gloves are essential for safe handling.
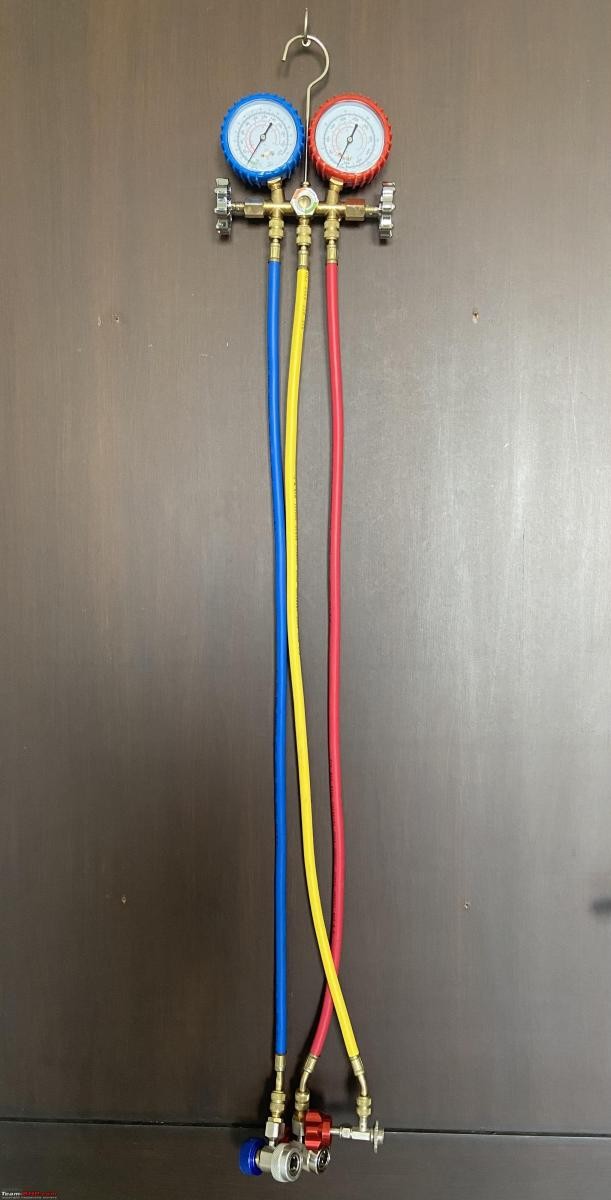
Understanding the AC Manifold Gauge Set in Detail
The AC manifold gauge set is the key to managing your car refrigerant. It’s designed to:
- Measure Pressures: Show the pressure in both the low-pressure (LP) and high-pressure (HP) sides of your AC system.
- Recharge Refrigerant: Allow you to safely add refrigerant into the system.
- Evacuate Refrigerant: Enable the removal of refrigerant from the system (required for major repairs but not part of a simple recharge).
The manifold itself is typically made of brass and features two pressure gauges:
- Low-Pressure Gauge (Blue): Marked from 0 to 220 psi.
- High-Pressure Gauge (Red): Marked from 0 to 500 psi.
Alt Text: Close-up of AC manifold gauge set showing the blue low-pressure and red high-pressure gauges with scales.
Valves on the manifold control the refrigerant flow through three ports. For recharging, the valve on the low-pressure (blue) side is used. Refrigerant flows from the can (high pressure) to the car’s AC system (low pressure side) in liquid form. A gauge glass in the center of the manifold allows you to visually observe the refrigerant flow during charging.
Alt Text: Gauge glass in the center of an AC manifold set, used to observe the flow of car refrigerant during charging process.
Color-Coded Hoses:
The manifold set uses color-coded hoses for easy identification:
- Blue Hose: Connects to the low-pressure (LP) side of the AC system.
- Red Hose: Connects to the high-pressure (HP) side of the AC system.
- Yellow Hose: The utility hose. Used for connecting to the refrigerant can during charging or to a vacuum pump during evacuation.
While color-coded for convenience, all hoses are generally identical in connectors and size.
Alt Text: Set of color-coded AC manifold hoses, blue for low pressure, red for high pressure, and yellow for utility.
Schrader Valves:
The hoses have Schrader valves at their ends, similar to tire valves. Pressing the central pin releases gas.
Alt Text: Close-up of a Schrader valve at the end of an AC manifold hose, similar to tire valves, controlling gas flow.
Quick Couplers:
Quick coupler fittings connect the hoses to your car’s AC service ports. They are also color-coded and designed to prevent incorrect connections:
- Blue Quick Coupler (LP): Smaller opening, fits only the low-pressure port.
- Red Quick Coupler (HP): Larger opening, fits only the high-pressure port.
Alt Text: Color-coded quick coupler fittings for AC manifold set, blue for low pressure and red for high pressure connections.
The different sizes ensure you cannot accidentally connect the wrong hose to the wrong port.
Alt Text: Comparison of opening sizes on low pressure (smaller) and high pressure (larger) AC quick couplers, preventing incorrect connections.
These quick couplers snap securely onto the car’s charging ports.
Alt Text: AC quick coupler securely connected to a car’s AC service port, demonstrating easy snap-on mechanism.
Refrigerant Can Valve:
The yellow hose connects to the refrigerant can using a special valve. This valve has a sharp point to pierce the can and a control to regulate refrigerant flow.
Alt Text: Refrigerant can valve with pointy end to pierce the can, used to connect refrigerant can to AC manifold yellow hose.
Crucial Safety Tip: Ensure the valve is open (handle backed out) before screwing it onto the refrigerant can to prevent accidental piercing and refrigerant leakage.
Dummy Ports:
Many manifold sets include dummy ports on the back to store the hoses when not in use, keeping them clean and protected.
Alt Text: Dummy threaded ports on the back of an AC manifold set used for storing hoses when not in use.
Alt Text: AC manifold hoses neatly parked on the dummy ports at the back of the manifold, keeping them clean and organized.
A complete manifold kit, including hoses and quick connectors, can be sourced from auto parts stores. Purchasing locally allows for physical inspection and immediate support if needed. These kits are versatile and can also be used for home AC systems with the correct refrigerant, although this guide focuses on car refrigerant.
Step-by-Step Procedure to Recharge Your Car AC Refrigerant
Now, let’s get to the practical steps of recharging your car refrigerant:
-
Initial Temperature Check: Start your car’s engine, set the AC to the coldest setting and the blower fan to maximum. Use your probe thermometer to measure the air temperature coming from the vents. Record this temperature as a baseline.
Alt Text: Using a probe thermometer to measure the temperature of air from car AC vents before refrigerant recharge.
Alt Text: Digital multimeter display showing vent air temperature before car AC refrigerant recharge, indicating insufficient cooling.
Note the initial temperature. It should be noticeably warmer than desired, confirming the need for a recharge.
-
Prepare the Manifold and Refrigerant Can: Open your car’s hood and hang the AC manifold gauge set in a convenient location. Ensure both manifold valves (LP and HP) are fully closed. Attach the refrigerant can valve to the can, making sure the valve is open (handle backed out) before screwing it onto the can.
Alt Text: Hanging AC manifold gauge set under car hood and preparing to connect the refrigerant can for recharge procedure.
-
Locate the Service Ports: Identify the low-pressure (LP) and high-pressure (HP) service ports in your car’s AC system.
- LP Port: Usually the smaller port, located on a larger diameter pipe.
- HP Port: Usually the larger port, located on a smaller diameter pipe.
Alt Text: Close-up of car AC service ports, highlighting the low pressure (LP) and high pressure (HP) port locations and sizes.
Remove the dust caps from both service ports and keep them in a safe place.
Alt Text: Removing dust caps from car AC low pressure and high pressure service ports in preparation for connecting manifold gauges.
-
Connect the Quick Couplers: Connect the blue (LP) quick coupler to the LP service port and the red (HP) quick coupler to the HP service port. Ensure the quick couplers are in the closed position when connecting.
Alt Text: Connecting color-coded quick coupler fittings from AC manifold to the car’s low pressure and high pressure service ports.
-
Open Quick Coupler Valves and Check Initial Pressures: Gently open the valves on the quick couplers. This allows pressure readings to appear on the gauges. You don’t need to open them fully, just enough to get a reading.
Alt Text: Animation showing the process of opening quick coupler valves on AC service ports to allow pressure readings on the manifold gauges.
Even with the manifold valves closed, the gauges will show pressure readings from the AC system.
-
Engine Rev and Pressure Readings: Have someone start the engine and rev it to around 1500 RPM. Check the pressure readings on both gauges. Higher engine speed simulates driving conditions and provides more accurate readings.
Alt Text: Reading pressure gauges on AC manifold set while car engine is revving to check system pressure under load.
-
Compare to Pressure-Temperature Chart: Measure the ambient temperature outside. Compare your gauge readings to a pressure-temperature chart for R-134a refrigerant. This chart helps determine if your pressures are within the expected range for the ambient temperature.
Alt Text: R-134a refrigerant temperature pressure chart, used as a reference to determine correct operating pressures based on ambient temperature.
In the example case, with an ambient temperature of 28°C, the expected LP pressure is 45-50 psi and HP pressure is 190-230 psi. A lower than expected HP reading indicates a likely car refrigerant deficiency.
Alt Text: Display showing ambient temperature reading of 28 degrees Celsius, used to reference the R-134a pressure temperature chart.
-
Safety Gear Up: Put on your safety goggles and nitrile gloves before handling the refrigerant can. Direct contact with refrigerant can cause frostbite.
Alt Text: Wearing safety goggles and nitrile gloves as personal protective equipment before handling car refrigerant can.
-
Puncture and Open Refrigerant Can Valve: Screw the valve on the refrigerant can completely clockwise to puncture the can. Then, turn it counter-clockwise to open the valve and allow refrigerant to flow into the yellow hose.
Alt Text: Puncturing a refrigerant can by screwing down the valve, initiating the refrigerant recharge process for car AC system.
-
Purge the Yellow Hose: The yellow hose now contains air, which is undesirable in the AC system. Loosen the yellow hose connection at the manifold slightly to purge air until refrigerant starts to escape. Then, tighten the connection firmly.
Alt Text: Animation showing purging air from the yellow hose of the AC manifold set by briefly loosening the connection until refrigerant escapes.
-
Charge the System: Slowly and gently open the low-pressure (LP) side valve on the manifold to begin charging the system with car refrigerant.
Alt Text: Opening the low pressure side valve on the AC manifold to initiate the flow of refrigerant into the car AC system.
Observe the refrigerant flow through the gauge glass on the manifold. Charge in short bursts, monitoring the pressure gauges.
Alt Text: Animation showing the flow of liquid refrigerant through the gauge glass on the AC manifold during the charging process.
-
Monitor Pressure Gauges: Watch the HP gauge reading. It should gradually increase as you add refrigerant. Refer to the R-134a pressure-temperature chart for your ambient temperature to determine the target HP pressure range (e.g., 190-230 psi at 28°C). Charge in intervals until the HP gauge reaches the desired range. Avoid overcharging, as it can harm cooling performance and potentially damage the compressor and other components. Do not open the LP valve fully at once.
Alt Text: Monitoring the high pressure gauge on the AC manifold during refrigerant recharge, observing the pressure increase.
Alt Text: High pressure gauge needle approaching the target pressure range during car AC refrigerant recharge, indicating sufficient refrigerant level.
-
Final Temperature Check: Re-check the vent air temperature with your probe thermometer inside the car. You should now see a significantly lower temperature, indicating successful car refrigerant recharge.
Alt Text: Digital multimeter showing a much lower vent air temperature after car AC refrigerant recharge, confirming improved cooling performance.
If you still experience cooling issues after recharging, it’s advisable to consult a professional car AC service technician. They have specialized equipment and expertise to diagnose more complex AC problems. While DIY recharge is effective for simple refrigerant loss, professional help is needed for other system malfunctions.
Thank you for reading this DIY guide. Hopefully, this has been a helpful resource for understanding how to recharge your car refrigerant and restore your car’s AC cooling performance. If you have any comments, feedback, or insights to share, please feel free to contribute.
Further Resources: For a more in-depth understanding of automotive AC systems, refer to this handy Automotive Air Conditioning Training Manual. You can also find valuable discussions and additional information in BHPian comments.