Caladiums in pots, also known as elephant ears or angel wings, offer a vibrant splash of color and tropical flair to any indoor or outdoor space. CARS.EDU.VN presents this comprehensive guide to ensure your potted caladiums thrive, providing expert tips and advice for optimal growth and care. Discover how to cultivate lush, healthy caladiums in containers, transforming your home or garden into a vibrant oasis with our insights on sunlight, watering, and fertilization for these stunning plants.
1. Understanding Caladiums: A Tropical Delight
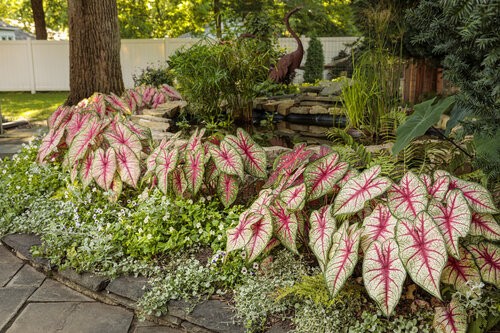
Caladiums, celebrated for their striking foliage, bring a touch of the tropics to your home or garden. Known for their heart-shaped or lance-shaped leaves in various colors and patterns, these plants are native to South America and thrive in warm, humid environments. Understanding their basic needs is the first step to successfully caring for caladiums in pots.
1.1. Types of Caladiums
There are two main types of caladiums: fancy-leaved and strap-leaved.
- Fancy-leaved caladiums: These feature broad, heart-shaped leaves and are more shade-tolerant.
- Strap-leaved caladiums: These have narrower, arrow-shaped leaves and can tolerate more sunlight.
Knowing which type you have will help you tailor your care routine for the best results.
1.2. The Appeal of Caladiums in Pots
Growing caladiums in pots offers several advantages:
- Flexibility: Pots can be easily moved to optimize sunlight exposure or protect plants from harsh weather.
- Control: You have better control over soil quality, moisture levels, and fertilization.
- Aesthetics: Potted caladiums add a decorative touch to patios, balconies, and indoor spaces.
2. Essential Requirements for Caladiums in Pots
To ensure your caladiums thrive, it’s crucial to meet their specific needs regarding sunlight, soil, water, and temperature. Providing the right conditions will result in vibrant, healthy foliage.
2.1. Sunlight: Finding the Perfect Balance
Caladiums prefer bright, indirect sunlight. Too much direct sun can scorch their delicate leaves, while too little light can cause them to lose their vibrant colors.
- Ideal Location: Place your potted caladiums in a spot that receives morning sun or dappled shade throughout the day.
- Indoor Lighting: If growing indoors, a north- or east-facing window is ideal. Supplement with grow lights if necessary.
- Signs of Too Much Sun: Look for brown spots or scorched edges on the leaves.
2.2. Soil: Creating the Ideal Growing Medium
Caladiums need well-draining, nutrient-rich soil. A slightly acidic to neutral pH (6.0-7.0) is ideal.
- Potting Mix: Use a high-quality potting mix that contains peat moss, perlite, and vermiculite for optimal drainage and aeration.
- Homemade Mix: You can create your own mix using equal parts potting soil, peat moss, and perlite.
- Avoid Heavy Soils: Heavy clay soils retain too much moisture and can lead to root rot.
2.3. Watering: Maintaining Consistent Moisture
Caladiums thrive in consistently moist soil but are susceptible to root rot if overwatered.
- Watering Frequency: Water when the top inch of soil feels dry to the touch.
- Drainage: Ensure your pots have drainage holes to prevent water from pooling.
- Water Quality: Use room-temperature water to avoid shocking the roots.
- Signs of Overwatering: Yellowing leaves, wilting, and a musty smell indicate overwatering.
- Signs of Underwatering: Dry, crispy leaves suggest the plant needs more water.
2.4. Temperature and Humidity: Mimicking Tropical Conditions
Caladiums are tropical plants and prefer warm, humid conditions.
- Temperature: Maintain a temperature between 70-85°F (21-29°C).
- Humidity: Aim for a humidity level of 60-70%.
- Increasing Humidity: Use a humidifier, place the pot on a pebble tray filled with water, or group plants together to increase humidity.
- Avoid Cold Drafts: Keep caladiums away from cold drafts, which can damage the leaves.
2.5. Fertilizing: Providing Essential Nutrients
Caladiums benefit from regular fertilization during the growing season (spring and summer).
- Type of Fertilizer: Use a balanced liquid fertilizer (20-20-20) diluted to half strength.
- Frequency: Fertilize every 2-4 weeks during the growing season.
- Dormancy: Do not fertilize during the dormancy period (fall and winter).
- Organic Options: Fish emulsion or compost tea are excellent organic alternatives.
3. Step-by-Step Guide to Planting Caladiums in Pots
Planting caladiums in pots is a straightforward process. Follow these steps to ensure a successful start for your plants.
3.1. Choosing the Right Pot
- Size: Select a pot that is at least 8-12 inches in diameter to allow room for the bulbs to grow.
- Material: Terracotta, plastic, or ceramic pots are all suitable, as long as they have drainage holes.
- Aesthetic: Choose a pot that complements the colors of your caladium leaves and your overall decor.
3.2. Preparing the Potting Mix
- Mixing: Combine equal parts of potting soil, peat moss, and perlite in a large container.
- Moistening: Moisten the mix with water until it is evenly damp but not soggy.
3.3. Planting the Bulbs
- Depth: Plant the bulbs about 2 inches deep, with the “eyes” (small buds) facing upward.
- Spacing: If planting multiple bulbs, space them about 4-6 inches apart.
- Covering: Cover the bulbs with the prepared potting mix and gently pat down the surface.
3.4. Initial Watering and Placement
- Watering: Water thoroughly after planting, ensuring the soil is evenly moist.
- Placement: Place the pot in a warm location with bright, indirect sunlight.
- Patience: It may take several weeks for the bulbs to sprout, so be patient and keep the soil consistently moist.
4. Ongoing Care for Caladiums in Pots
Once your caladiums are planted, consistent care is essential to maintain their health and beauty.
4.1. Regular Watering Practices
- Checking Moisture: Check the soil moisture regularly by inserting your finger about an inch deep.
- Adjusting Frequency: Adjust watering frequency based on weather conditions and the plant’s needs.
- Avoiding Overwatering: Ensure the pot drains well to prevent waterlogged soil, which can lead to root rot.
4.2. Maintaining Humidity Levels
- Humidifier: Use a humidifier to maintain consistent humidity levels, especially during dry months.
- Pebble Tray: Place the pot on a tray filled with pebbles and water. As the water evaporates, it will increase the humidity around the plant.
- Grouping Plants: Grouping caladiums with other plants can create a microclimate with higher humidity.
4.3. Fertilizing Schedule
- Growing Season: Fertilize every 2-4 weeks during the spring and summer months.
- Dormancy: Stop fertilizing in the fall and winter when the plant is dormant.
- Type of Fertilizer: Use a balanced liquid fertilizer (20-20-20) diluted to half strength.
- Application: Apply the fertilizer after watering to avoid burning the roots.
4.4. Pruning and Grooming
- Removing Dead Leaves: Regularly remove any dead or yellowing leaves to keep the plant looking its best and prevent disease.
- Encouraging Bushiness: Pinch off any flowers that appear to encourage more foliage growth. Caladiums are grown for their leaves, and flowering can divert energy away from leaf production.
4.5. Pest and Disease Management
- Common Pests: Watch out for common pests like aphids, spider mites, and mealybugs.
- Organic Solutions: Treat infestations with insecticidal soap or neem oil.
- Preventative Measures: Keep the area around the plants clean and free of debris to prevent pest infestations.
- Root Rot: Prevent root rot by ensuring good drainage and avoiding overwatering.
5. Overwintering Caladiums in Pots
Caladiums are tropical plants and cannot tolerate freezing temperatures. In colder climates, you’ll need to overwinter them to enjoy them again next year.
5.1. Preparing for Dormancy
- Stop Watering: In the fall, gradually reduce watering as the leaves begin to fade.
- Cutting Back Foliage: Once the foliage has died back completely, cut it off at the soil level.
- Digging Up Bulbs: Carefully dig up the bulbs from the pot.
5.2. Storing the Bulbs
- Cleaning: Gently clean the soil off the bulbs.
- Drying: Allow the bulbs to dry for a few days in a well-ventilated area.
- Storage Medium: Store the bulbs in a paper bag or box filled with peat moss or vermiculite.
- Storage Location: Keep the bulbs in a cool, dark, and dry place, such as a basement or garage, where the temperature stays above 50°F (10°C).
5.3. Replanting in Spring
- Starting Indoors: In early spring, replant the bulbs in fresh potting mix and start watering them.
- Warmth: Keep the pots in a warm location to encourage sprouting.
- Transplanting Outdoors: Once the weather warms up and the danger of frost has passed, you can move the pots outdoors.
6. Troubleshooting Common Issues with Caladiums in Pots
Even with the best care, you may encounter some common issues when growing caladiums in pots. Here’s how to troubleshoot them.
6.1. Yellowing Leaves
- Overwatering: Reduce watering frequency and ensure good drainage.
- Underwatering: Increase watering frequency and check soil moisture regularly.
- Nutrient Deficiency: Fertilize with a balanced liquid fertilizer.
- Pest Infestation: Check for pests and treat accordingly.
6.2. Brown Spots on Leaves
- Sunburn: Move the plant to a location with less direct sunlight.
- Fungal Infection: Treat with a fungicide and improve air circulation.
6.3. Leggy Growth
- Insufficient Light: Move the plant to a location with brighter, indirect sunlight or supplement with grow lights.
6.4. Lack of Color
- Insufficient Light: Caladiums need adequate light to develop their vibrant colors. Move the plant to a brighter location.
- Nutrient Deficiency: Fertilize with a balanced fertilizer to provide essential nutrients.
7. Creative Ways to Display Caladiums in Pots
Caladiums are not only beautiful but also versatile, allowing for creative displays in various settings.
7.1. Patio and Balcony Displays
- Mixed Plantings: Combine caladiums with other shade-loving plants like impatiens, ferns, and coleus for a colorful and textured display.
- Vertical Gardens: Use wall-mounted planters or hanging baskets to create a stunning vertical garden featuring caladiums.
- Container Groupings: Group pots of different sizes and colors together to create an eye-catching focal point.
7.2. Indoor Decor
- Windowsill Gardens: Place potted caladiums on windowsills to add a touch of the tropics to your indoor spaces.
- Table Centerpieces: Use caladiums as elegant table centerpieces for special occasions.
- Living Rooms and Bedrooms: Add potted caladiums to living rooms and bedrooms to bring a splash of color and life to your interior decor.
7.3. Themed Gardens
- Tropical Gardens: Create a tropical-themed garden with caladiums, banana plants, and other exotic foliage.
- Shade Gardens: Design a shade garden with caladiums, hostas, and other shade-loving plants for a lush and colorful display.
8. Choosing the Right Caladium Variety for Your Pot
With so many caladium varieties available, selecting the right one for your pot can make a big difference in your success.
8.1. Considering Pot Size
- Smaller Pots: For smaller pots (6-8 inches), choose compact varieties like ‘Dwarf Miss Muffet’ or ‘Little Miss Muffet.’
- Larger Pots: For larger pots (10+ inches), consider taller and more robust varieties like ‘Aaron’ or ‘Carolyn Whorton.’
8.2. Leaf Type and Color
- Fancy-Leaved Varieties: These are ideal for shadier locations and add a classic touch with their broad, heart-shaped leaves.
- Strap-Leaved Varieties: These can tolerate more sun and offer a unique texture with their narrow, arrow-shaped leaves.
- Color Combinations: Choose varieties with colors that complement your decor and other plants in your garden.
8.3. Sun Tolerance
- Shade-Loving Varieties: If your pot will be in a shady location, select varieties like ‘Pink Symphony’ or ‘White Queen.’
- Sun-Tolerant Varieties: For pots in sunny locations, choose varieties like ‘Florida Sweetheart’ or ‘Red Flash.’
9. Advanced Techniques for Caladium Care
For those looking to take their caladium care to the next level, here are some advanced techniques to consider.
9.1. Starting Bulbs Indoors
- Early Start: Start caladium bulbs indoors 6-8 weeks before the last expected frost to get a head start on the growing season.
- Warmth and Moisture: Keep the bulbs in a warm, moist environment to encourage sprouting.
- Transplanting: Transplant the sprouted bulbs into pots once the weather warms up.
9.2. Using Grow Lights
- Supplementing Light: If you live in an area with limited sunlight, use grow lights to supplement the plant’s light needs.
- Type of Lights: LED grow lights are energy-efficient and provide the right spectrum of light for caladiums.
- Placement: Position the grow lights about 12-18 inches above the plants.
9.3. Foliar Feeding
- Direct Nutrient Delivery: Foliar feeding involves spraying a diluted fertilizer solution directly onto the leaves, allowing the plant to absorb nutrients more quickly.
- Application: Use a diluted liquid fertilizer and spray the leaves in the early morning or late afternoon.
- Frequency: Apply foliar feed every 2-4 weeks during the growing season.
10. Frequently Asked Questions (FAQs) About Caladiums in Pots
1. How often should I water my caladiums in pots?
- Water when the top inch of soil feels dry to the touch. Adjust frequency based on weather conditions.
2. What kind of soil is best for caladiums in pots?
- Use a well-draining potting mix that contains peat moss, perlite, and vermiculite.
3. How much sunlight do caladiums need?
- Caladiums prefer bright, indirect sunlight. Avoid direct sun, which can scorch the leaves.
4. How do I fertilize caladiums in pots?
- Fertilize every 2-4 weeks during the growing season with a balanced liquid fertilizer diluted to half strength.
5. Why are my caladium leaves turning yellow?
- Yellowing leaves can be caused by overwatering, underwatering, nutrient deficiency, or pest infestation.
6. How do I overwinter caladiums in pots?
- Stop watering in the fall, cut back the foliage, dig up the bulbs, and store them in a cool, dark, and dry place.
7. What are common pests that affect caladiums?
- Common pests include aphids, spider mites, and mealybugs.
8. Can I grow caladiums indoors?
- Yes, caladiums can be grown indoors if provided with adequate light, humidity, and warmth.
9. How do I increase humidity for my caladiums?
- Use a humidifier, place the pot on a pebble tray filled with water, or group plants together.
10. Why are my caladium leaves losing their color?
- Lack of color can be caused by insufficient light or nutrient deficiency.
Caring for caladiums in pots is a rewarding experience that brings a touch of the tropics to your living space. By understanding their needs and following these comprehensive tips, you can enjoy their vibrant foliage and unique beauty year after year.
For more expert advice on plant care, innovative gardening techniques, and information about the latest automotive technologies, visit CARS.EDU.VN. Our team is dedicated to providing you with the knowledge and resources you need to succeed in all your ventures, from gardening to car maintenance.
Have you faced challenges in finding reliable information on car maintenance or trustworthy repair services? Are you looking for detailed guides to help you care for your vehicle effectively? At CARS.EDU.VN, we understand these concerns and offer a wealth of information and resources to help you keep your car in top condition.
Visit CARS.EDU.VN today to explore our extensive collection of articles and guides. For personalized assistance and expert advice, contact us at 456 Auto Drive, Anytown, CA 90210, United States, or reach out via WhatsApp at +1 555-123-4567. Let cars.edu.vn be your trusted partner in achieving automotive excellence and horticultural success!