Caring for hydrangeas in the fall is essential for robust blooms next season, and CARS.EDU.VN is here to guide you through every step. By focusing on proper late-season practices, we can ensure your hydrangeas not only survive but thrive. Explore expert advice on hydrangea winterizing strategies, including pH adjustments and optimal care techniques.
1. Understanding the Importance of Autumn Hydrangea Care
Proper fall care is paramount, whether you cultivate mophead, bigleaf ( Hydrangea macrophylla ), smooth ( Hydrangea arborescens ), or panicle hydrangeas ( Hydrangea paniculata ). Understanding how to prepare these flowering shrubs for the colder months dramatically influences their health and bloom production for the following year. Incorrect pruning or inadequate protection from the elements can negatively impact the plant’s vitality.
1.1 Seven Essential Fall Care Practices
There are seven core practices to consider when it comes to hydrangea fall care, each designed to protect and nurture your plants through the dormant season.
- Deadheading: Removing spent blooms to tidy the plant.
- Pruning: Strategic trimming to encourage future growth and blooms.
- Fertilizing: Applying nutrients to prepare the plant for the next growing season, and to adjust the soil pH to influence bloom color.
- Mulching: Insulating the roots against temperature fluctuations.
- Weather Protection: Shielding the plant from harsh winter conditions.
- Deer Protection: Guarding against wildlife damage.
- Container Care: Specific steps for hydrangeas grown in pots.
Each of these practices helps maintain the health and vigor of your hydrangeas, no matter if you favor blue hydrangeas, pink varieties, white blossoms, or the colorful elegance of lacecap hydrangeas. Let’s explore the first step: deadheading.
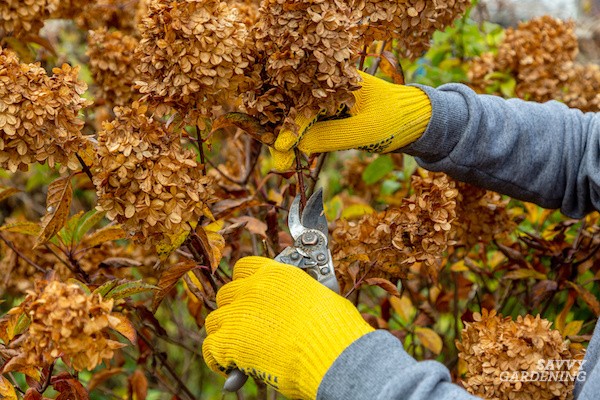
1.2 Deadheading: To Snip or Not to Snip
Deadheading, or the removal of old blooms, is a non-essential but aesthetically pleasing task. Whether or not you deadhead your hydrangeas comes down to personal preference, as it does not significantly affect flower quality or size in the coming season. Some gardeners appreciate the winter interest that spent flower heads provide, especially when dusted with snow. However, if you prefer a cleaner garden appearance, removing the old blooms is perfectly acceptable.
To deadhead, use sharp shears to cut off the flower heads, removing only an inch or two of the stem. Avoid cutting further down the stem, which could affect next year’s flower production. This simple step can keep your garden looking tidy throughout the dormant season.
2. Pruning Hydrangeas: Timing is Everything
When it comes to pruning hydrangeas in the fall, the general advice is to avoid it. Pruning at the wrong time can remove flower buds for the next year, potentially reducing or eliminating blooms, according to the American Horticultural Society. Understanding when to prune each type of hydrangea is crucial.
2.1 Understanding Hydrangea Bloom Types
Hydrangeas fall into two primary categories based on their blooming habits:
- Old Wood Bloomers: These hydrangeas develop flower buds on the previous season’s growth. Examples include bigleaf or mophead hydrangeas ( H. macrophylla ), lacecap, mountain ( Hydrangea serrata ), and oakleaf hydrangeas ( Hydrangea quercifolia ). These are best pruned immediately after flowering in the summer, although many gardeners prefer not to prune them at all.
- New Wood Bloomers: These hydrangeas bloom on growth produced in the current season. Examples include peegee hydrangeas ( H. paniculata ‘Grandiflora’), panicle hydrangeas, and smooth hydrangeas like ‘Annabelle’. These varieties should be pruned in early spring before new growth emerges.
There’s also a third, less formal category:
- Repeat Bloomers: Also known as continual bloomers, these hydrangeas bloom on both old and new wood. Popular examples include the Endless Summer series, such as ‘Blushing Bride’, ‘BloomStruck’, and ‘Summer Crush’. Minimal pruning is required, but if necessary, late summer is the best time.
2.2 The Dangers of Fall Pruning
Many gardeners mistakenly prune what they perceive as dead stems in the fall after the foliage has been damaged by frost. This practice can make the plant more susceptible to winter injury and reduce bloom production. By pruning in the fall, you risk removing dormant flower buds, resulting in fewer flowers in the spring.
To avoid these issues, it’s best to refrain from pruning hydrangeas in the fall. Instead, wait for the appropriate time based on your hydrangea’s bloom type, or better yet, consult resources like CARS.EDU.VN for specific guidance tailored to your plant.
3. Hydrangea Fertilization: Timing and Techniques
While not an essential part of hydrangea fall care, fertilization can be beneficial if done correctly. Fall fertilization helps prepare the plant for the upcoming growing season, ensuring it has the necessary nutrients to produce vibrant blooms.
3.1 Timing is Key
The timing of fertilizer application is crucial. Using a natural granular fertilizer in the fall allows soil microbes to process the nutrients over the winter, making them available for plant growth in the spring. However, applying these fertilizers too early can stimulate new growth that is vulnerable to frost damage. Wait until late September or October to apply natural granular fertilizers.
Synthetic fertilizers are best applied in the spring when the plant is actively growing. Applying them during dormancy can lead to nutrient runoff and waste.
3.2 Adjusting Bloom Color through Soil pH
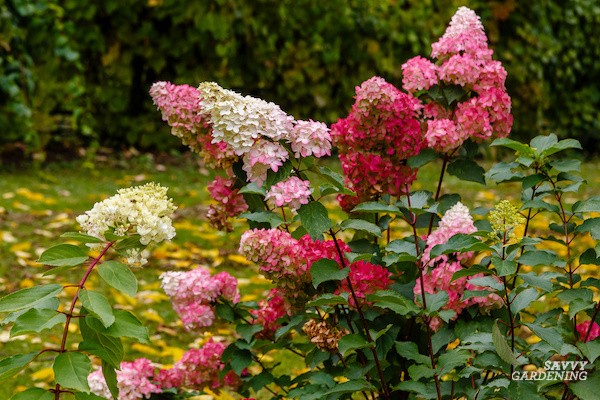
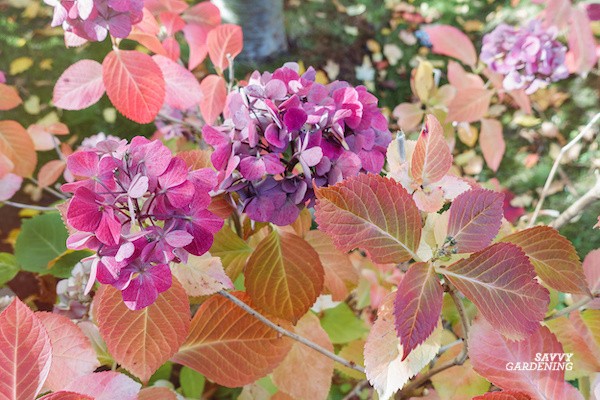
Certain hydrangea varieties, particularly mopheads ( H. macrophylla ), produce pink or blue blooms depending on the soil’s pH level. Manipulating the soil pH in the fall is an effective way to influence bloom color the following season.
- Blue Flowers: Acidic soil, with a pH below 5.5, makes aluminum more available to the plant, resulting in blue flowers. To lower your soil’s pH, add ½ cup of pelletized sulfur for every 10 square feet of soil surface in the fall.
- Pink Flowers: Basic soil, with a pH above 6, ties up aluminum, making it unavailable to the plant, which results in pink flowers. To increase your soil’s pH, add 1 cup of dolomitic lime per 10 square feet of soil surface in the fall.
- Purple Blooms: A pH between 5.5 and 6.0 often results in a mix of pink and blue flowers, or even purple blooms.
Changing bloom color through soil pH adjustment is a gradual process that can take several months. It is best done in the fall to allow sufficient time for the soil to adjust. Keep in mind that not all hydrangea varieties are affected by soil pH. Hydrangeas with “blue” or “pink” in their cultivar name will generally maintain that color regardless of soil pH, and white-blooming varieties are unaffected.
3.3 Choosing the Right Fertilizer
Selecting the right fertilizer can significantly impact your hydrangea’s health and bloom production. At CARS.EDU.VN, we recommend considering fertilizers enriched with slow-release nitrogen and phosphorus for robust root development and flower formation. Organic options like bone meal and composted manure are also excellent choices for enriching the soil naturally. Avoid fertilizers with high nitrogen content, as these can promote leafy growth at the expense of blooms.
4. Mulching Hydrangeas: Insulating and Protecting
Mulching is an essential part of hydrangea fall care, especially in colder climates. A 2- to 3-inch layer of mulch, such as shredded bark or arborist chips, helps maintain consistent soil moisture and reduce weeds throughout the growing season. In the fall and winter, mulch provides crucial insulation.
4.1 Benefits of Fall Mulching
Fall mulching insulates the roots, protecting them from weather extremes and freeze-thaw cycles. This is particularly important for hydrangeas, as their roots are relatively shallow and susceptible to temperature fluctuations.
When applying mulch, be sure to create a donut shape around the plant, avoiding piling it up against the base or trunk. This prevents moisture buildup and potential rot. Shredded fall leaves can also be used as mulch, providing additional nutrients as they decompose.
4.2 Choosing the Right Mulch
The type of mulch you choose can impact its effectiveness. Organic mulches like shredded bark, wood chips, and pine straw not only insulate the soil but also enrich it as they break down. Inorganic mulches, such as gravel or rubber mulch, provide insulation but do not add nutrients. For hydrangeas, organic mulches are generally preferred.
5. Protecting Hydrangeas from Cold Weather: Winterizing Strategies
If you live in a cold climate where hydrangeas are not reliable bloomers, taking extra steps to protect your plants through the winter is crucial. For mophead hydrangeas and other species that bloom on old wood, protecting the buds from freezing is essential.
5.1 Insulating the Buds
The buds for next season’s blooms are formed the previous season and remain dormant inside the existing stems throughout the winter. Protecting these buds ensures a vibrant display of flowers the following summer.
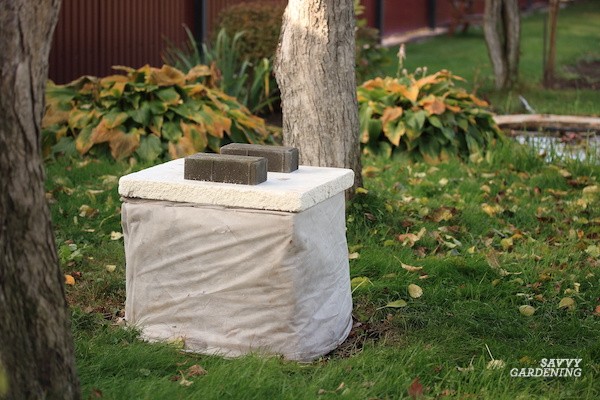
One effective method is to wrap the plants with landscape fabric, burlap, or heavy row cover in the fall. Secure the fabric by tying or stapling it closed. Alternatively, create a box around the plant using stakes and fabric.
5.2 Constructing a Protective Box
To create a protective box, hammer four stakes around the perimeter of the plant and staple the fabric to the stakes. While you can add a lid made of acrylic, Styrofoam, or another rigid material, leaving the top open allows snow to collect inside, providing additional insulation. Rainwater can also reach the plant, keeping it hydrated through the winter.
Wrapping hydrangeas is not a must-do for fall care, but it is highly recommended for mophead hydrangeas in very cold climates (USDA zones 5 and below). Other types of hydrangeas generally do not require this level of protection.
6. Deer Protection: Safeguarding Your Hydrangeas
Deer can pose a significant threat to hydrangeas, especially in late summer and early spring when food sources are scarce. Protecting your hydrangeas from deer is an essential part of fall care.
6.1 Effective Deer Deterrents
Wrap hydrangeas in deer netting or spray them every two weeks with deer repellent spray. Deer netting provides a physical barrier, preventing deer from reaching the plants. Deer repellent sprays deter deer through scent and taste.
The deer also seem to be extra hungry in the early spring (March and April) when a lot of wild foods are not yet available to them. Be sure to check that your deer netting is still in place come spring. Often it’s crushed beneath snowfall or it collapses under heavy winter winds. Replace it if necessary.
6.2 Alternative Protection Methods
In addition to netting and repellent sprays, consider planting deer-resistant companion plants around your hydrangeas. Plants like lavender, rosemary, and ornamental grasses can deter deer. Fencing is another effective method, particularly in areas with high deer populations.
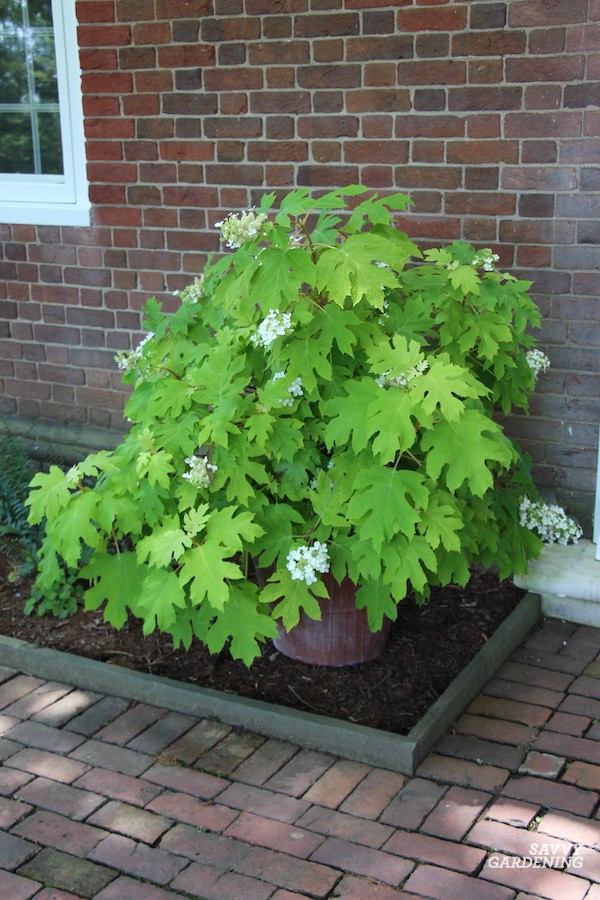
7. Caring for Containerized Hydrangeas: Unique Considerations
If you grow hydrangeas in containers, there are specific considerations for their fall care. While many hydrangea species are cold-hardy, they are more vulnerable to extreme cold when their roots are not insulated by the earth. Container-grown hydrangeas have roots that are more prone to freezing.
7.1 Protecting Container Roots
To prevent root freeze, follow one of these methods:
- Bubble Wrap Insulation: Surround the exterior of the pot with several layers of bubble wrap. Secure it with duct tape or twine. Move the pot to a protected spot, such as close to the house or next to a wall.
- Straw or Leaf Cage: Create a cylindrical cage of wire fencing around the outside of the pot that’s about one to two feet wider than the pot’s diameter. Stuff it full of straw or shredded leaves to help insulate the roots.
- Garage or Shed Storage: Move the pot into an attached but unheated garage or shed when the weather turns cold. The plant will sit dormant until spring, needing minimal light. Water it every 4 to 6 weeks, ensuring there is no standing water beneath the plant.
7.2 Monitoring Moisture Levels
During the dormant season, it’s essential to monitor the moisture levels in the container. Overwatering can lead to root rot, while underwatering can cause the plant to dry out. Check the soil moisture regularly and water sparingly as needed.
8. Expert Tips for Successful Hydrangea Fall Care
To ensure your hydrangeas thrive, remember these key tips for fall care:
- Avoid Over-Loving: Inappropriate pruning, over-fertilization, and over-mulching can harm hydrangeas.
- Be Judicious: Apply fall care practices thoughtfully to prevent overdoing it.
- Monitor Soil pH: Adjust soil pH as needed to achieve desired bloom color, but be aware that not all hydrangeas respond to pH changes.
- Protect from Deer: Use netting or repellent sprays to safeguard your plants from deer damage.
- Insulate Containerized Plants: Provide extra insulation for container-grown hydrangeas to protect their roots from freezing.
8.1 Common Mistakes to Avoid
- Pruning at the Wrong Time: Pruning in the fall can remove flower buds, reducing or eliminating blooms the following year.
- Over-Fertilizing: Applying too much fertilizer can lead to nutrient runoff and potential damage to the plant.
- Over-Mulching: Piling mulch against the base of the plant can trap moisture and promote rot.
- Ignoring Deer Pressure: Failing to protect hydrangeas from deer can result in significant damage to the plants.
8.2 Further Resources at CARS.EDU.VN
At CARS.EDU.VN, we understand the challenges of maintaining beautiful hydrangeas. Many of our clients struggle with finding reliable information on proper care techniques. This is why we’ve compiled a comprehensive guide to address common issues like bloom failure, pest infestations, and soil imbalances. Whether you are looking for detailed pruning guides, fertilization schedules, or troubleshooting tips, CARS.EDU.VN offers the expertise you need to achieve vibrant, healthy hydrangeas year after year.
9. Hydrangea Varieties: Choosing the Right Plant for Your Garden
Selecting the right hydrangea variety is crucial for successful gardening. Consider the following popular varieties and their unique characteristics:
| Variety | Bloom Type | Bloom Color | Pruning Time | USDA Zone |
|---|---|---|---|---|
| Bigleaf Hydrangea | Mophead/Lacecap | Pink/Blue | After Flowering (Summer) | 6-9 |
| Smooth Hydrangea | Mophead | White | Early Spring | 3-9 |
| Panicle Hydrangea | Panicle | White/Pink | Early Spring | 3-8 |
| Oakleaf Hydrangea | Panicle | White/Bronze | After Flowering (Summer) | 5-9 |
| Mountain Hydrangea | Lacecap | Pink/Blue | After Flowering (Summer) | 6-9 |
| Endless Summer Hydrangea | Mophead | Pink/Blue | Late Summer | 4-9 |
Each variety has specific needs and preferences, so choosing one that suits your climate and garden conditions is essential. Consult with local nurseries or gardening experts for personalized recommendations.
10. Hydrangea Planting Guide for Optimal Growth
To achieve optimal growth and flowering, follow these guidelines when planting hydrangeas:
- Timing: Plant hydrangeas in early spring or fall to allow their root systems to establish before the hot summer months or freezing winter temperatures.
- Location: Choose a location with morning sun and afternoon shade. Hydrangeas thrive in partial shade and protection from intense sunlight.
- Soil: Ensure the soil is well-draining and rich in organic matter. Amend heavy clay soils with compost or peat moss.
- Planting Depth: Dig a hole as deep as the root ball and twice as wide. Gently remove the plant from its container and loosen the roots. Place the plant in the hole, ensuring the top of the root ball is level with the ground.
- Watering: Water thoroughly after planting and keep the soil consistently moist, but not waterlogged.
- Mulching: Apply a layer of organic mulch around the base of the plant to retain moisture and suppress weeds.
By following these planting guidelines, you can create an ideal environment for your hydrangeas to thrive.
11. Hydrangea Pest and Disease Management
Protecting your hydrangeas from pests and diseases is crucial for maintaining their health and beauty. Common issues include:
| Problem | Symptoms | Treatment |
|---|---|---|
| Aphids | Small, soft-bodied insects on new growth; sticky honeydew | Insecticidal soap, neem oil |
| Spider Mites | Fine webbing on leaves; leaves appear stippled | Horticultural oil, miticide |
| Powdery Mildew | White, powdery coating on leaves | Fungicidal spray, improve air circulation |
| Botrytis Blight | Brown spots on flowers and leaves; gray mold | Remove infected parts, improve air circulation, fungicidal spray |
| Leaf Spot | Dark spots on leaves | Fungicidal spray, remove infected leaves |
| Japanese Beetles | Metallic green beetles that skeletonize leaves | Handpick beetles, insecticidal soap |
| Scale Insects | Small, armored insects on stems and leaves | Horticultural oil, systemic insecticide |
| Hydrangea Virus | Mottled or discolored leaves, stunted growth | No cure; remove and destroy infected plants |
| Root Rot | Yellowing leaves, wilting, mushy roots | Improve drainage, replant in well-draining soil, use fungicide if necessary |
| Chlorosis | Yellow leaves with green veins, often due to high soil pH | Amend soil with sulfur or iron chelate |
| Bud Drop | Premature dropping of flower buds | Ensure consistent watering, protect from late frosts |
| Iron Deficiency | Yellowing between leaf veins, especially on newer growth | Apply chelated iron to the soil or as a foliar spray |
| Nitrogen Deficiency | Overall yellowing of leaves, especially older ones | Fertilize with a balanced fertilizer, such as 10-10-10 or an organic equivalent |
| Phosphorus Deficiency | Stunted growth, dark green leaves, reduced flowering | Apply a fertilizer high in phosphorus, such as bone meal or superphosphate |
| Potassium Deficiency | Yellowing or browning of leaf edges, weak stems | Apply a fertilizer high in potassium, such as potassium sulfate or wood ash |
Regular monitoring and prompt treatment can prevent serious damage and ensure your hydrangeas remain healthy and vibrant.
12. Hydrangea Winter Care Checklist
To ensure your hydrangeas survive the winter and thrive in the spring, follow this winter care checklist:
- Clean Up Debris: Remove fallen leaves and debris from around the base of the plant to prevent disease.
- Water Before Freeze: Water deeply before the ground freezes to ensure the plant is well-hydrated.
- Apply Winter Mulch: Add a layer of winter mulch, such as straw or pine needles, around the base of the plant for insulation.
- Protect from Wind: Shield the plant from strong winds with burlap or a windbreak.
- Monitor for Pests: Check the plant regularly for signs of pests and diseases.
- Prune (If Necessary): Prune only if necessary and at the right time of year for your specific hydrangea variety.
- Check Soil pH: Test the soil pH and amend if necessary to achieve desired bloom color.
- Fertilize (Lightly): Fertilize lightly with a slow-release fertilizer in late fall or early winter.
- Protect Buds: Wrap the plant with burlap or row cover to protect flower buds from freezing.
- Water During Thaws: Water the plant during warm spells to prevent dehydration.
By following this checklist, you can provide your hydrangeas with the care they need to survive the winter and thrive in the spring.
13. Troubleshooting Common Hydrangea Problems
Even with the best care, hydrangeas can sometimes encounter problems. Here are some common issues and their solutions:
| Problem | Symptoms | Solutions |
|---|---|---|
| No Blooms | Healthy foliage but no flowers | Check pruning practices, ensure adequate sunlight, test soil pH, fertilize with phosphorus-rich fertilizer |
| Small Blooms | Flowers are smaller than usual | Ensure adequate watering, fertilize regularly, prune lightly to encourage new growth |
| Wilting | Drooping leaves, even when the soil is moist | Check for root rot, ensure proper drainage, protect from intense sunlight |
| Yellowing Leaves | Leaves turn yellow, often with green veins | Check soil pH, apply chelated iron, ensure adequate nutrients |
| Brown Leaf Tips | Leaf tips turn brown and dry | Ensure adequate watering, protect from wind, check for salt buildup in the soil |
| Stunted Growth | Plant growth is slow or minimal | Check soil quality, ensure adequate nutrients, protect from pests and diseases |
| Leggy Growth | Plant has long, spindly stems with few leaves | Prune to encourage bushier growth, ensure adequate sunlight |
| Sunburn | Leaves develop scorched or bleached patches | Provide afternoon shade, ensure adequate watering, consider transplanting to a less sunny location |
| Poor Drainage | Waterlogged soil, yellowing leaves | Improve drainage by adding compost or perlite, consider transplanting to a raised bed or container |
| Alkaline Soil | Soil pH is too high, resulting in nutrient deficiencies | Amend soil with sulfur, peat moss, or acidifying fertilizer |
| Compacted Soil | Soil is dense and difficult for roots to penetrate | Aerate the soil, amend with compost or other organic matter |
| Excessive Shade | Plant does not receive enough sunlight, resulting in poor flowering | Transplant to a sunnier location, prune surrounding trees to allow more sunlight |
| Overwatering | Yellowing leaves, root rot | Reduce watering frequency, ensure proper drainage, use well-draining soil |
| Underwatering | Wilting leaves, dry soil | Water deeply and regularly, mulch to retain moisture |
| Pests (Aphids, Spider Mites) | Visible pests, leaf damage | Use insecticidal soap, neem oil, or other appropriate insecticide |
| Diseases (Powdery Mildew) | White powdery coating on leaves | Use fungicidal spray, improve air circulation |
| Winter Damage | Dead or damaged stems after winter | Prune damaged stems in spring, protect from wind and cold in winter |
| Fertilizer Burn | Brown leaf edges, wilting | Reduce fertilizer application, water deeply to flush out excess fertilizer |
| Nutrient Imbalance | Discolored leaves, stunted growth | Test soil and amend with appropriate nutrients |
| Incorrect Pruning | Removing flower buds, resulting in no blooms | Prune at the correct time of year for your hydrangea variety, avoid heavy pruning in the fall |
| Root Bound | Plant roots are circling the inside of the pot | Repot in a larger container, loosen roots before planting |
| Transplant Shock | Wilting leaves, slow growth after transplanting | Water deeply and regularly, protect from sun and wind, provide shade if necessary |
| Herbicide Damage | Distorted leaves, stunted growth | Avoid using herbicides near hydrangeas, use caution when applying herbicides |
| Road Salt Damage | Brown leaf edges, stunted growth | Protect from road salt, flush soil with water in spring |
| Chemical Sensitivity | Leaves develop spots or discoloration after exposure to chemicals | Avoid using chemicals near hydrangeas, test new products on a small area before applying to the entire plant |
| Wildlife Damage | Damaged leaves or stems due to deer, rabbits, or other animals | Protect with fencing, netting, or repellent |
| Improper Soil pH | Discolored leaves, poor growth | Test soil and amend with appropriate materials, such as lime for alkaline soil or sulfur for acidic soil |
| Poor Air Circulation | Increased risk of fungal diseases | Prune to improve air circulation, space plants properly |
| Lack of Hardening Off | Plant is not acclimated to outdoor conditions, resulting in damage after transplanting | Harden off plants gradually before transplanting, protect from extreme weather |
By addressing these issues promptly, you can keep your hydrangeas healthy and thriving.
14. Hydrangea Propagation Techniques
Propagating hydrangeas allows you to expand your collection and share these beautiful plants with friends and family. Here are some common propagation techniques:
| Technique | Description | Timing | Success Rate |
|---|---|---|---|
| Stem Cuttings | Taking cuttings from new growth in spring or summer | Spring or Summer | High |
| Layering | Bending a stem to the ground and covering it with soil until roots form | Spring or Fall | Moderate |
| Seed Propagation | Collecting and planting seeds from hydrangea flowers | Fall or Winter | Low |
| Division | Separating the root ball of a mature plant into multiple sections | Spring or Fall | Moderate |
| Root Cuttings | Taking cuttings from the roots of a plant in late winter | Late Winter | Low |
| Grafting | Joining two plants together to combine their best traits | Spring | Moderate |
| Budding | Inserting a bud from one plant onto the stem of another | Late Summer | Moderate |
| Air Layering | Girdling a stem and wrapping it with moist sphagnum moss until roots form | Spring or Summer | High |
| Hardwood Cuttings | Taking cuttings from dormant hardwood stems in late fall or winter | Late Fall or Winter | Moderate |
| Tissue Culture | Growing plants from small pieces of tissue in a sterile lab environment | Year-Round | High |
| Leaf Cuttings | Taking cuttings from leaves and placing them in a rooting medium | Spring or Summer | Low |
| Cane Cuttings | Taking cuttings from the previous year’s growth in late fall or early winter | Late Fall or Early Winter | Low |
| Water Propagation | Placing stem cuttings in water until roots develop | Spring or Summer | Moderate |
| Root Division | Dividing the root ball of a mature plant into multiple sections | Spring or Fall | Moderate |
| Separation | Separating offsets or suckers from the parent plant | Spring or Fall | High |
| Scooping | Removing small pieces of tissue from the stem and placing them in a rooting medium | Spring or Summer | Low |
| Chip Budding | Removing a chip of bark with a bud and inserting it onto the stem of another plant | Late Summer | Moderate |
| Whip Grafting | Joining two plants together by making long, sloping cuts and interlocking them | Spring | Moderate |
| Cleft Grafting | Splitting the stem of one plant and inserting a wedge-shaped scion from another plant | Spring | Moderate |
| Side Veneer Grafting | Removing a thin strip of bark from the side of the rootstock and attaching a scion | Spring | Moderate |
Each technique has its advantages and disadvantages, so choosing the one that best suits your skills and resources is essential.
15. Frequently Asked Questions (FAQs) about Hydrangea Fall Care
- Q: When should I stop watering my hydrangeas in the fall?
- A: Continue watering until the ground freezes. Hydrangeas need moisture to stay healthy throughout the winter.
- Q: Can I use coffee grounds to fertilize my hydrangeas?
- A: Yes, coffee grounds can be used to lower the soil pH, which is beneficial for blue-blooming hydrangeas.
- Q: How do I know if my hydrangea needs winter protection?
- A: If you live in USDA zone 5 or below, winter protection is recommended for mophead hydrangeas and other varieties that bloom on old wood.
- Q: What is the best way to protect hydrangeas from frost?
- A: Cover the plants with burlap or a frost blanket when frost is predicted.
- Q: Can I move my hydrangeas in the fall?
- A: Yes, fall is a good time to transplant hydrangeas, as it allows the roots to establish before winter.
- Q: How often should I fertilize my hydrangeas in the fall?
- A: Fertilize once in late September or October with a natural granular fertilizer.
- Q: Should I remove dead leaves from my hydrangeas in the fall?
- A: Yes, removing dead leaves helps prevent disease.
- Q: Can I compost hydrangea leaves?
- A: Yes, but avoid composting leaves with signs of disease.
- Q: How do I prepare my hydrangeas for winter in containers?
- A: Wrap the container with bubble wrap or move it to a protected location, such as a garage or shed.
- Q: What are the signs of winter damage on hydrangeas?
- A: Blackened or brittle stems, lack of new growth in spring, and failure to bloom are signs of winter damage.
16. Conclusion: Nurturing Hydrangeas for Year-Round Beauty
Caring for hydrangeas in the fall is an investment in their future health and beauty. By following these comprehensive tips, you can ensure your hydrangeas thrive and produce stunning blooms year after year. From understanding the importance of pruning and fertilization to protecting your plants from cold weather and deer, these essential practices will help you create a vibrant and healthy garden.
Ready to take your hydrangea care to the next level? Visit CARS.EDU.VN today to discover a wealth of expert advice, detailed guides, and personalized support. Our team of experienced horticulturalists is here to help you tackle any challenge and achieve the garden of your dreams. Contact us at 456 Auto Drive, Anytown, CA 90210, United States or Whatsapp: +1 555-123-4567. Let cars.edu.vn be your trusted partner in creating a beautiful and thriving landscape.