Is your car’s AC not as cold as it used to be? Are you noticing a strange hissing sound? It might be time to recharge your AC system. At CARS.EDU.VN, we understand the importance of a well-functioning AC, especially during those scorching summer months. This comprehensive guide will walk you through the process of recharging your car’s AC system, ensuring you stay cool and comfortable on the road. We’ll cover everything from identifying the need for a recharge to the step-by-step process, tools, and safety precautions.
1. Understanding Your Car’s AC System
Before diving into how to recharge AC system in car, let’s understand the basics of your car’s air conditioning system. The AC system works by circulating refrigerant, a special chemical compound, through a closed loop. This refrigerant absorbs heat from the cabin and releases it outside, creating a cooling effect. Over time, the refrigerant level can decrease due to small leaks, reducing the AC’s efficiency.
1.1 Key Components of the AC System
- Compressor: This is the heart of the system, responsible for compressing the refrigerant gas and circulating it throughout the AC loop.
- Condenser: Located in front of the radiator, the condenser cools the high-pressure refrigerant gas, turning it into a liquid.
- Evaporator: Situated inside the dashboard, the evaporator absorbs heat from the cabin air, turning the liquid refrigerant back into a gas.
- Expansion Valve (Orifice Tube): This component regulates the flow of refrigerant into the evaporator, controlling the cooling process.
- Refrigerant: The chemical compound that absorbs and releases heat, enabling the cooling process. R-134a is a common type, but newer vehicles may use R-1234yf.
- Receiver Drier (Accumulator): This component filters and stores the refrigerant, removing moisture and contaminants.
1.2 Identifying the Need for an AC Recharge
Several signs indicate that your car’s AC system may need a recharge:
- Reduced Cooling Performance: The most obvious sign is a decrease in the AC’s ability to cool the cabin. The air might not feel as cold as it used to, even on the highest setting.
- Hissing Noise: A hissing sound coming from the vents can indicate low refrigerant levels. This is the sound of the refrigerant gas expanding as it passes through the system.
- AC Compressor Clutch Not Engaging: If the AC compressor clutch isn’t engaging, the system might be low on refrigerant. A safety switch prevents the compressor from running when refrigerant levels are too low to prevent damage.
- Visible Leaks: Check for any signs of refrigerant leaks around the AC components, such as oily residue or staining.
- Inconsistent Cooling: The AC might cool intermittently, with periods of cold air followed by warm air.
- Age of the Vehicle: If your car is over 6-8 years old and you’ve never recharged the AC system, it’s likely due for a recharge. As seals and hoses age, they can develop small leaks, leading to refrigerant loss.
2. Safety First: Precautions Before You Begin
Working with refrigerants can be dangerous if proper precautions are not taken. Here’s what you need to know:
- Wear Safety Glasses: Refrigerant can cause serious eye damage. Always wear safety glasses or goggles to protect your eyes.
- Wear Gloves: Refrigerant can cause frostbite on contact with skin. Wear nitrile gloves to protect your hands.
- Work in a Well-Ventilated Area: Refrigerant is a gas and can displace oxygen. Work in a well-ventilated area to avoid breathing in too much refrigerant.
- Avoid Direct Contact with Refrigerant: If refrigerant comes into contact with your skin or eyes, flush the affected area with plenty of water and seek medical attention immediately.
- Follow Instructions Carefully: Read and follow the instructions provided with the AC recharge kit or equipment.
- Do Not Overcharge the System: Overcharging the AC system can damage the compressor and other components. Follow the manufacturer’s recommendations for refrigerant levels.
- Dispose of Refrigerant Properly: Do not release refrigerant into the atmosphere. It’s harmful to the environment. Take used refrigerant cans to a certified回收 center for proper disposal.
- Work with Caution: Proceed with caution. If you are not confident in your ability to perform the recharge safely, it’s best to seek professional help.
3. Gathering the Necessary Tools and Materials
Before you begin, make sure you have all the necessary tools and materials:
- AC Manifold Gauge Set: This tool is used to measure the pressure in the AC system and to charge the refrigerant.
- Refrigerant Can Tap: This device is used to pierce the refrigerant can and connect it to the manifold gauge set.
- Refrigerant Can: Make sure you have the correct type and amount of refrigerant for your vehicle. Check the owner’s manual or the sticker under the hood for the recommended refrigerant type.
- Probe Thermometer: A probe thermometer is used to measure the temperature of the air coming from the vents.
- Wrench Set: You may need a wrench to tighten the connections on the manifold gauge set and refrigerant can tap.
- Safety Glasses: Protect your eyes from refrigerant splashes.
- Nitrile Gloves: Protect your hands from frostbite.
- Rags: Use rags to wipe up any spills or leaks.
- Vehicle’s Owner’s Manual: Consult your owner’s manual for specific information about your car’s AC system.
You can find these tools at most auto parts stores or online retailers. At CARS.EDU.VN, we recommend purchasing high-quality tools to ensure accurate readings and safe operation.
4. Step-by-Step Guide: How to Recharge AC System in Car
Now that you’ve gathered the necessary tools and materials and taken the proper safety precautions, let’s move on to the step-by-step guide:
4.1. Preparing the Vehicle
- Park the Car in a Well-Ventilated Area: Ensure the car is parked in a space where there’s plenty of air circulation.
- Turn on the Engine: Start the engine and let it run.
- Set the AC to Maximum Cooling: Turn the AC on to the highest setting and set the temperature to the coldest setting.
- Open the Hood: Locate the hood release lever and open the hood.
4.2. Connecting the Manifold Gauge Set
- Identify the Low-Pressure (LP) and High-Pressure (HP) Ports: The LP port is typically located on the larger diameter pipe, while the HP port is on the smaller diameter pipe. The ports are usually labeled with an “L” or “H” or may have different sized openings.
- Remove the Dust Caps: Remove the dust caps from the LP and HP ports. Keep the caps in a safe place, as you’ll need them later.
- Connect the Blue Hose (LP) to the LP Port: Attach the blue hose from the manifold gauge set to the LP port. Make sure the connection is secure.
- Connect the Red Hose (HP) to the HP Port: Attach the red hose from the manifold gauge set to the HP port. Ensure the connection is tight.
The quick couplers are designed to prevent incorrect connections. The LP quick coupler has a smaller opening, while the HP one has a larger opening. One cannot fit the wrong fitting to the port
4.3. Reading the Initial Pressure
- Observe the Gauges: Once the hoses are connected, observe the readings on the gauges. The blue gauge shows the LP side pressure, and the red gauge shows the HP side pressure.
- Compare the Readings to the Ambient Temperature Chart: Consult a pressure-temperature chart for R-134a refrigerant to determine the correct pressure ranges for the current ambient temperature. This chart can typically be found online or in the AC recharge kit instructions.
- Interpreting the Readings:
- Low Pressure on Both Gauges: This indicates a low refrigerant level in the system.
- High Pressure on Both Gauges: This could indicate an overcharged system or a blockage in the system.
- Abnormal Pressure Differences: Significant differences between the LP and HP readings can indicate a problem with the compressor, expansion valve, or other components.
4.4. Charging the Refrigerant
- Attach the Refrigerant Can Tap to the Refrigerant Can: Screw the refrigerant can tap onto the top of the refrigerant can. Follow the instructions provided with the can tap.
- Connect the Yellow Hose to the Refrigerant Can Tap: Connect the yellow hose from the manifold gauge set to the refrigerant can tap.
- Purge the Air from the Yellow Hose: Loosen the yellow hose connection at the manifold gauge set slightly to allow any air to escape. Once refrigerant starts to come out, tighten the connection. This step is crucial to prevent air and moisture from entering the system.
- Open the Refrigerant Can Tap: Puncture the refrigerant can by turning the handle on the can tap.
- Slowly Open the LP Valve on the Manifold Gauge Set: Open the LP valve (blue) on the manifold gauge set slowly to allow refrigerant to flow into the system.
- Monitor the Pressure Gauges: Watch the pressure gauges as you charge the system. Refer to the pressure-temperature chart to determine the correct pressure range for the ambient temperature.
- Charge in Short Bursts: Charge the system in short bursts, allowing the pressure to stabilize between each burst. This prevents overcharging.
- Rock the Refrigerant Can: Gently rock the refrigerant can back and forth to help the refrigerant flow into the system.
- Close the LP Valve When the Correct Pressure is Reached: Once the LP gauge reaches the correct pressure, close the LP valve.
- Monitor the HP Gauge: Ensure that the HP gauge is also within the correct range. If it’s too high, there may be a blockage in the system.
4.5. Monitoring the Cooling Performance
- Insert the Probe Thermometer into the Vent: Place the probe thermometer into one of the AC vents inside the car.
- Monitor the Temperature: Observe the temperature reading on the thermometer. The air coming from the vents should be significantly colder than the ambient temperature.
- Adjust Charging as Needed: If the air is not cold enough, you may need to add a little more refrigerant. Continue charging in short bursts until the desired temperature is reached, always keeping an eye on the pressure gauges.
- Do Not Overcharge: Overcharging can damage the AC system.
4.6. Disconnecting the Manifold Gauge Set
- Close the Refrigerant Can Tap: Close the refrigerant can tap to stop the flow of refrigerant.
- Close the LP and HP Valves on the Manifold Gauge Set: Close both the LP (blue) and HP (red) valves on the manifold gauge set.
- Carefully Disconnect the Hoses: Disconnect the hoses from the LP and HP ports. Some refrigerant may escape during this process, so work quickly and carefully.
- Replace the Dust Caps: Replace the dust caps on the LP and HP ports.
- Dispose of the Refrigerant Can Properly: Take the empty refrigerant can to a certified recycling center for proper disposal.
4.7. Final Check
- Monitor Vent Temperature: Monitor the vent temperature to ensure the AC is cooling properly.
- Listen for Unusual Noises: Listen for any unusual noises coming from the AC system.
- Check for Leaks: Inspect the connections for any signs of refrigerant leaks.
5. Understanding Pressure Readings
Understanding the pressure readings on your AC manifold gauge set is crucial for a successful recharge. The pressure readings provide valuable information about the health and performance of your AC system.
5.1. Low-Pressure Side (LP)
The low-pressure side, measured by the blue gauge, indicates the pressure of the refrigerant as it enters the compressor. Typical readings for the LP side range from 25 to 45 psi, depending on the ambient temperature and the vehicle’s specifications.
- Low LP Reading: A low LP reading (below 25 psi) indicates a low refrigerant level in the system. This is a common reason for reduced cooling performance.
- High LP Reading: A high LP reading (above 45 psi) could indicate an overcharged system or a problem with the expansion valve.
5.2. High-Pressure Side (HP)
The high-pressure side, measured by the red gauge, indicates the pressure of the refrigerant as it leaves the compressor. Typical readings for the HP side range from 150 to 250 psi, depending on the ambient temperature and the vehicle’s specifications.
- Low HP Reading: A low HP reading (below 150 psi) could indicate a weak compressor or a low refrigerant level.
- High HP Reading: A high HP reading (above 250 psi) could indicate a blockage in the system or an overcharged system.
5.3. Interpreting Pressure Differences
The difference between the LP and HP readings can provide valuable insights into the health of your AC system.
- Small Difference: A small difference between the LP and HP readings could indicate a weak compressor or a low refrigerant level.
- Large Difference: A large difference between the LP and HP readings could indicate a blockage in the system or a problem with the expansion valve.
5.4. Ambient Temperature and Pressure
It’s important to consider the ambient temperature when interpreting pressure readings. The higher the ambient temperature, the higher the expected pressure readings. Consult a pressure-temperature chart for R-134a refrigerant to determine the correct pressure ranges for the current ambient temperature.
5.5. Pressure-Temperature Chart Example
| Ambient Temperature (°F) | LP Pressure (psi) | HP Pressure (psi) |
|---|---|---|
| 70 | 30-40 | 150-170 |
| 80 | 35-45 | 170-190 |
| 90 | 40-50 | 190-210 |
| 100 | 45-55 | 210-230 |
This chart provides a general guideline for pressure readings. Always consult your vehicle’s specifications for the most accurate information.
6. Troubleshooting Common Issues
Even with careful attention, you may encounter some issues during the AC recharge process. Here are some common problems and how to troubleshoot them:
- AC Not Cooling After Recharge:
- Possible Causes: Overcharging, undercharging, air in the system, blockage in the system, faulty compressor.
- Troubleshooting Steps:
- Check pressure readings to ensure they are within the correct range.
- Purge the system to remove any air.
- Inspect the system for blockages.
- Have the compressor tested by a professional.
- Gauges Not Reading Properly:
- Possible Causes: Faulty gauges, incorrect connections, blocked hoses.
- Troubleshooting Steps:
- Ensure the hoses are connected correctly to the LP and HP ports.
- Check the hoses for kinks or blockages.
- Try using a different set of gauges.
- Refrigerant Leaking from Connections:
- Possible Causes: Loose connections, damaged O-rings, faulty fittings.
- Troubleshooting Steps:
- Tighten the connections.
- Replace the O-rings.
- Inspect the fittings for damage.
- Compressor Not Engaging:
- Possible Causes: Low refrigerant level, faulty compressor clutch, electrical issues.
- Troubleshooting Steps:
- Ensure the refrigerant level is sufficient.
- Check the compressor clutch for proper operation.
- Have the electrical system inspected by a professional.
- Hissing Sound Continues After Recharge:
- Possible Causes: Small leak in the system.
- Troubleshooting Steps:
- Use a leak detector to locate the leak.
- Have the leak repaired by a professional.
- System Overcharged:
- Possible Causes: Adding too much refrigerant during the recharge process.
- Troubleshooting Steps:
- Carefully release some refrigerant from the system using the manifold gauge set until the pressure readings are within the correct range.
- Monitor the cooling performance to ensure it is optimal.
7. When to Seek Professional Help
While recharging your car’s AC system can be a DIY project, there are times when it’s best to seek professional help. Consider consulting a qualified mechanic if:
- You’re Not Comfortable Performing the Recharge: If you’re not confident in your ability to perform the recharge safely, it’s best to leave it to the professionals.
- You Suspect a Major Problem: If you suspect a major problem with your AC system, such as a faulty compressor or a significant leak, it’s best to have it diagnosed and repaired by a professional.
- You’ve Tried Recharging the System Multiple Times with No Success: If you’ve tried recharging the system multiple times and the AC still isn’t cooling properly, there’s likely an underlying issue that needs to be addressed by a professional.
- You Don’t Have the Necessary Tools: If you don’t have the necessary tools or equipment, it may be more cost-effective to have a professional perform the recharge.
- You’re Unsure About the Correct Refrigerant Type or Amount: Using the wrong refrigerant or overcharging the system can damage the AC components. If you’re unsure about the correct refrigerant type or amount, consult a professional.
- You Want to Ensure the Job is Done Right: A qualified mechanic can ensure that the recharge is performed correctly and that your AC system is functioning optimally.
8. Maintaining Your Car’s AC System for Optimal Performance
Once you’ve recharged your car’s AC system, it’s important to maintain it properly to ensure optimal performance and longevity. Here are some tips for maintaining your car’s AC system:
- Run the AC Regularly: Even during the cooler months, run the AC for a few minutes each week to keep the system lubricated and prevent the seals from drying out.
- Inspect the Condenser: Regularly inspect the condenser for debris, such as leaves, bugs, and dirt. Clean the condenser with a soft brush or a garden hose to ensure proper airflow.
- Replace the Cabin Air Filter: Replace the cabin air filter regularly to ensure that clean air is flowing through the AC system. A dirty cabin air filter can reduce airflow and cause the AC to work harder.
- Check the Refrigerant Level: Have the refrigerant level checked periodically by a qualified mechanic. Low refrigerant levels can lead to reduced cooling performance and damage to the compressor.
- Inspect the Belts and Hoses: Inspect the belts and hoses for cracks, leaks, and wear. Replace any damaged components promptly.
- Have the System Serviced Regularly: Have the AC system serviced regularly by a qualified mechanic. This includes checking the pressure, inspecting the components, and cleaning the system.
By following these maintenance tips, you can keep your car’s AC system running smoothly and efficiently for years to come.
9. Alternative Refrigerants: R-1234yf
While R-134a has been the standard refrigerant for many years, newer vehicles are increasingly using R-1234yf. This refrigerant has a lower global warming potential than R-134a, making it a more environmentally friendly option.
9.1. Key Differences Between R-134a and R-1234yf
- Global Warming Potential (GWP): R-1234yf has a GWP of less than 1, while R-134a has a GWP of 1430. This means that R-1234yf is significantly less harmful to the environment.
- Flammability: R-1234yf is mildly flammable, while R-134a is not flammable.
- Cost: R-1234yf is typically more expensive than R-134a.
- Equipment: Different equipment is required to service AC systems that use R-1234yf.
9.2. Servicing R-1234yf Systems
If your vehicle uses R-1234yf, it’s important to have it serviced by a qualified mechanic who has the necessary equipment and training. Attempting to recharge an R-1234yf system with R-134a can damage the system and create a safety hazard.
9.3. Identifying the Refrigerant Type
The refrigerant type is typically indicated on a sticker under the hood or in the owner’s manual. If you’re unsure about the refrigerant type, consult a qualified mechanic.
10. New Automotive Technologies and Their Impact on AC Systems
The automotive industry is constantly evolving, with new technologies being introduced all the time. These technologies can have a significant impact on AC systems.
10.1. Electric Vehicles (EVs) and Hybrid Vehicles
Electric vehicles (EVs) and hybrid vehicles have unique AC system requirements.
- Electric Compressors: EVs and hybrids typically use electric compressors, which are powered by the vehicle’s battery. These compressors can operate independently of the engine, providing cooling even when the vehicle is stopped.
- Heat Pumps: Some EVs and hybrids use heat pumps, which can provide both heating and cooling. Heat pumps are more energy-efficient than traditional AC systems.
- Refrigerant Management: EVs and hybrids often have more sophisticated refrigerant management systems to optimize energy efficiency.
10.2. Advanced Driver-Assistance Systems (ADAS)
Advanced driver-assistance systems (ADAS), such as lane departure warning and automatic emergency braking, rely on sensors and cameras that can be affected by temperature and humidity. The AC system plays a role in maintaining a stable environment for these sensors.
10.3. Connected Car Technologies
Connected car technologies, such as remote start and climate control, allow drivers to control the AC system remotely. This can improve comfort and convenience.
10.4. Impact on AC System Maintenance
These new technologies can impact AC system maintenance. For example, EVs and hybrids may require specialized tools and training to service their AC systems.
11. Tips for Finding Reliable Car AC Service
Finding reliable car AC service can be challenging, but here are some tips to help you find a trustworthy mechanic:
- Ask for Recommendations: Ask friends, family, and colleagues for recommendations.
- Check Online Reviews: Read online reviews on sites like Google, Yelp, and Facebook.
- Look for Certifications: Look for mechanics who are certified by organizations like ASE (Automotive Service Excellence).
- Get Multiple Quotes: Get quotes from multiple mechanics before choosing one.
- Ask About Warranties: Ask about warranties on parts and labor.
- Check the Shop’s Reputation: Visit the shop and check its reputation. Is it clean, organized, and well-equipped?
- Communicate Clearly: Communicate your concerns clearly to the mechanic and ask questions.
- Trust Your Gut: If something doesn’t feel right, trust your gut and find another mechanic.
12. How CARS.EDU.VN Can Help You
At CARS.EDU.VN, we’re dedicated to providing you with the information and resources you need to keep your car running smoothly. We offer a wide range of articles, guides, and tutorials on car maintenance and repair, including detailed information on AC systems.
12.1. In-Depth Articles and Guides
We provide in-depth articles and guides on various aspects of car AC systems, including:
- AC System Components and Functions
- Troubleshooting Common AC Problems
- Refrigerant Types and Compatibility
- AC System Maintenance Tips
- Finding Reliable AC Service
12.2. Step-by-Step Tutorials
We offer step-by-step tutorials on how to perform common AC maintenance tasks, such as:
- Recharging the AC System
- Replacing the Cabin Air Filter
- Cleaning the Condenser
12.3. Expert Advice
Our team of experienced automotive experts is available to answer your questions and provide personalized advice.
12.4. Connecting You with Trusted Service Providers
We can connect you with trusted service providers in your area who specialize in car AC repair.
13. The Future of Car AC Systems
The future of car AC systems is likely to be shaped by several factors, including:
- Stricter Environmental Regulations: Stricter environmental regulations will drive the development of more environmentally friendly refrigerants and AC systems.
- Increasing Adoption of Electric Vehicles: The increasing adoption of electric vehicles will lead to the development of more efficient and sophisticated electric compressors and heat pumps.
- Advancements in Sensor Technology: Advancements in sensor technology will enable more precise control of AC systems, optimizing comfort and energy efficiency.
- Integration with Smart Car Technologies: AC systems will become increasingly integrated with smart car technologies, allowing for remote control and personalized climate settings.
14. FAQ About How to Charge AC System in Car
Here are some frequently asked questions about recharging your car’s AC system:
-
How often should I recharge my car’s AC system?
- It depends on several factors, such as the age of the vehicle, the climate, and how often you use the AC. As a general rule, it’s a good idea to have the AC system checked every year or two and recharged if necessary.
-
Can I use any refrigerant to recharge my car’s AC system?
- No. It’s important to use the correct refrigerant type for your vehicle. Check the owner’s manual or the sticker under the hood for the recommended refrigerant type. Using the wrong refrigerant can damage the system.
-
Is it safe to recharge my car’s AC system myself?
- Yes, it can be safe to recharge your car’s AC system yourself if you follow the instructions carefully and take the proper safety precautions. However, if you’re not comfortable performing the recharge, it’s best to seek professional help.
-
How much does it cost to recharge a car’s AC system?
- The cost to recharge a car’s AC system can vary depending on the refrigerant type, the amount of refrigerant needed, and whether you do it yourself or have it done by a professional. A DIY recharge kit typically costs between $30 and $50, while professional recharge can cost between $150 and $300.
-
What are the symptoms of an overcharged AC system?
- Symptoms of an overcharged AC system can include reduced cooling performance, high pressure readings on the gauges, and unusual noises coming from the compressor.
-
What are the symptoms of an undercharged AC system?
- Symptoms of an undercharged AC system can include reduced cooling performance, low pressure readings on the gauges, and the compressor not engaging.
-
Can I add too much refrigerant to my car’s AC system?
- Yes, you can add too much refrigerant to your car’s AC system. Overcharging the system can damage the compressor and other components.
-
What should I do if I accidentally release refrigerant into the atmosphere?
- Releasing refrigerant into the atmosphere is harmful to the environment. If you accidentally release refrigerant, try to contain it as much as possible and ventilate the area. Dispose of the refrigerant can properly.
-
How can I find a leak in my car’s AC system?
- Leaks can be difficult to find. A qualified mechanic can use a leak detector to locate leaks.
-
Can a dirty cabin air filter affect my car’s AC performance?
- Yes, a dirty cabin air filter can reduce airflow and cause the AC to work harder, reducing its performance.
15. Real-World Examples and Case Studies
To illustrate the importance of proper AC maintenance and recharge, let’s consider some real-world examples and case studies:
15.1. Case Study 1: The Neglected AC System
John, a busy professional, neglected his car’s AC system for several years. He noticed that the AC wasn’t cooling as well as it used to, but he didn’t take any action. Eventually, the compressor failed, resulting in a costly repair.
- Lesson Learned: Regular AC maintenance can prevent costly repairs.
15.2. Case Study 2: The DIY Recharge Gone Wrong
Sarah decided to recharge her car’s AC system herself to save money. However, she didn’t follow the instructions carefully and overcharged the system. This damaged the compressor and required a professional repair.
- Lesson Learned: Follow instructions carefully and take safety precautions when performing DIY repairs.
15.3. Example 1: The Importance of Refrigerant Type
Mark accidentally used the wrong refrigerant to recharge his car’s AC system. This caused the system to malfunction and required a complete overhaul.
- Lesson Learned: Always use the correct refrigerant type for your vehicle.
15.4. Example 2: The Value of Regular Maintenance
Lisa had her car’s AC system serviced regularly by a qualified mechanic. This helped to prevent major problems and kept the system running smoothly for years.
- Lesson Learned: Regular maintenance can extend the life of your AC system.
16. Keeping Up with the Latest Automotive News and Technology
Staying informed about the latest automotive news and technology is crucial for making informed decisions about your car. Here are some of the latest developments in the automotive industry:
16.1. New Vehicle Models
Several new vehicle models have been released recently, including:
| Make | Model | Key Features |
|---|---|---|
| Toyota | Grand Highlander | Spacious three-row SUV with hybrid option. |
| Honda | CR-V | Redesigned compact SUV with improved fuel economy and safety features. |
| Ford | Mustang Mach-E | All-electric SUV with sporty performance and long range. |
| BMW | i5 | All-electric sedan with luxurious interior and advanced technology. |
| Kia | EV9 | All-electric three-row SUV with fast charging and innovative design. |
16.2. Advanced Technologies
Advanced technologies being introduced include:
- Improved Battery Technology: New battery technology is increasing the range and reducing the charging time of electric vehicles.
- Advanced Driver-Assistance Systems (ADAS): ADAS features, such as lane keeping assist and adaptive cruise control, are becoming more common.
- Over-the-Air (OTA) Updates: Over-the-air (OTA) updates allow manufacturers to update vehicle software remotely, improving performance and adding new features.
16.3. Industry Trends
Key industry trends include:
- Electrification: The automotive industry is shifting towards electrification, with more and more electric vehicles being introduced.
- Autonomous Driving: Autonomous driving technology is being developed and tested, with the goal of creating self-driving cars.
- Connectivity: Cars are becoming increasingly connected, with features such as integrated navigation, entertainment, and remote control.
17. Contact CARS.EDU.VN Today
Don’t let a malfunctioning AC system ruin your driving experience. At CARS.EDU.VN, we’re here to help you keep your car running smoothly and comfortably. Visit our website to learn more about car AC systems and find trusted service providers in your area.
For more information or assistance, please contact us:
- Address: 456 Auto Drive, Anytown, CA 90210, United States
- WhatsApp: +1 555-123-4567
- Website: CARS.EDU.VN
We’re committed to providing you with the information and resources you need to make informed decisions about your car. Let cars.edu.vn be your trusted source for all things automotive. Explore more insightful articles and expert advice on our website today!
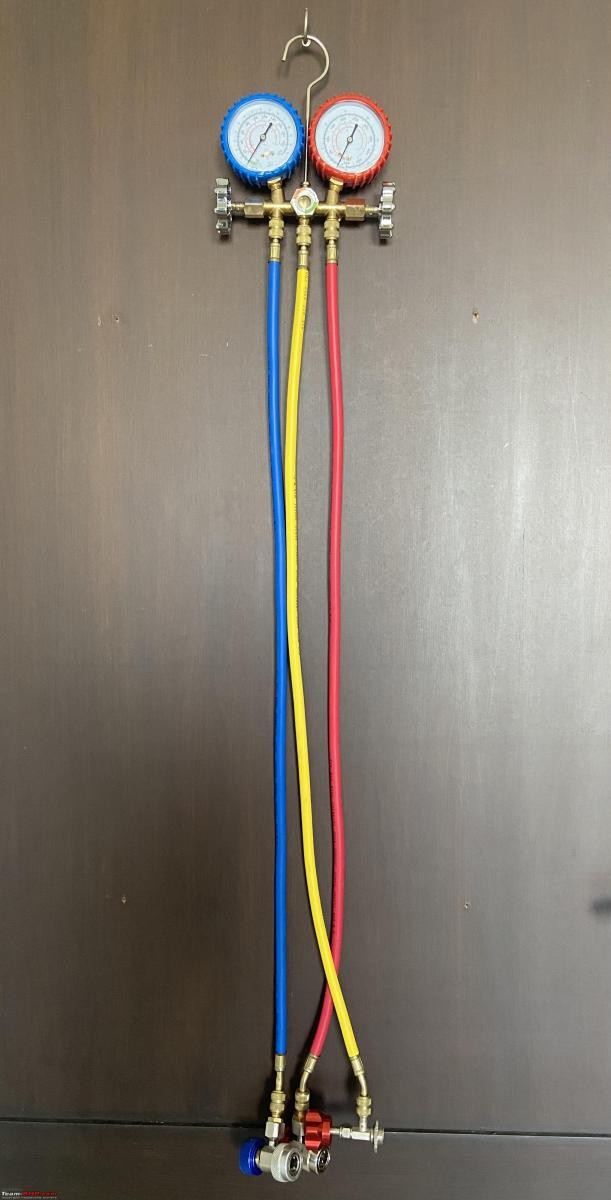 AC Manifold Gauge Set
This AC manifold gauge set is essential for measuring pressure and recharging your car’s AC system.
A probe thermometer accurately measures the temperature of the air coming from your car’s AC vents, helping you determine the effectiveness of the recharge.
A refrigerant can, typically filled with R-134a, is crucial for replenishing the AC system and restoring its cooling capacity.
This sticker, usually found in the engine bay, provides essential information about the type and quantity of refrigerant your vehicle requires.
A closer look at the AC manifold gauge set reveals the detailed pressure gauges used to monitor the system during the recharge process.
The gauge glass on the AC manifold allows you to visually monitor the flow of refrigerant as you charge the system.
Color-coded hoses, blue for low pressure and red for high pressure, ensure you connect the AC manifold correctly for safe and efficient recharging.
The threaded Schrader valves on the ends of the AC hoses prevent gas from escaping when connecting to the system.
Quick coupler fittings, color-coded blue and red, ensure a secure and leak-proof connection to the car’s AC ports for accurate pressure readings and efficient recharging.
The different sized openings of the AC ports and quick couplers prevent incorrect connections