Is your car battery draining faster than usual? Learn How To Check Your Alternator In Your Car with CARS.EDU.VN using a multimeter. This comprehensive guide covers the process step-by-step, ensuring you can identify alternator issues early and keep your vehicle running smoothly. Discover vital tips for alternator testing, voltage checks, and electrical system diagnostics.
1. What is an Alternator and Why is it Important?
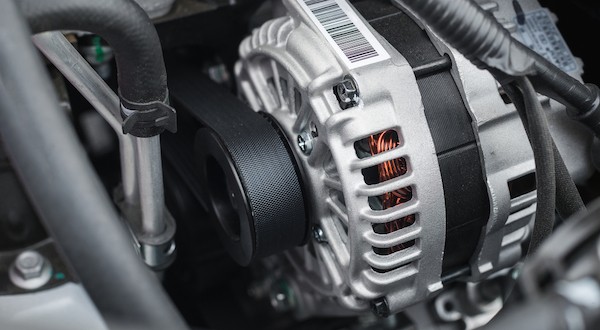
An alternator, or synchronous generator, is the powerhouse of your car’s electrical system. It converts mechanical energy from the engine into electrical energy, supplying power to components such as lights, radio, and air conditioning while simultaneously charging the battery. Think of it as a mini power plant under the hood, ensuring everything runs smoothly.
An alternator works by:
- Rotor Excitation: A magnetic field is created by passing DC current through the rotor coils. This rotor is connected to the engine.
- Electromagnetic Induction: The spinning rotor induces an alternating current (AC) in the stationary armature coils.
2. Recognizing the Signs of a Failing Alternator
Ignoring a faulty alternator can leave you stranded. Be alert for these common symptoms:
- Dimming Headlights: If your headlights appear weaker than usual, especially at idle, it could be an alternator issue.
- Battery Light On: The dashboard battery light illuminating while driving is a strong indicator.
- Slow Engine Cranking: Difficulty starting your car suggests the battery isn’t receiving adequate charge.
- Unusual Noises: Whining or grinding sounds coming from the engine area can indicate worn alternator bearings.
- Electrical Issues: Problems with power windows, radio, or other electrical components can stem from an underperforming alternator.
- Stalling: A failing alternator may not provide enough power to keep the engine running.
- Burning Smell: Overheated components inside the alternator can produce a distinct burning odor.
3. Essential Tools for Alternator Testing
To check your alternator effectively, you’ll need the right tools:
- Multimeter: A digital multimeter is your primary tool for measuring voltage and continuity. A quality multimeter is essential for accurate readings.
- Safety Glasses: Protect your eyes from potential sparks or debris.
- Gloves: Insulated gloves will protect you from electrical shock.
- Wrench Set: You might need wrenches to disconnect the battery or access the alternator.
- Jumper Cables (Optional): Useful for jump-starting the car if the battery is weak.
- Battery Charger (Optional): For charging a depleted battery before testing.
- Car Manual: Consult your car’s manual for specific alternator location and voltage information.
4. Understanding Car Battery Voltage and Alternator Output
A healthy car battery typically has a resting voltage between 12.4 and 12.6 volts. When the engine is running, the alternator should output between 13.5 and 14.5 volts to charge the battery and power the car’s electrical systems. This higher voltage ensures the battery is replenished.
5. Step-by-Step Guide: How to Check Your Alternator with a Multimeter
These steps will help you diagnose your alternator’s performance accurately.
5.1. Safety First: Preparing for the Test
- Park Safely: Park your car on a level surface in a well-ventilated area.
- Engage Parking Brake: Ensure the parking brake is firmly engaged.
- Turn Off Engine: Turn off the engine and remove the keys from the ignition.
- Wear Safety Gear: Put on safety glasses and gloves.
5.2. Checking Battery Voltage Before Starting the Car
- Set Multimeter: Turn on your multimeter and set it to DC voltage mode (V–) in the 20V range.
- Connect Probes: Connect the red (positive) probe to the positive (+) terminal of the battery and the black (negative) probe to the negative (-) terminal.
- Read Voltage: Note the voltage reading on the multimeter display. A fully charged battery should read between 12.4 and 12.6 volts.
- Interpret Results: If the voltage is below 12.4 volts, charge the battery before proceeding.
5.3. Testing Alternator Output While the Engine is Running
-
Start the Car: Start the engine and let it idle.
-
Recheck Voltage: With the engine running, reconnect the multimeter probes to the battery terminals.
-
Read Voltage: Observe the voltage reading. It should now be between 13.5 and 14.5 volts. This indicates the alternator is charging the battery.
-
Interpret Results:
- Below 13.5V: The alternator may not be producing enough power.
- Above 14.5V: The alternator may be overcharging, which can damage the battery.
5.4. Loading the Electrical System: Stress Test
This test assesses the alternator’s ability to maintain voltage under load.
- Turn on Accessories: With the engine running, turn on the headlights, radio, air conditioning, and other electrical accessories.
- Monitor Voltage Drop: Observe the voltage reading on the multimeter. The voltage should not drop below 13 volts with all accessories on.
- Interpret Results: If the voltage drops significantly below 13 volts, the alternator is struggling to keep up with the electrical demand.
5.5. Direct Alternator Voltage Check
For a more precise reading, check the voltage directly at the alternator.
- Locate Alternator: Find the alternator in your engine compartment (consult your car’s manual if needed).
- Set Multimeter: Set your multimeter to DC voltage mode (20V range).
- Connect Probes: Connect the red probe to the alternator’s output terminal (usually a large red wire) and the black probe to a good ground point on the engine block.
- Read Voltage: Observe the voltage reading with the engine running. It should be between 13.5 and 14.5 volts.
5.6. Checking for AC Voltage Leakage (Advanced Test)
This test identifies if the alternator’s diodes are failing, which can cause AC voltage to leak into the DC system.
- Set Multimeter: Set your multimeter to AC voltage mode (20V range).
- Connect Probes: Connect the red probe to the battery’s positive terminal and the black probe to the negative terminal.
- Read Voltage: Observe the AC voltage reading. A healthy alternator should have very little AC voltage leakage (typically less than 0.5 volts AC).
- Interpret Results: A high AC voltage reading indicates a faulty diode in the alternator.
6. Common Causes of Alternator Failure
Understanding the reasons behind alternator failure can help prevent future issues.
- Worn Brushes: Alternator brushes wear down over time, reducing their ability to make contact and conduct electricity.
- Faulty Diodes: Diodes convert AC voltage to DC voltage. When they fail, they can cause AC voltage leakage and reduce alternator output.
- Bad Voltage Regulator: The voltage regulator controls the alternator’s output voltage. A faulty regulator can cause overcharging or undercharging.
- Loose or Corroded Connections: Loose wiring or corroded terminals can restrict current flow and cause the alternator to fail.
- Overheating: Excessive heat can damage the alternator’s internal components.
- Physical Damage: Impacts or debris can physically damage the alternator.
- Worn Bearings: Worn alternator bearings can cause noise and eventually lead to alternator failure.
7. When to Replace Your Alternator
If any of these conditions are met, consider replacing your alternator:
- Failed Voltage Tests: If the alternator consistently fails the voltage tests described above.
- High AC Voltage Leakage: Excessive AC voltage leakage indicates a failing diode.
- Visible Damage: If the alternator has visible damage, such as cracks, dents, or burnt wiring.
- Loud Noises: Excessive whining or grinding noises indicate internal damage.
- Age and Mileage: If your alternator is over 5-7 years old or has over 100,000 miles, it may be nearing the end of its lifespan.
8. Choosing a Replacement Alternator: Key Considerations
Selecting the right replacement alternator ensures optimal performance and longevity.
- OEM vs. Aftermarket: Original Equipment Manufacturer (OEM) alternators are made by the vehicle manufacturer and offer guaranteed compatibility. Aftermarket alternators are made by third-party companies and can be more affordable, but ensure they meet or exceed OEM specifications.
- Amperage Rating: Choose an alternator with the same amperage rating as the original. A higher amperage rating may be beneficial if you have added electrical accessories, but consult a professional.
- New vs. Remanufactured: New alternators are brand new and offer the longest lifespan. Remanufactured alternators have been rebuilt with new or refurbished components and are typically more affordable.
- Warranty: Look for an alternator with a good warranty to protect against defects.
- Reputation: Research the brand and read reviews to ensure you are buying a quality product.
9. Step-by-Step Guide: Replacing Your Alternator
Replacing an alternator can be a DIY project for experienced car owners. However, if you’re not comfortable working on your car’s electrical system, it’s best to consult a professional mechanic.
- Disconnect Battery: Disconnect the negative battery cable to prevent electrical shock.
- Remove Belt: Loosen the tensioner pulley and remove the serpentine belt from the alternator pulley.
- Disconnect Wiring: Disconnect the electrical connectors and the main power wire from the alternator.
- Remove Alternator: Unbolt the alternator from its mounting bracket and carefully remove it from the engine compartment.
- Install New Alternator: Install the new alternator in the reverse order of removal.
- Reconnect Wiring: Reconnect the electrical connectors and the main power wire.
- Reinstall Belt: Reinstall the serpentine belt and tighten the tensioner pulley.
- Reconnect Battery: Reconnect the negative battery cable.
- Start Car: Start the engine and check that the alternator is charging properly (13.5-14.5 volts).
10. Tips for Maintaining Your Alternator and Extending Its Lifespan
Proper maintenance can significantly extend your alternator’s lifespan.
- Keep Connections Clean: Regularly clean the battery terminals and alternator connections to prevent corrosion.
- Check Belt Tension: Ensure the serpentine belt is properly tensioned. A loose belt can cause the alternator to work harder and overheat.
- Avoid Overloading Electrical System: Avoid running too many electrical accessories at the same time, especially for extended periods.
- Address Issues Promptly: If you notice any signs of alternator problems, address them promptly to prevent further damage.
- Regular Inspections: Have your car’s electrical system inspected regularly by a qualified mechanic.
11. Advanced Diagnostic Techniques for Alternator Problems
These techniques require specialized equipment and knowledge and are best left to professionals.
- Oscilloscope Testing: An oscilloscope can be used to analyze the alternator’s waveform and identify issues with diodes or the voltage regulator.
- Load Testing: A load tester applies a controlled load to the alternator to measure its output under stress.
- Circuit Testing: A circuit tester can be used to identify shorts or open circuits in the alternator wiring.
12. Common Mistakes to Avoid When Testing or Replacing an Alternator
- Not Disconnecting the Battery: Always disconnect the battery before working on the electrical system to prevent shorts.
- Using the Wrong Tools: Using the wrong tools can damage the alternator or other components.
- Over-Tightening Bolts: Over-tightening bolts can strip the threads or damage the alternator housing.
- Ignoring Warning Signs: Ignoring warning signs of alternator problems can lead to more serious damage.
- Not Consulting a Professional: If you’re not comfortable working on your car’s electrical system, consult a professional mechanic.
13. Understanding the Role of the Voltage Regulator
The voltage regulator is a crucial component of the alternator, responsible for maintaining a constant output voltage. It prevents overcharging and undercharging, protecting the battery and electrical components.
- Function: The voltage regulator monitors the battery voltage and adjusts the alternator’s output accordingly.
- Types: Voltage regulators can be internal (built into the alternator) or external (mounted separately).
- Symptoms of Failure: A faulty voltage regulator can cause overcharging (high voltage) or undercharging (low voltage), leading to battery problems.
14. What to Do If Your Car Won’t Start Due to Alternator Issues
If your car won’t start and you suspect an alternator problem, here are some steps you can take:
- Jump Start: Try jump-starting the car using jumper cables and another vehicle. If the car starts and runs, it’s likely the alternator is not charging the battery.
- Check Connections: Inspect the battery terminals and alternator connections for corrosion or looseness.
- Test Battery: Have the battery tested at an auto parts store to rule out a dead battery.
- Consult a Mechanic: If the car still won’t start, consult a professional mechanic for further diagnosis and repair.
15. The Impact of a Failing Alternator on Other Car Systems
A failing alternator can have a ripple effect, impacting other systems in your car.
- Battery: An underperforming alternator can lead to a drained battery, shortening its lifespan.
- Electrical Components: Insufficient power can cause dimming headlights, malfunctioning power windows, and other electrical issues.
- Engine Performance: A failing alternator can cause the engine to stall or run poorly.
- Safety Systems: Some safety systems, such as anti-lock brakes (ABS) and electronic stability control (ESC), rely on a stable power supply and may be affected by alternator problems.
16. Alternator Testing vs. Battery Testing: Understanding the Difference
It’s crucial to differentiate between alternator and battery problems.
- Battery Testing: A battery test checks the battery’s ability to hold a charge and deliver current. It’s performed with the engine off.
- Alternator Testing: An alternator test checks the alternator’s ability to generate voltage and charge the battery while the engine is running.
17. Using a Clamp Meter to Check Alternator Current Output
A clamp meter is a specialized tool that measures current flow without disconnecting any wires. It can be used to check the alternator’s current output.
- Set Meter: Set the clamp meter to measure DC current.
- Clamp Around Wire: Clamp the meter around the alternator’s output wire (the large red wire).
- Read Current: Start the engine and observe the current reading. The reading should be within the alternator’s specifications.
18. How Temperature Affects Alternator Performance
Extreme temperatures can affect alternator performance.
- Heat: High temperatures can cause the alternator to overheat and reduce its output.
- Cold: Cold temperatures can increase the alternator’s workload, as it needs to provide more power to start the engine and run the heater.
19. The Role of CARS.EDU.VN in Automotive Education and Maintenance
At CARS.EDU.VN, we are dedicated to empowering car owners with the knowledge and resources they need to maintain their vehicles. Our comprehensive guides, expert advice, and step-by-step tutorials cover a wide range of automotive topics, from alternator testing to advanced diagnostics. We strive to provide accurate, reliable, and easy-to-understand information that helps you keep your car running smoothly and safely.
20. Benefits of Regular Automotive Maintenance
Regular automotive maintenance is essential for keeping your car in top condition and preventing costly repairs.
- Improved Reliability: Regular maintenance can help identify and address potential problems before they become major issues.
- Extended Lifespan: Proper maintenance can extend the lifespan of your car and its components.
- Increased Safety: Regular inspections can help ensure that your car’s safety systems are functioning properly.
- Better Fuel Economy: A well-maintained car typically gets better fuel economy.
- Higher Resale Value: A car with a good maintenance record typically has a higher resale value.
21. New Automotive Technologies and Their Impact on Alternators
New automotive technologies, such as hybrid and electric vehicles, are changing the role of alternators.
- Hybrid Vehicles: Hybrid vehicles use a combination of an internal combustion engine and an electric motor. The alternator is still used to charge the battery, but it may also be used to generate electricity for the electric motor.
- Electric Vehicles: Electric vehicles do not have an alternator. Instead, they use a high-voltage battery pack to power the electric motor and other electrical components.
22. How to Find a Reliable Mechanic for Alternator Repair
Finding a reliable mechanic is crucial for alternator repair.
- Ask for Recommendations: Ask friends, family, and colleagues for recommendations.
- Read Online Reviews: Check online reviews on sites like Google, Yelp, and Angie’s List.
- Check for Certifications: Look for mechanics who are certified by the National Institute for Automotive Service Excellence (ASE).
- Get Estimates: Get estimates from several mechanics before choosing one.
- Ask Questions: Ask the mechanic questions about their experience and qualifications.
23. The Importance of Using Quality Parts for Alternator Replacement
Using quality parts for alternator replacement is essential for ensuring optimal performance and longevity.
- OEM vs. Aftermarket: As mentioned earlier, OEM parts are made by the vehicle manufacturer and offer guaranteed compatibility. Aftermarket parts can be more affordable, but ensure they meet or exceed OEM specifications.
- Warranty: Look for parts with a good warranty to protect against defects.
- Reputation: Research the brand and read reviews to ensure you are buying a quality product.
24. How to Prepare Your Car for an Alternator Replacement
Preparing your car for an alternator replacement can help ensure a smooth and efficient repair.
- Gather Tools and Parts: Gather all the necessary tools and parts before starting the repair.
- Review Instructions: Review the repair instructions carefully.
- Disconnect Battery: Disconnect the battery before starting the repair.
- Protect Surfaces: Protect the surrounding surfaces from damage.
- Take Pictures: Take pictures of the wiring and connections before disconnecting them.
25. Step-by-Step Guide: Cleaning Alternator Connections
Cleaning alternator connections can improve performance and prevent corrosion.
- Disconnect Battery: Disconnect the negative battery cable.
- Locate Connections: Locate the alternator connections.
- Clean Terminals: Clean the terminals with a wire brush or sandpaper.
- Apply Dielectric Grease: Apply a thin layer of dielectric grease to the terminals.
- Reconnect Connections: Reconnect the connections.
- Reconnect Battery: Reconnect the negative battery cable.
26. The Future of Alternator Technology in Automotive Engineering
The future of alternator technology is evolving with the rise of electric and hybrid vehicles.
- Integrated Starter-Generators (ISG): ISGs combine the functions of a starter and an alternator into a single unit.
- Belt-Driven Starter-Generators (BSG): BSGs are similar to ISGs but are driven by the serpentine belt.
- Regenerative Braking: Regenerative braking systems capture energy during braking and use it to charge the battery.
27. Understanding Alternator Pulleys and Their Function
Alternator pulleys play a crucial role in transferring power from the engine to the alternator.
- Function: The alternator pulley is driven by the serpentine belt and transmits the engine’s rotational force to the alternator.
- Types: Alternator pulleys can be solid or clutched.
- Clutched Pulleys: Clutched pulleys allow the alternator to spin freely when the engine decelerates, reducing stress on the serpentine belt and improving fuel economy.
28. How to Test Alternator Diodes with a Multimeter
Testing alternator diodes can help identify a faulty alternator.
- Disconnect Alternator: Disconnect the alternator from the vehicle.
- Set Multimeter: Set the multimeter to diode test mode.
- Test Diodes: Touch the red probe to the anode of the diode and the black probe to the cathode. The multimeter should display a voltage reading (typically around 0.5-0.7 volts). Reverse the probes. The multimeter should display an open circuit (OL).
- Interpret Results: If the diode shows a voltage reading in both directions or an open circuit in both directions, it is faulty and needs to be replaced.
29. The Benefits of Using Synthetic Oil in Your Car’s Engine
Using synthetic oil in your car’s engine can indirectly benefit the alternator.
- Reduced Engine Wear: Synthetic oil provides better lubrication and reduces engine wear, which can help extend the life of the alternator.
- Improved Fuel Economy: Synthetic oil can improve fuel economy, which can reduce the alternator’s workload.
- Better Heat Resistance: Synthetic oil is more resistant to heat than conventional oil, which can help keep the engine running cooler.
30. How CARS.EDU.VN Can Help You Troubleshoot Common Car Problems
CARS.EDU.VN is your go-to resource for troubleshooting common car problems. Our comprehensive guides, expert advice, and step-by-step tutorials cover a wide range of automotive topics, from alternator testing to advanced diagnostics. We provide the information you need to keep your car running smoothly and safely. Visit our website at CARS.EDU.VN to explore our vast library of automotive resources.
Remember, CARS.EDU.VN is here to support you with detailed guides and expert advice, making car maintenance less daunting.
For any automotive inquiries or service needs, reach out to us:
- Address: 456 Auto Drive, Anytown, CA 90210, United States
- WhatsApp: +1 555-123-4567
- Website: cars.edu.vn
FAQ: Checking Your Alternator
1. How do I test to see if my alternator is bad?
Use a multimeter to check the voltage at the battery while the engine is running. It should be between 13.5 and 14.5 volts. Also, check for dimming headlights or a battery light on the dashboard.
2. What voltage should an alternator test at?
An alternator should test between 13.5 and 14.5 volts while the engine is running.
3. Can a bad alternator drain my battery overnight?
Yes, a bad diode in the alternator can cause a parasitic drain, depleting the battery overnight.
4. How long does an alternator typically last?
An alternator typically lasts between 5 and 7 years or 80,000 to 150,000 miles.
5. Is it safe to drive with a failing alternator?
It’s not recommended. A failing alternator can cause the car to stall, and electrical components may fail, posing safety risks.
6. What are the signs of an overcharging alternator?
Signs include a boiling battery, excessively bright headlights, and electrical component failures.
7. Can I test my alternator with a car battery charger?
A car battery charger can’t directly test the alternator, but you can use it to charge the battery before performing a voltage test on the alternator.
8. How does temperature affect alternator performance?
Extreme heat can reduce alternator output, while cold temperatures can increase the alternator’s workload.
9. What is the role of the voltage regulator in the alternator?
The voltage regulator maintains a constant output voltage, preventing overcharging and undercharging.
10. How much does it typically cost to replace an alternator?
The cost can vary, but typically ranges from $300 to $800, including parts and labor.