Keeping your car clean, both inside and out, is more than just about appearances. Regular car cleaning is crucial for protecting your vehicle’s paint, preventing rust, and maintaining its overall value. Environmental pollutants, road salt, bug splatter, and everyday grime can all take a toll on your car’s exterior, while the interior can accumulate dirt, dust, and spills, leading to unpleasant odors and wear and tear. Knowing How To Clean A Car effectively will not only make your vehicle look its best but also contribute to its longevity.
This comprehensive guide will walk you through the essential steps and techniques for achieving a professional-level car clean at home. We’ll cover everything from gathering the right supplies to mastering the best washing and detailing methods for both the exterior and interior of your car.
Gathering Your Car Cleaning Supplies
Before you begin, assembling the right tools and products is essential for an efficient and effective car cleaning process. Using the correct materials will not only make the job easier but also prevent damage to your car’s surfaces. Here’s a checklist of what you’ll need:
- Two Buckets: Essential for the two-bucket wash method (more on this later).
- Car Wash Soap: Specifically formulated for car paint, unlike dish soap which can strip away wax and damage the finish.
- Wash Mitt or Sponge: Microfiber wash mitts are gentler on paint than sponges and trap dirt effectively.
- Wheel Cleaner: Formulated to remove brake dust and grime from wheels and tires. Choose a cleaner appropriate for your wheel type (alloy, chrome, etc.).
- Tire Brush and Wheel Brush: Different brushes for tires and wheels to effectively scrub away dirt.
- Microfiber Drying Towels: Soft and absorbent, these towels minimize the risk of scratches and water spots.
- Glass Cleaner: For streak-free windows and mirrors.
- Interior Cleaner: For cleaning dashboards, consoles, and door panels. Choose an all-purpose cleaner or specialized cleaners for different materials (plastic, vinyl, leather).
- Upholstery Cleaner (if needed): For fabric seats and carpets.
- Leather Cleaner and Conditioner (if you have leather seats): To clean and moisturize leather and prevent cracking.
- Vacuum Cleaner with Attachments: For removing dirt and debris from the car’s interior.
- Detailing Brushes: Small brushes for cleaning vents, crevices, and hard-to-reach areas.
- Optional but Recommended:
- Grit Guards: Place in the bottom of your buckets to trap dirt and prevent it from being reintroduced to your wash mitt.
- Clay Bar: For removing embedded contaminants from the paint surface.
- Wax or Sealant: To protect the paint and add shine after washing.
- Headlight Restoration Kit: For cleaning foggy or yellowed headlights.
- Bug and Tar Remover: For stubborn bug splatter and tar stains.
Having these supplies ready will streamline your car cleaning process and ensure you achieve the best results.
Step-by-Step Guide to Exterior Car Cleaning
Cleaning your car’s exterior involves several steps, starting with the wheels and tires and moving upwards to the body, headlights, and grill. Following a systematic approach ensures a thorough clean and prevents dirt from being transferred back onto already cleaned areas.
Washing Wheels and Tires
Wheels and tires are often the dirtiest parts of your car, accumulating brake dust, road grime, and dirt. Cleaning them first prevents dirty water from splashing onto your freshly washed car body.
- Rinse the Wheels and Tires: Use a hose to rinse off loose dirt and debris from each wheel and tire.
- Apply Wheel Cleaner: Spray wheel cleaner liberally onto the wheels and tires, following the product instructions. Allow it to dwell for the recommended time to loosen grime.
- Scrub the Wheels: Use a wheel brush to scrub the wheel surfaces, paying attention to the lug nuts and intricate areas. For the inner wheel barrels, a long-handled wheel brush is helpful.
- Scrub the Tires: Use a stiff tire brush to scrub the tire sidewalls, removing dirt and tire blooming (brown discoloration).
- Rinse Thoroughly: Rinse each wheel and tire thoroughly with water, ensuring all cleaner and loosened dirt are removed.
- Dry the Wheels and Tires: Use a dedicated microfiber drying towel to dry each wheel and tire. This prevents water spots and leaves a clean finish. Applying tire shine at this stage is optional but enhances the appearance.
Washing the Car Body: The Two-Bucket Method
The two-bucket wash method is a crucial technique for minimizing swirl marks and scratches during the car wash process. It involves using one bucket for soapy water and another for rinsing your wash mitt.
- Park in the Shade: Avoid washing your car in direct sunlight, as this can cause soap and water to dry too quickly, leading to water spots.
- Pre-Rinse the Car: Hose down the entire car to remove loose dirt and debris. This prevents scratching the paint during the washing stage.
- Prepare the Two Buckets: Fill one bucket with car wash soap and water according to the soap manufacturer’s instructions (the wash bucket). Fill the second bucket with clean water only (the rinse bucket). Place grit guards in both buckets if you have them.
- Start Washing from the Top: Dip your clean wash mitt into the soap bucket, ensuring it’s fully saturated. Begin washing the car from the top (roof, hood, and windows), working your way downwards in sections. Use straight, overlapping strokes rather than circular motions to minimize swirl marks.
- Rinse the Mitt Frequently: After washing a section, rinse your wash mitt thoroughly in the rinse bucket to remove dirt and grit. Rub the mitt against the grit guard (if using) to release trapped particles. Wring out excess water.
- Reload Soap and Continue: Re-dip your clean mitt into the soap bucket and continue washing the next section. Repeat the rinse process after each section.
- Rinse the Car Thoroughly: Once you’ve washed the entire car, rinse it thoroughly with a hose, starting from the top and working your way down. Ensure all soap residue is removed.
- Dry the Car Immediately: Use clean microfiber drying towels to dry the car. Start from the top and work downwards, using a blotting or patting motion rather than dragging the towel to prevent scratches. Dry door jambs, trunk jambs, and hood jambs as well.
Alt text: Hand polishing a car’s surface to a high shine after washing and waxing.
Cleaning Headlights and Grills
Headlights and grills are prone to becoming dirty and dull. Headlights can become foggy or yellowed over time due to UV exposure, reducing light output. Grills accumulate bugs and road grime.
Headlights:
- Inspect Headlights: Check if your headlights are simply dirty or if they are foggy/yellowed. For simple dirt, washing with car soap and water may suffice.
- DIY Cleaning for Foggy Headlights (Optional): For mild fogging, you can try DIY methods like using toothpaste or baking soda paste (as mentioned in the original article). However, these are often temporary fixes.
- Headlight Restoration Kits (Recommended): For more effective and longer-lasting results, use a headlight restoration kit. These kits typically include sanding pads, polishing compounds, and sealants to remove the hazy outer layer and restore clarity. Follow the kit instructions carefully.
- Professional Headlight Restoration: For severely yellowed or damaged headlights, professional restoration services offer the most reliable solution.
Grills:
- Bug Removal: For bug-splattered grills, use bug remover spray or soak dryer sheets in warm water and gently wipe away bugs. WD-40 can also be effective for stubborn bug residue (use sparingly and avoid overspray on paint).
- Cleaning Grill Slats: Use detailing brushes or foam brushes to clean between grill slats and remove dirt and grime.
- Rinse and Dry: Rinse the grill area with water and dry with a microfiber towel.
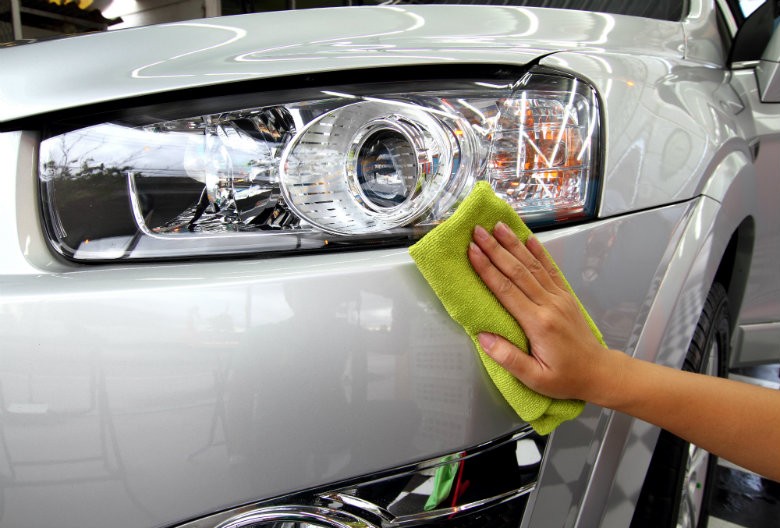
Alt text: Close-up of a restored car headlight showing clarity and cleanliness after a detailing process.
Step-by-Step Guide to Interior Car Cleaning
Cleaning your car’s interior creates a more pleasant driving environment and helps maintain the interior materials. Interior cleaning typically involves vacuuming, cleaning surfaces, and conditioning leather if applicable.
- Remove Loose Items and Trash: Start by removing all loose items, trash, and personal belongings from the car. This makes vacuuming and cleaning easier.
- Vacuum the Interior Thoroughly: Vacuum the entire interior, including carpets, floor mats, seats (crevices and under seats), dashboard, console, door panels, and trunk. Use attachments to reach tight spaces and corners. A crevice tool is helpful for seat seams and edges.
- Clean Floor Mats: Remove floor mats and shake them out to remove loose dirt. For carpeted mats, vacuum them thoroughly. For rubber or plastic mats, wash them with soap and water and scrub with a brush if needed. Allow them to dry completely before placing them back in the car.
- Clean Interior Surfaces:
- Dashboard, Console, and Door Panels: Use an interior cleaner and a microfiber cloth to wipe down these surfaces. For dusty areas like air vents, use a detailing brush or foam brush to loosen dust before wiping.
- Windows and Mirrors: Use a glass cleaner and a clean microfiber cloth to clean interior windows and mirrors. Spray the cleaner onto the cloth, not directly onto the glass, to prevent overspray.
- Steering Wheel and Gear Shift: Clean these high-touch areas with an interior cleaner or leather cleaner (if leather-wrapped).
- Clean Seats:
- Fabric Seats: For fabric seats, use an upholstery cleaner and follow the product instructions. You may need to spray the cleaner, agitate with a brush, and then blot with a clean cloth. For stain removal, address stains as quickly as possible.
- Leather Seats: For leather seats, use a leather cleaner to gently clean the surface. Follow with a leather conditioner to moisturize the leather and prevent cracking. Apply conditioner with a clean cloth and allow it to absorb.
Alt text: Man vacuuming the interior of a car, focusing on cleaning car seats to remove dust and crumbs.
- Detail Nooks and Crannies: Use detailing brushes, cotton swabs, or compressed air to clean hard-to-reach areas like air vents, trim lines, and around buttons and controls.
- Organize and Replace Items: Once the interior is clean, organize your belongings and replace essential items in the car. Consider using car organizers to keep things tidy.
Pro Tips for a Spotless Car
- Wash Your Car Regularly: Regular washing, ideally every two weeks, prevents dirt and grime buildup and makes cleaning easier.
- Address Spills and Stains Immediately: Clean up spills and stains as soon as they happen to prevent them from setting in and becoming harder to remove.
- Use Quality Products: Invest in quality car wash soaps, cleaners, and waxes designed for automotive use.
- Dry Properly to Avoid Water Spots: Always dry your car thoroughly after washing to prevent water spots.
- Wax Your Car Periodically: Waxing protects the paint, adds shine, and makes future cleaning easier. Wax every 2-3 months, or as needed.
- Protect Your Interior from Sun Damage: Use a windshield sunshade to protect your dashboard, seats, and steering wheel from sun damage.
- Consider Professional Detailing: For a truly deep clean and professional finish, consider professional car detailing services periodically.
Conclusion
Knowing how to clean a car properly is an essential skill for any car owner. By following these step-by-step guides for both exterior and interior cleaning, and using the right techniques and products, you can maintain your car’s appearance, protect its value, and enjoy a cleaner, more pleasant driving experience. Regular car cleaning is not just about aesthetics; it’s an investment in your vehicle’s longevity and your own driving satisfaction.