The interior of your car is your personal space on the road, and while most drivers are diligent about vacuuming floors and wiping down dashboards, the ceiling, or headliner, often gets overlooked. However, your car’s ceiling is constantly exposed to dust, airborne pollutants, and even stains from accidental spills or greasy fingerprints. A clean car ceiling not only enhances the overall appearance of your vehicle but also contributes to a fresher and healthier in-cabin environment. Cleaning it might seem daunting, but with the right approach, it’s a straightforward task that can significantly improve your car’s interior. This guide will walk you through the steps on How To Clean The Car Ceiling effectively and safely, ensuring a spotless finish without damaging delicate materials.
Understanding Your Car Ceiling (Headliner)
Before you begin cleaning, it’s important to understand what you’re dealing with. The car ceiling, technically known as the headliner, isn’t just a simple piece of fabric. It’s a layered component typically consisting of fabric stretched and glued to a molded, hard backing board that conforms to the shape of your car’s roof. This adhesive bond is crucial to consider because harsh cleaning methods or excessive moisture can weaken the glue, causing the fabric to sag or detach – a problem that often requires professional and costly replacement of the entire headliner.
Another critical aspect to be mindful of is the presence of electrical components housed within or attached to the ceiling. Many vehicles have interior lights, sunroof controls, and even sensors integrated into the headliner. It’s vital to avoid direct contact with these areas and minimize moisture exposure to prevent electrical damage. Being aware of these construction details will help you approach the cleaning process with the necessary caution and care.
Simple Steps for Cleaning Your Car Ceiling
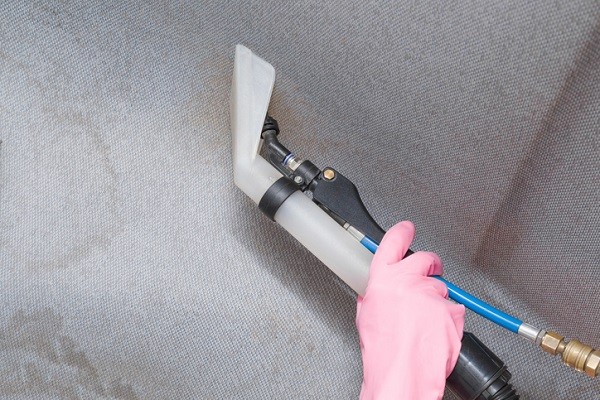
For routine cleaning and light stains, a simple approach is often the most effective and safest way to clean car headliner. Here’s a step-by-step method you can follow:
Gathering Your Supplies
To start, you’ll need to gather a few essential items:
- Microfiber cloths: These are gentle on the fabric and effective at trapping dust and dirt.
- Upholstery cleaner: Choose a cleaner specifically designed for car interiors or upholstery. Ensure it’s suitable for the material of your headliner by testing it in an inconspicuous area first.
- Soft-bristled brush (optional): For more stubborn dirt or stains, a soft brush can be helpful.
- Vacuum cleaner with a soft brush attachment: To remove loose dirt and debris before wet cleaning.
Initial Dry Cleaning
Begin by using a vacuum cleaner with a soft brush attachment to gently remove loose dirt, dust, and any debris from the car ceiling. Work in sections, moving the brush attachment lightly across the surface. If you don’t have a vacuum with an attachment, a dry microfiber cloth can also be used to gently wipe down the ceiling. Always rub in the direction of the fabric’s grain to avoid causing any damage or unwanted texture changes. This initial dry cleaning step is crucial as it removes surface dirt, making the wet cleaning stage more effective.
Wet Cleaning with Upholstery Cleaner
Once you’ve removed the loose dirt, it’s time to tackle any stains or embedded grime using an upholstery cleaner. Spray the cleaner onto a clean microfiber cloth – avoid spraying directly onto the car ceiling to control the amount of moisture applied. Gently dab or blot the stained areas, working from the outside of the stain inwards to prevent it from spreading. After blotting the stain, use a separate clean, slightly damp microfiber cloth to gently wipe the area and remove any cleaner residue. Allow the ceiling to air dry completely. Open your car doors and windows to improve ventilation and speed up the drying process.
Tackling Stubborn Stains on Your Car Ceiling
Sometimes, simple cleaning methods aren’t enough, especially when dealing with stubborn stains like grease or oil, which are common culprits in car interiors. For these tougher challenges, you might need to step up your cleaning game. Here are a couple of effective techniques for dealing with stubborn stains and how to clean stubborn car ceiling stains:
Grease Stains: Vinegar and Water Solution
Grease stains can be particularly tricky to remove from car upholstery. A proven home remedy involves a mixture of vinegar and water. Create a solution using equal parts white vinegar and water. Dampen a clean microfiber cloth with this mixture and gently blot the grease stain. Vinegar is a natural degreaser and can effectively break down the oily components of grease stains without damaging the fabric or the adhesive underneath. After treating the stain, use a clean, damp cloth to wipe the area and remove any vinegar residue. Allow the area to dry thoroughly.
Deep Cleaning for Persistent Stains (Use with Caution)
For extremely stubborn stains that resist milder methods, a professional-grade upholstery cleaner or a dedicated car interior cleaning solution might be necessary. These are often more potent and should be used with caution to avoid damaging the headliner material or weakening the adhesive. When using a stronger cleaner, always test it in an inconspicuous area first to ensure it doesn’t cause discoloration or damage. Apply the cleaner sparingly to a microfiber cloth and gently work on the stain. Avoid oversaturating the fabric and always follow the product’s instructions carefully. For deep cleaning, some people consider using a fabric steamer on a very low setting, but this method carries a higher risk of damaging the adhesive and should only be attempted with extreme caution and preferably by someone with experience.
Drying and Final Inspection
After cleaning, it’s crucial to ensure the car ceiling is completely dry to prevent mold or mildew growth. Leave your car doors and windows open for several hours, ideally in a well-ventilated area or under sunlight, to facilitate air circulation and drying. You can also use a car fan to direct airflow inside the cabin to speed up the drying process.
Once the ceiling is dry, inspect your work. Check for any remaining stains and repeat the cleaning process if necessary. A thoroughly cleaned car ceiling will not only look much better but also contribute to a fresher and more pleasant driving environment. Regularly cleaning your car ceiling, even with just a dry cloth or vacuuming, can prevent the buildup of dirt and make future cleaning tasks easier. By following these steps on how to clean car ceiling, you can maintain a pristine and inviting car interior.