Science projects can be a rollercoaster, right? One minute you’re feeling confident, and the next you’re knee-deep in online tutorials trying to figure out 8th-grade physics! Last week, just like many parents out there, I found myself on a mousetrap car mission with my twins. Their science assignment: construct a mousetrap car capable of traveling over 4 meters. We dove headfirst into the challenge, sketching designs, tweaking them with teacher input, and then dedicated a weekend to building. The kids were in charge, but I was there to offer guidance, navigating a sea of YouTube videos and Instructables pages alongside them. By Sunday night, we had our first prototype ready. Excitement quickly turned to frustration when it just spun in circles! Hoping for some expert advice, they took their creation in for evaluation.
Disappointed but not defeated, we took a day to regroup before tackling the project again. This time, armed with a teacher’s suggestion for larger wheels and a renewed determination, we started fresh. We ditched the juice and milk bottle caps we initially used (in an attempt to be eco-friendly) and invested in some blank CDs. The result? Success! Our redesigned car zoomed over 4 meters on its first test run and then impressively hit the 6-meter mark, crashing into the front door for good measure. Below, I’m sharing our journey – the trials, errors, and ultimately, what worked to create a mousetrap car that really performs.
Now, I’m no science guru, just a parent who navigated this project alongside my kids. Consider this guide a collection of practical tips from our experience. If you’re a seasoned mousetrap car builder or science teacher, your insights are welcome! Share your tips and successful project links in the comments – let’s make this a collaborative resource for all parents and students embarking on this fun science challenge.
Key Factors for a Successful Mousetrap Car
Before we dive into the construction, let’s address some common pitfalls and essential tips for building a good mousetrap car. Learning from our initial mistakes is crucial!
Common Mistakes to Avoid
- Don’t prioritize lightness over stability: A super light car might seem faster, but it’s prone to flipping or losing traction. Adding some weight, like extra wood or washers, provides stability and helps keep the car moving in a straight line.
- Avoid short car designs: Length matters! A longer car frame paired with a longer lever arm translates to increased travel distance. The lever arm’s length directly impacts how much string you can pull and how long the force is applied to the wheels.
- Bottle cap wheels are unreliable: We learned this the hard way. Bottle caps, whether from juice or milk jugs, just didn’t provide consistent performance. Even with electrical tape for better grip, they proved ineffective. The reasons are unclear – possibly inconsistent shape or material – but they hindered our car’s movement significantly.
Let’s break down the winning formula – the changes we implemented in our second design that led to a mousetrap car traveling straight and exceeding 6 meters.
Essential Supplies for Your Mousetrap Car
Gathering the right materials is the first step towards a successful build. Here’s what you’ll need:
- Standard Mousetrap: The power source of your car.
- Wood Rectangle (Plywood Recommended): This will serve as the chassis or base of your car. Plywood is a good choice for its strength and ease of cutting.
- Popsicle Sticks: Versatile for reinforcement, lever arm extensions, and decorative elements.
- Wood Dowel Rods (1/4″ width): These will act as your axles. You can use one long rod to cut or several pre-cut shorter ones.
- Hot Glue: Your primary adhesive. Don’t underestimate the amount you’ll need!
- Washers: Essential for securing wheels to axles and reducing friction. Choose washers with holes that fit snugly onto your dowel rods.
- Cord or Rope: To transmit the mousetrap’s power to the axle and propel the car forward.
- Eye Screw: To attach the string to the lever arm of the mousetrap.
- Straws: Crucial for creating low-friction axle housings. We used specific straws (link below) that fit perfectly over the dowel rods, allowing for smooth wheel rotation.
- Electrical Tape: For securing components and potentially adding grip to wheels if needed (though CDs worked well without extra grip in our case).
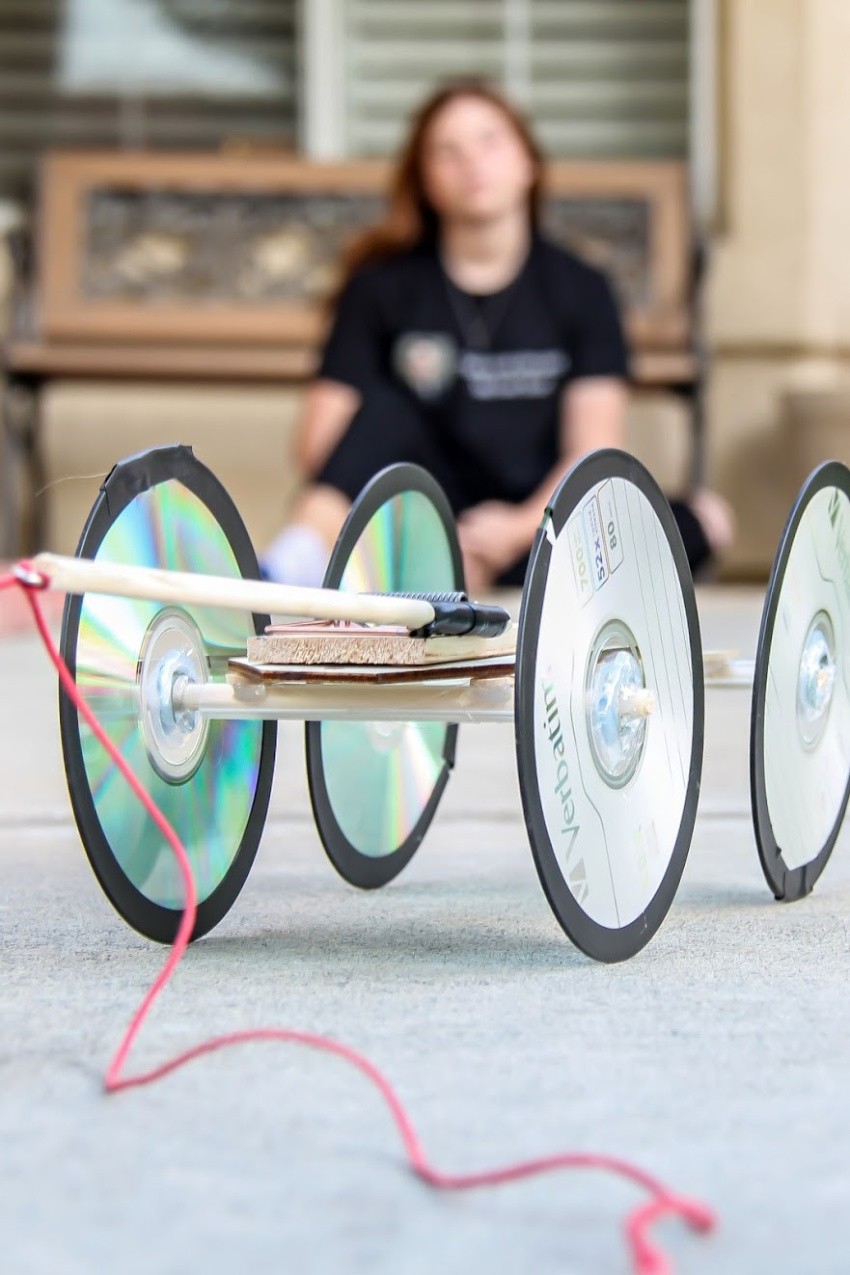
- CDs or DVDs: Our winning wheel choice! They are lightweight, uniformly round, and provide a good diameter for distance.
Step-by-Step Instructions to Build Your Mousetrap Car
Follow these instructions to assemble your own high-performing mousetrap car. Refer to the video below for a visual guide. The images following the video provide close-ups of the car’s top and underside for detailed assembly reference.
A mousetrap car built with CD wheels ready for action.
One of the biggest challenges we faced was ensuring smooth axle rotation, particularly for the rear wheels. Our initial attempt with juice box straws and skewers felt flimsy. When the teacher suggested larger wheels, we realized we needed to scale up the entire axle system. That’s when inspiration struck, right at our dining table! Our rotating tray, usually holding napkins and honey sticks, also contained Milk Magic straws. These straws turned out to be the perfect diameter to house our dowel rod axles, providing a sturdy and smooth housing for rotation. Sometimes, the best solutions are right in front of you!
Watch this video to see our mousetrap car in action. It was so fast, I had to cut the video short to avoid a collision! But you can clearly see it traveling well over 6 meters.
[Video Placeholder – Insert Video Link Here]
Pin this guide for future reference and share it with fellow science project enthusiasts!