Creating a car drawing might seem daunting, but with this easy-to-follow guide, you’ll be sketching your own vehicles in no time! This step-by-step tutorial is perfect for kids and beginners of all ages who want to learn how to draw a car simply and have fun doing it.
Cars are everywhere in our daily lives, and while you might think drawing them would be straightforward, capturing all the elements like wheels, lights, bumpers, and doors can be tricky. Getting them to come together to form a recognizable car shape is the real challenge.
In this tutorial, we break down the process, showing you how to use basic shapes to gradually build up a complete and charming cartoon car design. By following these simple steps, you’ll learn the fundamentals of car drawing.
After mastering the basic sketch, you can unleash your creativity! Add details like vibrant colors, car emblems, and even a background to place your car in a scene. No matter your current drawing skills, by the end of this guide, you’ll have a solid understanding of how to create your very own car drawing.
Step-by-Step Guide: How to Draw a Car Easily
Let’s get started and learn how to draw a car in easy steps!
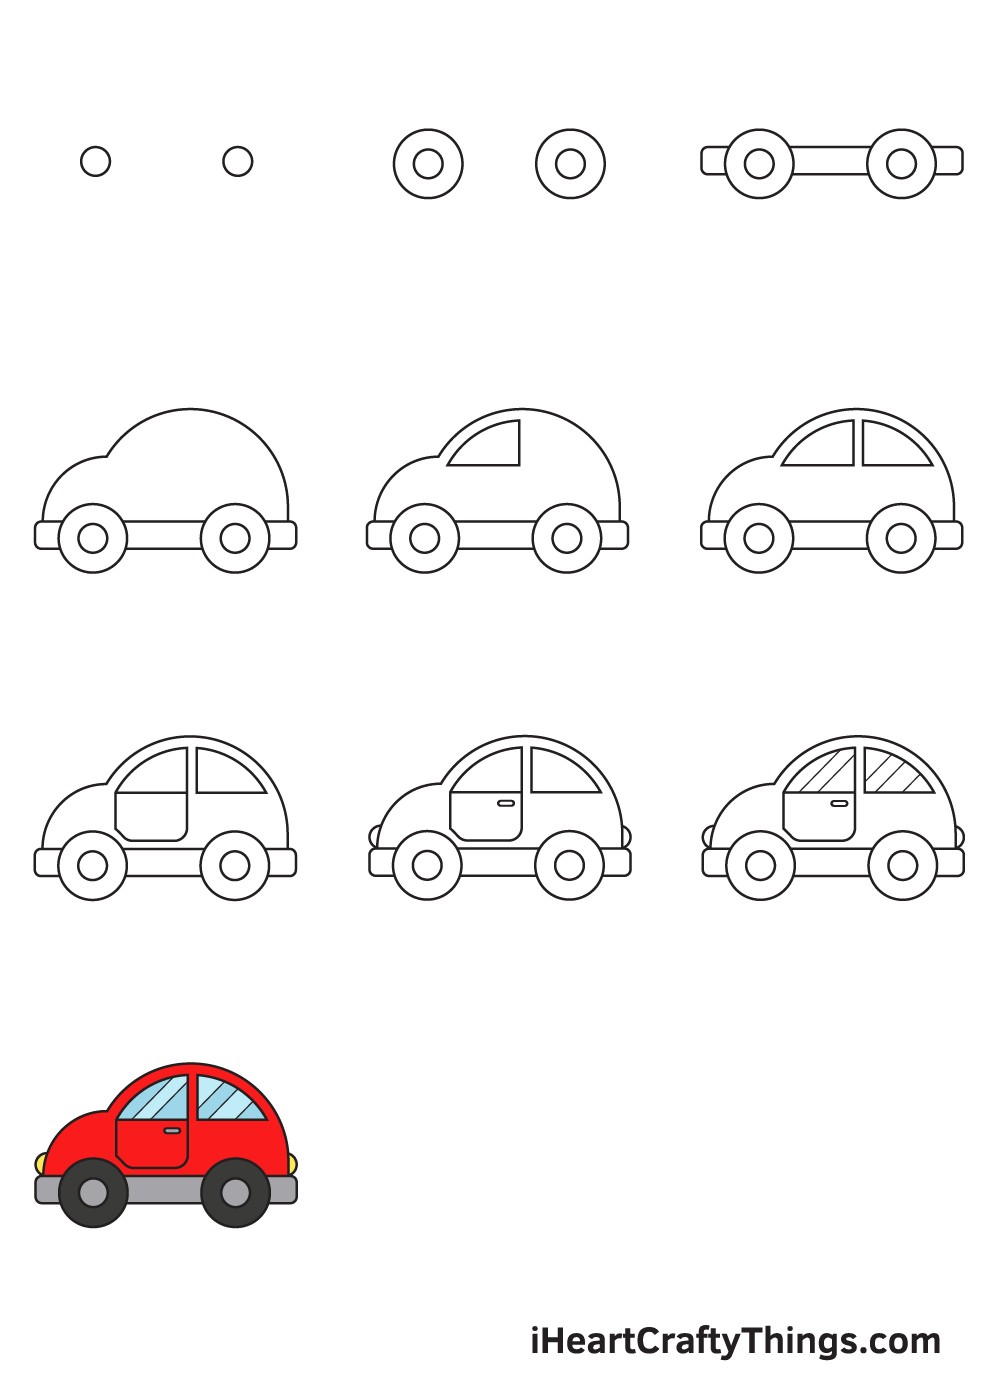
Step 1: Draw the Inner Wheel Outlines
Begin by drawing two small circles on the lower part of your paper. These circles will form the inner outlines of your car’s wheels.
Don’t worry about making perfect circles freehand! If you prefer, you can use a compass or any circular object to help you draw flawless circles quickly and easily for your car sketch.
Step 2: Draw the Outer Wheels of the Car
Next, draw two larger circles around the smaller circles you drew in the previous step. These outer circles will complete the wheels of your car.
Once you’ve finished drawing these circle shapes, you should have what looks like a pair of car wheels, as shown in the illustration. Position the wheels about an inch apart on your drawing surface.
Step 3: Connect the Wheels with the Car Bumper
Now, draw a long, narrow rectangular shape connecting the tops of both wheels. This rectangle will serve as the car’s bumper and the base of the car body, so make it as long as you want your car to be.
Step 4: Outline the Car Body Shape
Right above the bumper, start to structure the outline of the car’s body. Draw a downward curved line starting from the front of the bumper, curving upwards to create the hood and then continuing to curve downwards again to form the roof of the car, extending all the way to the rear end of the bumper.
This body outline consists of two main downward curved lines: a smaller curve for the hood flowing into a larger curve to define the roof of the car.
Step 5: Sketch the Front Door Window
On the left side of the roofline, draw a curved line that follows the existing curve of the roof. Then, connect the ends of this curved line with a vertical line to create a 90-degree angle, forming the frame of the front door window.
Step 6: Add the Rear Door Window
Repeat the previous step on the other side of the car to create the rear door window. Aim for symmetrical car windows that are in proportion to each other. The front window should be slightly larger than the rear window for a realistic car window design.
Step 7: Outline the Front Car Door
Create the front car door by drawing a square-like shape with gently curved corners right underneath the front window. Ensure that the front window and the front door are aligned vertically and appear balanced in your car drawing.
Step 8: Draw the Headlights and Taillights
Now it’s time to add details to your car drawing to make it look more complete and realistic.
Start by drawing half-circle shapes on both the front and rear ends of the car to represent the headlight and taillight. Position these lights just above the bumper of the car on each end. You can also add a small rectangle for a door handle.
Step 9: Add Reflection Patterns to the Car Windows
Car windows typically reflect light, creating visible diagonal patterns. Draw multiple parallel diagonal lines on each car window to give the illusion of “reflection” on the glass surfaces.
With the basic car drawing complete, it’s time for the most exciting part—coloring your awesome car drawing! Go ahead and pick your favorite colors to make your car vibrant and colorful!
Cars come in a huge variety of designs and colors. If you have a favorite color, there’s very likely a car out there in that shade!
This gives you endless color options to choose from when coloring your car.
Easy Tips for Drawing Cars
Drawing cars can be challenging, but these tips will help make your car drawing experience smoother and more enjoyable!
Learning how to draw a car can seem intimidating, even for experienced artists! However, with the right approach and a few helpful tips, it becomes much easier.
1. Use Reference Photos: Looking at reference pictures is incredibly helpful. Search for photos of cars online or look at real cars around you. Observing different car models and styles will not only make drawing this specific car easier but will also help you draw different types of cars in the future. Reference images are great for understanding proportions and details like wheels and side mirrors.
2. Start with Light Pencil Sketches: The key to making car drawing easy is to start with light pencil lines for all the initial steps, even for a simple cartoon car like this. This technique allows you to easily correct mistakes and adjust shapes without leaving dark marks. Once you’re happy with the outline, you can then go over your sketch with a pen or darker pencil to finalize the lines.
3. Draw on a Larger Scale: When learning how to draw a car, especially details, drawing bigger makes it easier. Use a larger piece of paper than you might usually choose. Enlarge the example images provided in this guide to get a clearer view of details like door handles, windows, and wheels. Drawing larger will make it easier to manage details and also result in a more visually impressive drawing.
By keeping these three tips in mind, you’ll find that drawing a car becomes much more manageable and fun!
Conclusion: You’ve Drawn a Car!
Congratulations! You (or your kids) have successfully learned how to draw a car using this simple, step-by-step tutorial.
This activity is not only enjoyable but also a fantastic way to develop artistic skills and bring your dream car to life on paper!
Remember, we regularly upload new drawing tutorials to expand our collection, so keep visiting us to continuously learn how to draw new things. We’re excited to see what you’ll draw next!
Once you’ve finished drawing and coloring your car, be sure to show off your artwork! Share your masterpiece on social media platforms like Facebook, Pinterest, and Instagram. Be proud of your creative work and inspire others with your talent.
We can’t wait to see what your dream car looks like!
Get Inspired: Cartoon Car Example
Drawing cars, even in a cartoon style, can sometimes feel a bit challenging. Our artist Amanda created this cartoon car drawing to demonstrate just how fun and easy it can be!
This example shows one possible outcome after following our guide. Feel free to use it as inspiration or even as a template for your own drawing.
Amanda has struck a great balance between realistic car features and fun cartoon elements. You can choose to make your car drawing more realistic or even more cartoonish, depending on your personal preference.
It’s all up to you and what feels right for your own cartoon car sketch. After sketching, you can enhance your drawing with amazing colors and background details. There are endless ways to make your car drawing unique and personal!