Racing cars capture the imagination with their speed, sleek designs, and thrilling races. For car enthusiasts and aspiring artists alike, learning How To Draw A Racing Car Step By Step can be a rewarding and fun experience. While drawing cars might seem complex at first, this easy-to-follow guide will break down the process into manageable steps, allowing you to create your own impressive speed machine in no time!
Whether you’re a beginner or looking to refine your drawing skills, this tutorial will guide you through each stage, from the basic outline to adding the final details and colors. Get ready to rev up your creativity and learn how to draw a racing car step by step like a pro!
Step 1: Sketching the Basic Frame of Your Race Car
Drawing cars, especially dynamic vehicles like racing cars, can seem daunting initially. But don’t worry! We’re going to take it nice and slow, ensuring each step is clear and easy to understand. For this first step in learning how to draw a racing car step by step, we’ll begin by outlining the fundamental frame of the car. Using a ruler for straight lines can be incredibly helpful in achieving the crisp, clean lines characteristic of race cars.
This initial frame is crucial as it sets the foundation for the entire drawing. Since it’s a foundational step, it’s advisable to start lightly with a pencil. This allows you to easily make corrections and adjustments until you’re satisfied with the shape. Once you’re happy with the pencil outline, you can confidently go over it with a pen or marker to create more defined lines. Pay close attention to the reference image provided; it’s your visual guide throughout this process of learning how to draw a racing car step by step. Don’t hesitate to lightly trace the image if you find it challenging to get started – sometimes a little help is all you need to get your artistic wheels turning!
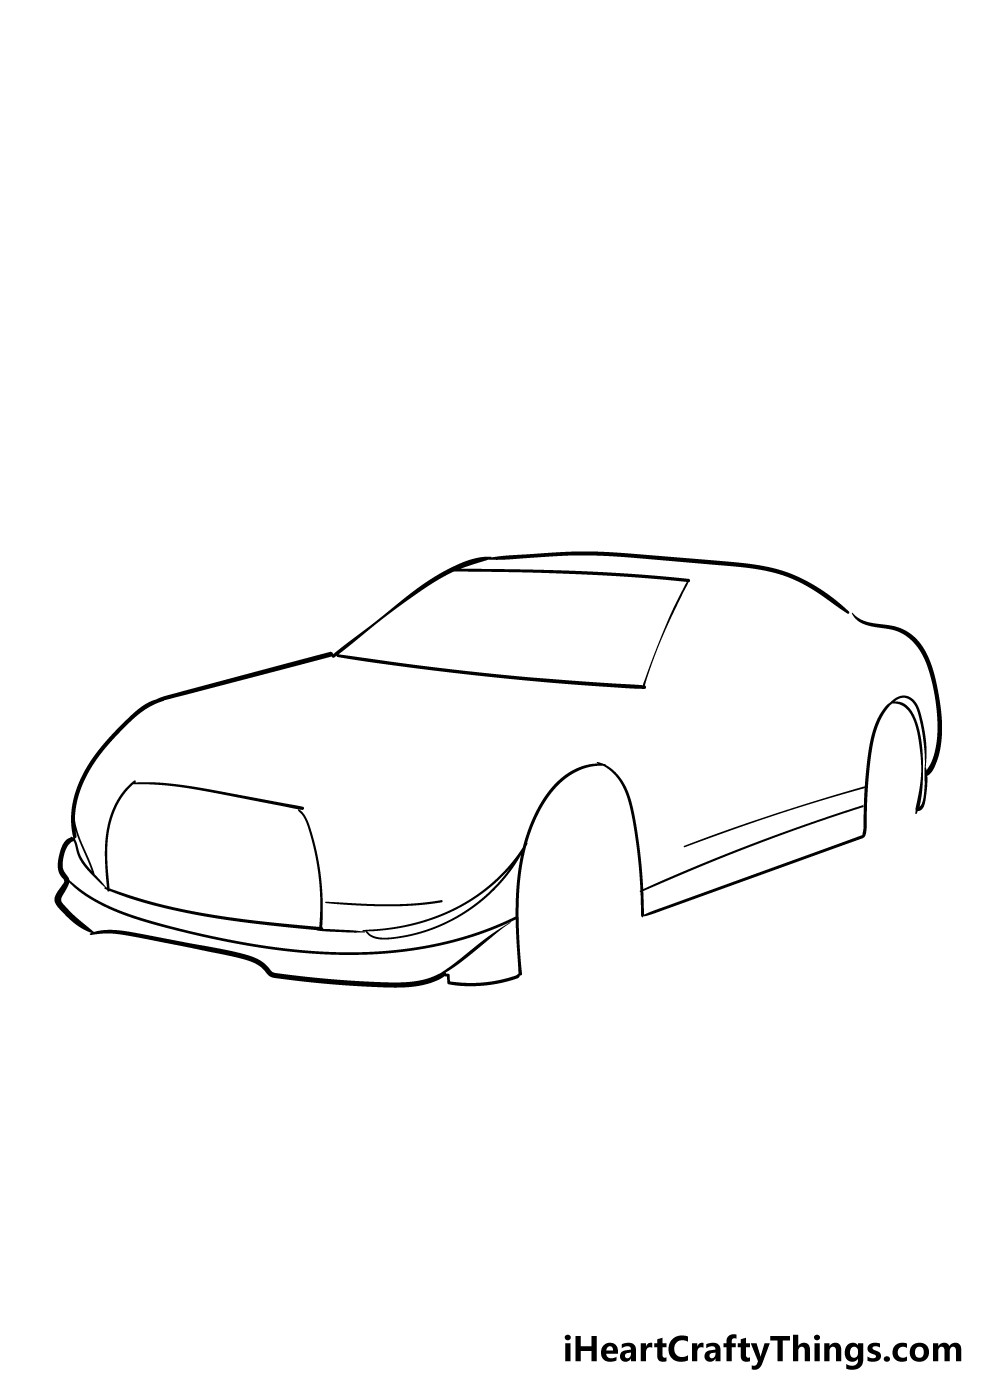
Step 2: Adding the Windshield and Front Details
Moving on with our guide on how to draw a racing car step by step, we’re now going to focus on adding the windshield and some essential front details to our sketch. This stage involves incorporating slightly more intricate elements, so remember to keep referring to the example image to ensure accuracy and proportion.
First, sketch a rectangle to represent the windshield of the racing car, positioning it as shown in the image. Below the windshield, towards the front of the car, draw a more rounded rectangular shape. This will form the car’s grill, a distinctive feature of many racing car designs. Lastly, for added detail and to give the car a grounded look, use your ruler to draw straight lines along the base of the car’s frame. These lines help define the lower edge and add to the overall structure of your racing car drawing. Take your time, observe the reference, and you’ll be mastering how to draw a racing car step by step in no time!
Step 3: Incorporating Side Windows, Headlights, and Spoiler
As we progress further in our tutorial on how to draw a racing car step by step, Step 3 is all about layering in more details that bring our vehicle to life. In this stage, we’ll be adding the side windows, headlights, and that iconic racing car element – the spoiler! This step involves a bit more angular detailing, so precision and careful observation are key.
Begin by sketching the side windows, mirroring the shape and placement shown in the reference image. Next, add the headlights at the front of the car. These are generally represented as angular shapes that integrate into the front design. Around the headlights and near where the doors would be, incorporate more angular lines and shapes to enhance the bodywork details of the racing car. Finally, extend a spoiler from the rear of the car, reaching upwards into the air. The spoiler is a crucial aerodynamic component and a visually striking part of a racing car’s design. Remember to work at your own pace and keep checking the image to guide you as you learn how to draw a racing car step by step.
Step 4: Drawing the Wheels and Grill Details
After the more intricate detailing of the previous steps, Step 4 in our guide on how to draw a racing car step by step offers a slightly simpler phase. Here, we will be focusing on adding the wheels and refining the details of the car’s grill. Wheels are fundamental to any car drawing, and getting them right adds a lot to the realism of your race car.
Start by drawing the wheels using oval or circular shapes. Position them underneath the car body, ensuring they are evenly spaced and proportional to the overall size of the car. Inside each wheel, draw slightly smaller circles. These inner circles define the tires and separate them from the wheel rims, adding depth to your drawing. Lastly, turn your attention back to the grill area at the front of the car. Draw lines within the grill space to create definition and detail, giving it a more realistic and finished look. These lines can be vertical, horizontal, or a combination, depending on the style you want to achieve. With these additions, you’re steadily progressing in learning how to draw a racing car step by step.
Step 5: Adding Final Touches and Details
We’re almost at the finish line in our guide on how to draw a racing car step by step! Step 5 is dedicated to adding those crucial final details that will elevate your drawing from a sketch to a more complete artwork. Before we bring in color in the next step, let’s focus on refining the details.
Look closely at the wheels again. Inside the rims, add further detailing using lines, small circles, and slightly curved lines, as shown in the reference image. These details can represent spokes or other design elements of the wheel rims, making them look more intricate and realistic. Next, turn your attention to the hood of the racing car. Add straight lines to the hood to create panel lines or design elements. These lines can add to the aerodynamic feel and visual interest of the car’s front. At this stage, consider if there are any personal touches you’d like to add. Perhaps a specific racing number, a logo, or even a background element like a racetrack could be sketched in lightly. How you choose to finish your race car drawing is part of the fun in learning how to draw a racing car step by step!
Step 6: Coloring Your Race Car to Life
Congratulations, you’ve reached the final step in our tutorial on how to draw a racing car step by step! Step 6 is all about bringing your drawing to life with color! After all the detailed sketching, now comes the exciting part where you can unleash your creativity and personalize your racing car with your favorite colors.
In our example, we’ve used a vibrant red color scheme, complemented by grey details. However, this is just a suggestion – the beauty of art is in personal expression! Feel absolutely free to choose any colors you desire. Bright, bold colors often suit racing cars, but you can also opt for more realistic or fantastical color schemes. Consider using colored pencils, markers, crayons, or even digital coloring tools if you’re drawing digitally. Markers or pens can make colors pop and give a sleek, vibrant finish, perfect for a racing car. For an extra touch of flair, think about adding highlights and shadows to give your coloring depth and dimension. You could even experiment with glitter or metallic pens to mimic the shine of chrome and give your racing car that extra sparkle. The possibilities are endless when you’re learning how to draw a racing car step by step and making it uniquely yours through color!
5 Tips to Enhance Your Race Car Drawing
Ready to take your race car drawing to the next level? Here are five fun and easy tips to make your artwork even more dynamic and exciting:
-
Add Racing Decals and Branding: Real racing cars are covered in logos and branding. Adding these to your drawing can make it look incredibly authentic. You can replicate logos from your favorite racing teams or even design your own fictional brands to sponsor your car! This is a great way to personalize your race car and add a story to your artwork.
-
Draw Multiple Race Cars in Action: One race car is cool, but a whole race is even more thrilling! Now that you know how to draw a racing car step by step, try drawing a few more and create a dynamic race scene. You can vary the colors and designs of each car to make them unique and create an exciting composition.
-
Create a Racetrack Background: What’s a race car without a racetrack? Adding a background can dramatically enhance your drawing. Draw a racetrack with curves, starting grids, and maybe even some cheering spectators. A detailed background places your race car in its element and adds depth and context to your artwork. Consider different racetrack settings, from city circuits to desert rallies!
-
Incorporate Speed Effects: To really convey the speed of a racing car, add some motion effects. Draw speed lines behind the car to show movement, or add dust clouds billowing from the wheels to simulate fast turns on a dirt track. Smoke coming from the exhaust or blurred background elements can also effectively communicate speed and action.
-
Experiment with Colors and Mediums: Don’t limit yourself to just one coloring style. Experiment with different art mediums like watercolors, pastels, or digital painting to see how they can transform your race car drawing. Try out different color combinations and shading techniques to create various effects, from a classic vintage racer to a futuristic speed machine.
Your Race Car Drawing is Complete!
You’ve successfully completed our guide on how to draw a racing car step by step! Give yourself a pat on the back – you’ve taken on the challenge of drawing a car and created your very own racing masterpiece.
Drawing cars, especially detailed ones like racing cars, requires patience and practice. By following this guide, taking your time, and staying persistent, you’ve proven that you can achieve impressive results. We hope this tutorial was not only helpful but also enjoyable and sparked your creativity.
Now that you have the basic skills, the next step is to let your imagination run wild! Experiment with different designs, colors, backgrounds, and details. Create a whole garage of unique racing cars, design your dream racetrack, or even invent your own racing world.
We’d love to see your amazing race car drawings! Please share your artwork on your favorite social media platforms to inspire others and show off your newfound artistic talent. Happy drawing, and keep creating!