Fixing a car interior roof, commonly known as the headliner, can seem daunting. This guide from CARS.EDU.VN provides simple yet effective methods to restore your car’s headliner, focusing on techniques that minimize the need for complete removal. Discover how to tackle this common auto upholstery issue, from headliner adhesive options to preventative measures.
1. Understanding the Car Headliner
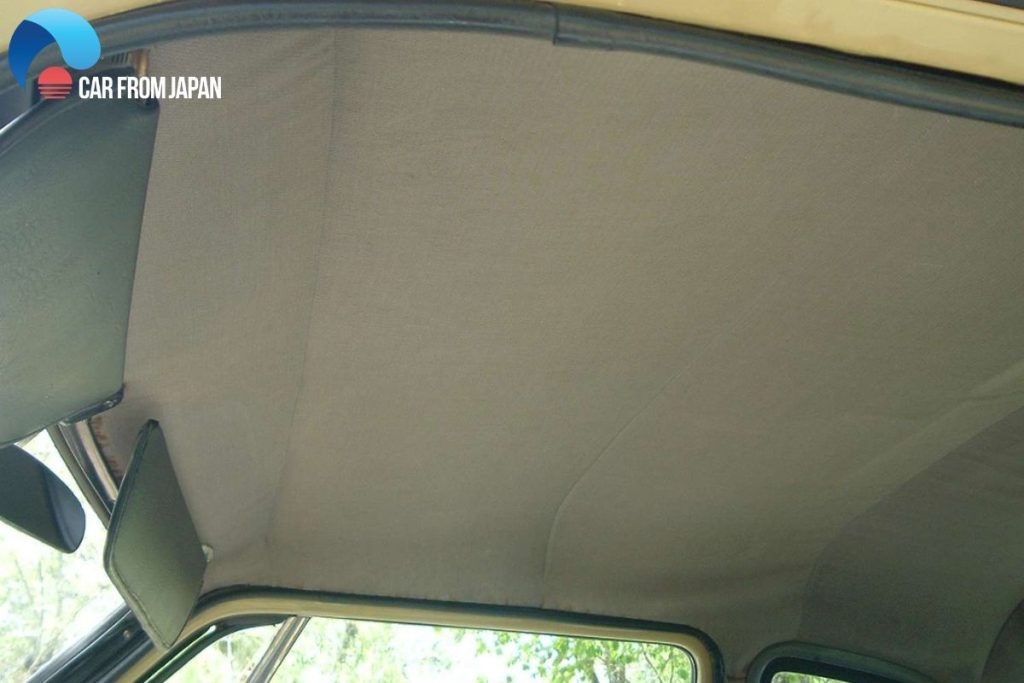
The headliner is the fabric lining on the interior roof of your car. It’s typically made of cloth or a synthetic material bonded to a foam backing board. Beyond aesthetics, it serves crucial functions:
- Insulation: The headliner helps maintain a comfortable cabin temperature by insulating against external heat and cold.
- Noise Reduction: It absorbs sound, reducing road noise and improving the overall acoustics inside the vehicle.
- Aesthetics: A clean, well-maintained headliner enhances the interior appearance of your car.
1.1. The Anatomy of a Car Headliner
Typically, a car headliner consists of multiple layers, with polyurethane foam being a common component. This foam is sprayed or attached to a headliner board that is mounted to the inside of the roof. This construction softens the headliner, offering insulation against heat and noise.
1.2. Headliner’s Importance
The headliner does more than just look good. Without this layer of insulation, the interior of a car parked in the sun can become excessively hot. Additionally, wind noise can become more noticeable, especially when driving at higher speeds.
This insulation also enhances the acoustics for audio systems that are customized to specific car interiors.
2. What Causes a Car Headliner to Sag?
Several factors can lead to a sagging headliner. Understanding these causes can help you prevent the issue and address it effectively when it occurs.
-
Heat and Sunlight: Prolonged exposure to high temperatures and direct sunlight is a primary cause. The heat degrades the adhesive that bonds the fabric to the backing board, causing it to separate and sag.
-
Moisture: Humidity and leaks can seep into the headliner, causing the foam backing to absorb moisture and lose its shape. This can lead to warping and sagging.
-
Poor Installation or Material Quality: Inferior adhesive or low-quality materials can fail over time, especially in hot climates.
-
Age: Over time, the materials used in the headliner simply degrade due to age and environmental factors.
3. Identifying the 5 Key Search Intents for “How to Fix Car Interior Roof”
Understanding what users are looking for when they search for “How To Fix Car Interior Roof” is crucial for providing relevant and helpful content. Here are five key search intents:
- DIY Repair Methods: Users want to find step-by-step instructions for fixing a sagging headliner themselves, often without removing it entirely.
- Cost of Professional Repair: Users are interested in understanding the average cost of headliner replacement or repair services.
- Preventative Measures: Users seek advice on how to prevent the headliner from sagging in the first place, including tips on car care and maintenance.
- Types of Headliner Materials and Adhesives: Users want to learn about different materials used in headliners and the best adhesives for repair.
- Troubleshooting Specific Issues: Users may be experiencing specific problems, such as sagging in certain areas or dealing with stains and odors, and need targeted solutions.
4. Quick Fixes: How to Fix Sagging Headliner Without Removing It
Before considering a full replacement, try these methods to repair a sagging headliner without removing it:
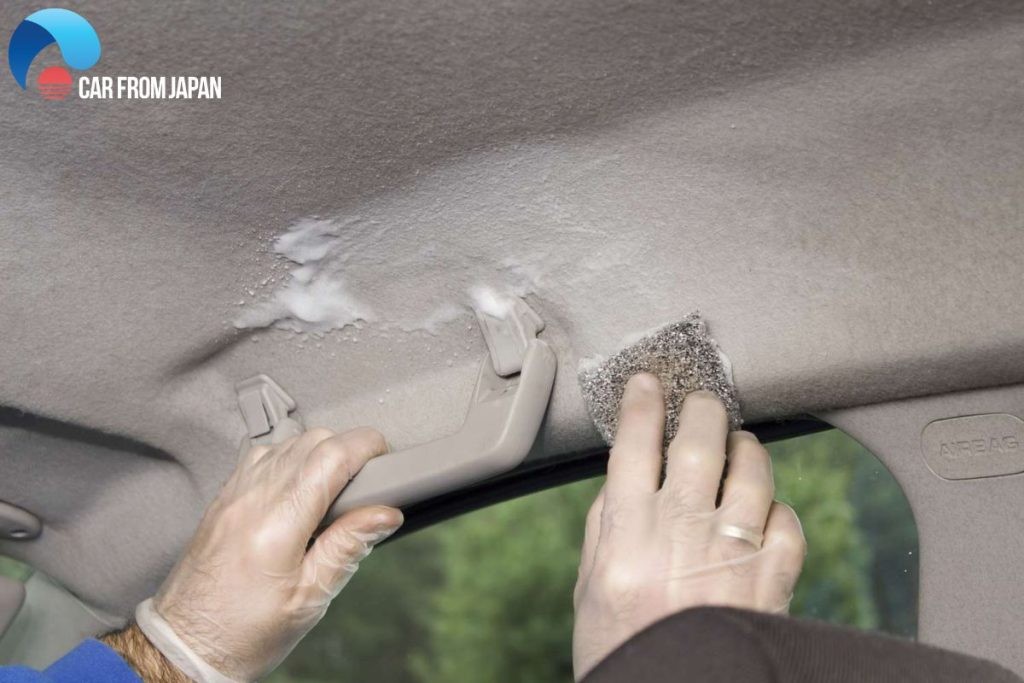
4.1. Re-Gluing with Headliner Adhesive
This method works best for small areas of sagging, particularly around the edges.
-
Materials Needed:
- Headliner adhesive spray (specifically designed for automotive headliners)
- Clean cloth
- Masking tape
-
Steps:
- Clean the sagging area with a clean, dry cloth to remove any loose debris.
- Spray the adhesive onto both the back of the fabric and the exposed backing board. Apply in a thin, even layer.
- Wait a few minutes for the adhesive to become tacky.
- Carefully press the fabric back onto the backing board, smoothing out any wrinkles or bubbles.
- Use masking tape to hold the fabric in place while the adhesive dries completely (usually several hours).
-
CARS.EDU.VN Tip: Choose a high-quality adhesive specifically designed for automotive headliners to ensure a long-lasting bond. Avoid using general-purpose adhesives, as they may not withstand high temperatures.
4.2. Twist Pins
Twist pins (also known as headliner repair pins or saggy stoppers) are an easy and inexpensive solution for temporarily securing a sagging headliner.
-
Materials Needed:
- Twist pins (available at most auto parts stores)
-
Steps:
- Gently push the fabric back into place.
- Insert a twist pin through the fabric and into the backing board.
- Twist the pin to secure it in place.
- Repeat as needed to cover the sagging area.
-
CARS.EDU.VN Tip: Arrange the pins in a visually appealing pattern to minimize their appearance. While this is a temporary fix, it can be a good option if you’re on a budget or need a quick solution.
4.3. Steaming and Rolling
This method uses steam to soften the old adhesive and a roller to re-bond the fabric to the backing board.
-
Materials Needed:
- Fabric steamer
- Soft paint roller
- Clean cloth
-
Steps:
- Use the steamer to gently heat the sagging area, holding the nozzle a few inches away from the fabric.
- As the fabric becomes more pliable, use the roller to smooth it back onto the backing board.
- Wipe away any excess moisture with a clean cloth.
- Repeat as needed until the sagging is reduced or eliminated.
-
CARS.EDU.VN Tip: Be careful not to over-saturate the fabric with steam, as this could damage the backing board. Work in small sections and allow the fabric to dry completely.
5. More Involved Repair: Partial Headliner Removal and Re-Adhesion
For more significant sagging, a partial removal might be necessary. This involves detaching the headliner around the affected area to apply adhesive more effectively.
5.1. Assessing the Damage
Before starting, carefully examine the extent of the sagging. Identify the areas where the fabric has completely detached from the backing board. This will determine the scope of the repair.
5.2. Gathering Your Supplies
You’ll need the following:
- Headliner adhesive spray
- Screwdrivers and trim removal tools
- Clean cloths
- Masking tape
- Utility knife or scissors
- Newspaper or plastic sheeting
5.3. Step-by-Step Guide to Partial Removal and Re-Adhesion
- Prepare the Area: Protect the surrounding interior with newspaper or plastic sheeting. Use masking tape to define the area you’ll be working on.
- Carefully Detach the Headliner: Use trim removal tools to gently detach the headliner around the affected area. Be careful not to damage the fabric or the surrounding trim.
- Clean the Surfaces: Remove any old adhesive or debris from both the fabric and the backing board. A clean surface is essential for a strong bond.
- Apply Adhesive: Spray the adhesive onto both the fabric and the backing board, following the manufacturer’s instructions. Allow the adhesive to become tacky before reattaching the fabric.
- Reattach the Fabric: Carefully press the fabric back onto the backing board, smoothing out any wrinkles or bubbles.
- Secure the Edges: Use masking tape to hold the edges in place while the adhesive dries.
- Reinstall Trim: Once the adhesive is fully cured, reinstall any trim pieces that were removed.
6. Full Headliner Replacement: When Is It Necessary?
In some cases, the damage to the headliner may be too extensive for simple repairs. A full replacement may be necessary if:
- The fabric is severely torn or stained.
- The backing board is damaged or crumbling.
- The sagging is widespread and cannot be effectively addressed with re-gluing or pinning.
6.1. The Cost of a Full Headliner Replacement
The cost of a full headliner replacement can vary depending on the make and model of your car, the type of fabric used, and whether you choose to do it yourself or hire a professional.
Cost Summary Table:
| Vehicle Type | Average Cost |
|---|---|
| Simple-designed Sedan/Hatchback/Coupe | $300 – $750 |
| Typical SUV/Crossover with sunroof/moonroof | $500 – $900 |
| Luxury Vehicle with high-quality ceiling materials | $1,000 – $6,000+ |
6.2. DIY vs. Professional Replacement
Replacing a headliner is a complex task that requires patience, skill, and the right tools. If you’re comfortable with DIY car repairs, you can save money by doing it yourself. However, if you’re not confident in your abilities, it’s best to hire a professional.
6.3. Steps for Full Headliner Replacement (Brief Overview)
- Remove the Old Headliner: This involves removing all trim pieces, lights, and other components that are attached to the headliner.
- Prepare the New Headliner: Cut the new fabric to the correct size and shape, and apply adhesive to both the fabric and the backing board.
- Install the New Headliner: Carefully position the new headliner in the car and smooth out any wrinkles or bubbles.
- Reinstall Trim: Reinstall all trim pieces, lights, and other components.
- CARS.EDU.VN Caution: When removing the old headliner, be careful not to damage the surrounding interior components. Take your time and work methodically.
7. Choosing the Right Materials: Fabrics and Adhesives
Selecting the right materials is crucial for a successful headliner repair or replacement.
7.1. Headliner Fabrics
- Cloth: A common and affordable option.
- Suede: A luxurious option that adds a touch of elegance to your car’s interior.
- Vinyl: Durable and easy to clean, but may not be as comfortable as cloth or suede.
7.2. Headliner Adhesives
- Spray Adhesive: The most common type of adhesive for headliner repair. Choose a high-quality adhesive specifically designed for automotive headliners.
- Brush-On Adhesive: Can be used for more precise application, but may be more difficult to work with.
7.3. Factors to Consider When Choosing Materials
- Durability: Choose materials that can withstand high temperatures and humidity.
- Appearance: Select materials that match the overall style of your car’s interior.
- Ease of Installation: Consider your skill level and choose materials that are easy to work with.
8. Preventing Headliner Sagging: Proactive Measures
Prevention is always better than cure. Here are some tips to help prevent your car’s headliner from sagging:
- Park in the Shade: Avoid parking your car in direct sunlight, especially during hot weather.
- Use a Sunshade: When parking in the sun is unavoidable, use a sunshade to protect the interior from heat.
- Ventilate Your Car: Open the windows slightly to allow hot air to escape.
- Address Leaks Promptly: Repair any leaks in your car’s roof or windows to prevent moisture from damaging the headliner.
- Regular Cleaning: Gently clean the headliner regularly to remove dust and debris. Avoid using harsh chemicals or abrasive cleaners.
9. Advanced Tips and Tricks for a Professional Finish
For those looking to achieve a truly professional finish, consider these advanced tips:
- Use a Heat Gun: A heat gun can help soften the adhesive and make it easier to smooth out wrinkles and bubbles.
- Work in a Clean Environment: Dust and debris can contaminate the adhesive and affect the bond.
- Take Your Time: Rushing the job can lead to mistakes. Work slowly and methodically to ensure a high-quality result.
- Practice on a Small Area: Before tackling the entire headliner, practice your technique on a small, inconspicuous area.
10. Addressing Common Headliner Problems: Stains, Odors, and Tears
Beyond sagging, headliners can also suffer from stains, odors, and tears. Here’s how to address these common problems:
10.1. Removing Stains
- Blot the Stain: Use a clean cloth to blot the stain, working from the outside in.
- Apply a Mild Cleaner: Mix a small amount of mild detergent with water and apply it to the stain with a clean cloth.
- Rinse and Dry: Rinse the area with clean water and pat it dry with a clean cloth.
10.2. Eliminating Odors
- Baking Soda: Sprinkle baking soda on the headliner and let it sit for several hours before vacuuming it up.
- Fabric Refresher: Use a fabric refresher spray to eliminate odors.
10.3. Repairing Tears
- Fabric Patch: Use a fabric patch and adhesive to repair small tears.
- Professional Repair: For larger tears, it’s best to consult a professional.
11. The Importance of Proper Ventilation During and After Repair
When working with adhesives and cleaners, proper ventilation is crucial for your safety.
- Open Windows and Doors: Ensure adequate ventilation by opening windows and doors.
- Use a Fan: Use a fan to circulate fresh air.
- Wear a Mask: Wear a respirator mask to protect yourself from harmful fumes.
After the repair, allow the car to air out completely before driving it.
12. Finding Professional Help: Locating Reputable Auto Upholstery Services
If you’re not comfortable tackling a headliner repair or replacement yourself, it’s best to seek professional help.
- Online Reviews: Check online reviews to find reputable auto upholstery services in your area.
- Referrals: Ask friends, family, or your mechanic for referrals.
- Experience and Expertise: Choose a service with experience and expertise in headliner repair.
Address: 456 Auto Drive, Anytown, CA 90210, United States.
Whatsapp: +1 555-123-4567.
13. Latest Innovations in Headliner Materials and Technology
The automotive industry is constantly evolving, and headliner materials and technology are no exception. Here are some of the latest innovations:
- Recycled Materials: Many manufacturers are now using recycled materials in their headliners, making them more environmentally friendly.
- Acoustic Enhancements: New headliner materials are designed to provide even better sound absorption and noise reduction.
- Advanced Adhesives: New adhesives offer improved durability and resistance to heat and moisture.
13.1. New Car Models and Headliner Features (Recent Updates)
| Car Model | Year | Headliner Material | Special Features |
|---|---|---|---|
| Tesla Model Y | 2024 | Recycled Polyester | Enhanced acoustic dampening |
| BMW iX | 2024 | Microfiber Suede | Integrated ambient lighting |
| Ford F-150 | 2024 | Durable Woven Fabric | Stain-resistant coating |
| Honda CR-V | 2024 | Premium Cloth | Improved thermal insulation |
| Mercedes-Benz EQS | 2024 | Dinamica Microfiber | Available in multiple colors and textures |
14. Maintaining Your Car’s Interior: A Holistic Approach
Repairing or replacing a headliner is just one aspect of maintaining your car’s interior. Here are some additional tips:
- Regular Vacuuming: Vacuum the interior regularly to remove dirt and debris.
- Cleaning Upholstery: Clean the upholstery regularly with a mild cleaner.
- Protecting Leather: Condition leather seats regularly to prevent cracking and fading.
- Using Floor Mats: Use floor mats to protect the carpets from dirt and stains.
- Avoiding Smoking: Avoid smoking in the car to prevent odors and stains.
15. Conclusion: Restoring and Preserving Your Car’s Interior Roof
A sagging headliner can detract from the overall appearance and comfort of your car. By understanding the causes of sagging, implementing preventative measures, and using the appropriate repair techniques, you can restore and preserve your car’s interior roof for years to come. Remember, CARS.EDU.VN is your go-to resource for expert advice and guidance on all aspects of car care and maintenance.
Is your car’s interior roof sagging or damaged? Don’t let it detract from your driving experience. Visit cars.edu.vn today for more in-depth guides, expert tips, and professional service recommendations. Let us help you restore your car’s interior to its former glory.
16. FAQs: Addressing Your Questions About Car Interior Roofs
16.1. How do you know if your ceiling is sagging?
Signs include a cracking sound when the car shakes, drooping plasterboard sheeting, visible cracking, or tiny blisters forming on the surface. Sagging car ceiling can be caused by stress, weakening, or general wear and tear.
16.2. Is it OK to fix the headliner sagging myself?
Yes, for minor issues, DIY repair is possible. Kits are available online and at auto parts stores. These kits typically include tools to secure the headliner’s inner layer to the foam backing.
16.3. Can I paint a headliner?
While possible, painting is not recommended. It requires extensive preparation to avoid getting paint on the trim and glass. Also, paint may not react well to temperature changes within the car’s interior.
16.4. Does car insurance cover the cost of car headliner replacement?
Most standard car insurance policies do not cover interior upholstery, trim, or headliners.
16.5. How long does it take for headliner adhesive to dry?
Drying time varies depending on the adhesive. Refer to the product instructions, but generally, allow several hours for the adhesive to dry completely.
16.6. What is the best way to clean a car headliner without damaging it?
Use a soft cloth and a mild detergent solution. Gently blot the surface, working from the outside in. Avoid harsh chemicals or abrasive cleaners.
16.7. Can humidity cause a headliner to sag?
Yes, moisture can seep into the headliner, causing the foam backing to absorb water and lose its shape, leading to sagging.
16.8. Are there any specific tools needed to replace a car headliner?
You’ll need screwdrivers, trim removal tools, a utility knife or scissors, and possibly a heat gun for smoothing out wrinkles.
16.9. How can I prevent my car headliner from sagging in the future?
Park in the shade, use a sunshade, ventilate your car, address leaks promptly, and clean the headliner regularly.
16.10. What are some eco-friendly options for headliner replacement?
Look for headliners made from recycled materials, such as recycled polyester or other sustainable fabrics.