Fixing ripped car leather seats can restore your vehicle’s interior. CARS.EDU.VN provides expert advice and solutions to address leather damage. Discover how to repair tears, maintain your seats, and ensure a luxurious driving experience with our comprehensive guide. Learn practical techniques and tips for leather care and restoration.
1. Understanding Leather Damage in Car Seats
Leather car seats, while luxurious, are prone to damage. Understanding the types of damage helps in choosing the correct repair method. Common issues include:
- Cracks: Surface-level damage caused by drying and lack of maintenance.
- Tears: Rips in the leather from sharp objects or excessive wear.
- Fading: Discoloration due to sun exposure.
- Stains: Marks from spills, dirt, or dyes.
- Scratches: Superficial damage from keys, pets, or other abrasive materials.
Addressing these issues promptly prevents further deterioration and maintains the leather’s integrity. CARS.EDU.VN offers detailed guides on identifying and preventing these types of damage, ensuring your car seats remain in top condition.
2. Essential Tools and Materials for Leather Repair
Before starting any repair, gather the necessary tools and materials. Having the right equipment ensures a professional finish. Essential items include:
- Leather Repair Kit: Contains fillers, dyes, and sealants specifically designed for leather repair.
- Leather Cleaner: Removes dirt and oils from the surface.
- Leather Conditioner: Keeps the leather supple and prevents cracking.
- Rubbing Alcohol: Prepares the surface for bonding.
- Scissors or Utility Knife: Trims loose or frayed edges.
- Sandpaper: Smooths out imperfections and prepares the surface for coloring.
- Applicator Sponges: Applies cleaner, dye, and sealant evenly.
- Mixing Cups and Stir Sticks: Mixes dyes and fillers to the correct consistency.
- Heat Gun or Hair Dryer: Speeds up the drying process.
- Sewing Kit (for larger tears): Includes needles, thread, and leather patches.
Investing in high-quality tools and materials guarantees better results and prolongs the life of your repair. For a curated list of recommended products, visit CARS.EDU.VN.
3. Step-by-Step Guide to Repairing Small Tears
Small tears can often be repaired using a simple DIY method. Here’s a step-by-step guide:
- Clean the Area: Use a leather cleaner to remove dirt and oils.
- Trim Loose Edges: Carefully trim any frayed or loose leather around the tear.
- Apply Leather Filler: Use a palette knife to apply a thin layer of leather filler into the tear.
- Allow to Dry: Let the filler dry completely, usually about 20-30 minutes. Use a heat gun or hair dryer to speed up the process.
- Sand the Area: Gently sand the filled area with fine-grit sandpaper to smooth out any imperfections.
- Apply Leather Dye: Use an applicator sponge to apply a matching leather dye to the repaired area.
- Seal the Repair: Apply a leather sealant to protect the dye and blend the repair with the surrounding leather.
- Condition the Leather: Finish by applying a leather conditioner to keep the area supple and prevent future cracking.
Following these steps ensures a seamless repair that is both durable and visually appealing. For more detailed instructions and video tutorials, visit CARS.EDU.VN.
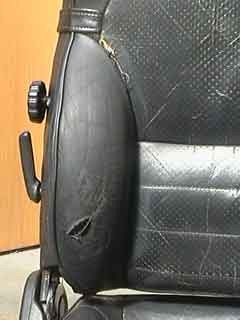 Preparing the leather car seat
4. Repairing Larger Rips: A Comprehensive Approach
Larger rips require a more involved approach to ensure a lasting repair. Here’s how to tackle them:
- Assess the Damage: Determine the size and severity of the rip.
- Clean and Prepare: Clean the area with leather cleaner and trim any loose edges.
- Apply a Backing Patch: Cut a leather or canvas patch slightly larger than the rip. Insert it under the leather, using tweezers or a spatula.
- Glue the Patch: Apply leather glue to the edges of the patch and the underside of the leather around the rip. Press firmly and let it dry.
- Sew the Rip: Use a curved needle and strong thread to carefully stitch the edges of the rip together, creating a tight seam.
- Apply Leather Filler: Fill any remaining gaps with leather filler, applying thin layers and allowing each to dry before adding the next.
- Sand and Smooth: Sand the filled area with fine-grit sandpaper to create a smooth, even surface.
- Dye and Seal: Apply leather dye to match the original color, followed by a leather sealant to protect the repair.
- Condition the Leather: Finish with a leather conditioner to keep the area soft and prevent cracking.
This method provides a strong, durable repair that blends seamlessly with the original leather. CARS.EDU.VN offers advanced techniques and troubleshooting tips for complex repairs.
5. Matching Leather Color for a Seamless Repair
One of the biggest challenges in leather repair is matching the color of the original leather. Here are some tips to ensure a seamless blend:
- Use a Leather Dye Kit: Purchase a leather dye kit that includes a range of colors that can be mixed to match your specific shade.
- Test the Dye: Always test the dye on a hidden area of the leather to ensure it matches before applying it to the repaired area.
- Apply in Thin Layers: Apply the dye in thin, even layers, allowing each layer to dry before applying the next. This prevents the color from becoming too dark or uneven.
- Blend the Edges: Use a soft cloth or sponge to blend the edges of the dyed area with the surrounding leather, creating a smooth transition.
- Use a Color Chart: Refer to a color chart to help you mix the correct shade. Many leather repair kits include a color chart for easy reference.
Achieving a perfect color match is crucial for a professional-looking repair. CARS.EDU.VN provides color-matching guides and expert advice to help you achieve the best results.
6. Preventing Future Leather Damage
Prevention is key to maintaining the longevity of your leather car seats. Here are some tips to prevent future damage:
- Regular Cleaning: Clean your leather seats regularly with a leather cleaner to remove dirt, oils, and stains.
- Conditioning: Apply a leather conditioner every 1-3 months to keep the leather supple and prevent cracking.
- Avoid Direct Sunlight: Park in shaded areas or use a sunshade to protect your seats from direct sunlight, which can cause fading and drying.
- Use Seat Covers: Consider using seat covers to protect your leather seats from wear and tear, especially if you have pets or children.
- Promptly Address Spills: Clean up spills immediately to prevent staining and damage to the leather.
- Avoid Sharp Objects: Be careful when placing sharp objects on your seats, such as keys, tools, or accessories.
By following these preventive measures, you can significantly extend the life of your leather car seats and keep them looking their best. CARS.EDU.VN offers a range of leather care products and maintenance guides to help you protect your investment.
7. Professional Leather Repair Services vs. DIY: Making the Right Choice
Deciding whether to repair your leather car seats yourself or hire a professional depends on the extent of the damage and your comfort level with DIY projects. Here’s a comparison to help you make the right choice:
| Factor | DIY Leather Repair | Professional Leather Repair |
|---|---|---|
| Cost | Lower initial cost (materials only) | Higher cost (labor and materials) |
| Time | Time-consuming, requires patience and attention to detail | Faster, completed by experienced professionals |
| Skill Level | Requires basic skills and knowledge of leather repair techniques | Requires advanced skills and specialized tools |
| Damage Severity | Suitable for small tears, scratches, and minor damage | Suitable for large rips, extensive damage, and complex repairs |
| Quality of Result | Results may vary depending on skill level; may not be as seamless as professional repair | High-quality, seamless repair with professional-grade materials and techniques |
| Convenience | Can be done at your own pace and convenience | Requires scheduling and dropping off your vehicle |
| Longevity | May not be as durable as professional repair | More durable and long-lasting due to professional techniques and materials |
| Risk | Risk of further damaging the leather if not done correctly | Minimal risk; professionals are insured and guarantee their work |
| Color Matching | Can be challenging to achieve a perfect color match without experience | Professionals have access to advanced color-matching systems for a seamless blend |
| Warranty | No warranty | Often comes with a warranty on the repair work |
| Tools & Materials | Requires purchasing tools and materials | Professionals have all necessary tools and materials |
| Expertise | Limited expertise; relies on online tutorials and guides | Extensive expertise and experience in leather repair |
| Customization | Limited customization options | Professionals can offer custom solutions and finishes |
| Stress & Hassle | Can be stressful and frustrating if the repair is not successful | Stress-free; professionals handle all aspects of the repair |
| Learning Opportunity | Opportunity to learn new skills and save money | No learning opportunity |
| Resale Value | May not significantly increase resale value | Can increase resale value by restoring the interior to its original condition |
| Environmental Impact | DIY kits often contain harsh chemicals; professionals often use eco-friendly products and disposal methods | Professionals often use eco-friendly products and have proper disposal methods |
| Safety | Risk of injury from sharp tools or exposure to chemicals; wear safety glasses and gloves | Professionals follow safety protocols and use protective equipment |
If you’re dealing with minor damage and enjoy DIY projects, repairing your leather car seats yourself can be a cost-effective option. However, for larger rips, extensive damage, or if you want a professional-quality repair, hiring a professional is the best choice. CARS.EDU.VN can connect you with trusted leather repair specialists in your area.
8. Cost-Effective Leather Seat Restoration: Balancing Quality and Budget
Restoring leather car seats doesn’t have to break the bank. Here are some tips for cost-effective restoration:
- Assess the Damage: Determine the extent of the damage to avoid unnecessary repairs.
- DIY for Minor Issues: Handle small tears, scratches, and stains yourself to save on labor costs.
- Shop Around for Materials: Compare prices from different suppliers to find the best deals on leather repair kits, dyes, and conditioners.
- Consider Refurbishing: Refurbishing can be a more affordable alternative to replacing the entire seat.
- Preventative Maintenance: Regularly clean and condition your seats to prevent costly repairs in the future.
- Buy in Bulk: Purchase leather care products in bulk to save money in the long run.
- Look for Discounts: Check for discounts, coupons, and promotional offers from leather repair suppliers and service providers.
- Do Your Research: Read reviews and compare quotes from different professionals to find the best value for your money.
By balancing quality with budget-conscious decisions, you can restore your leather car seats without overspending. CARS.EDU.VN offers a range of affordable leather care products and resources to help you achieve professional results on a budget.
9. Maintaining Leather Seats in Different Climates
Climate plays a significant role in the condition of your leather car seats. Here’s how to maintain them in different climates:
- Hot and Sunny Climates:
- Problem: Leather can dry out, crack, and fade due to prolonged exposure to sunlight.
- Solution: Park in shaded areas, use sunshades, and apply leather conditioner more frequently (every 1-2 months).
- Cold and Dry Climates:
- Problem: Leather can become stiff and brittle due to low humidity.
- Solution: Use a humidifier in your car, condition your seats regularly (every 1-2 months), and avoid using harsh chemicals that can dry out the leather.
- Humid Climates:
- Problem: Leather can become sticky and prone to mold and mildew growth.
- Solution: Ensure proper ventilation in your car, use a dehumidifier if necessary, and clean your seats regularly with a leather cleaner that contains antifungal properties.
- Rainy Climates:
- Problem: Leather can become waterlogged and damaged by frequent exposure to moisture.
- Solution: Use a waterproof leather protectant, dry your seats thoroughly after exposure to rain, and clean them regularly to prevent water stains.
Adapting your leather care routine to your local climate is essential for maintaining the longevity and appearance of your car seats. CARS.EDU.VN offers climate-specific maintenance guides and product recommendations.
10. The Future of Leather Car Seat Care: Innovations and Trends
The leather care industry is constantly evolving with new innovations and trends. Here are some developments to watch out for:
- Self-Healing Leather: Advanced leather technology that can repair minor scratches and abrasions on its own.
- Eco-Friendly Leather Alternatives: Sustainable materials like mushroom leather, pineapple leather, and lab-grown leather are gaining popularity.
- Smart Leather Seats: Seats equipped with sensors that monitor temperature, humidity, and pressure to optimize comfort and prevent wear.
- AI-Powered Leather Care: Apps and devices that use artificial intelligence to analyze the condition of your leather and recommend personalized care routines.
- Nanotechnology Coatings: Protective coatings that provide superior resistance to stains, scratches, and UV damage.
- Customizable Leather Designs: 3D printing and laser etching technologies that allow for intricate and personalized leather seat designs.
Staying informed about these innovations can help you make the best choices for maintaining and upgrading your leather car seats. CARS.EDU.VN is committed to providing the latest information and resources on the future of leather care.
Latest Car Models with Advanced Leather Interiors
| Car Model | Features | Starting Price |
|---|---|---|
| 2024 BMW i7 | Merino leather upholstery, Executive Lounge Seating, BMW Individual interior options | $119,300 |
| 2024 Mercedes-Benz S-Class | Nappa leather upholstery, massaging seats, active ambient lighting | $114,500 |
| 2024 Audi A8 | Valcona leather seats, diamond stitching, individual contour seats | $88,900 |
| 2024 Lexus LS | Semi-aniline leather, Kiriko glass trim, handcrafted details | $77,075 |
| 2024 Land Rover Range Rover | Windsor leather seats, sustainable Ultrafabrics options, noise cancellation technology | $107,400 |
| 2024 Porsche Cayenne | Club leather interior, adaptive sport seats, deviated stitching | $86,800 |
| 2024 Volvo XC90 | Nappa leather or wool blend upholstery, crystal gear shifter, Bowers & Wilkins sound system | $56,000 |
| 2024 Cadillac Escalade | Premium leather seating, AKG Studio Reference 36-speaker audio system, Super Cruise driver assistance technology | $80,795 |
| 2024 Genesis G90 | Nappa leather interior, massaging seats, rear seat entertainment system | $89,495 |
| 2024 Tesla Model S | Vegan leather upholstery, minimalist design, advanced technology features | $94,990 |
Updated Car Technology and Leather Care Products
| Technology/Product | Description | Benefits |
|---|---|---|
| Self-Healing Leather | Leather treated with polymers that can automatically repair minor scratches and abrasions when exposed to heat or sunlight. | Reduces the appearance of wear and tear, extends the lifespan of the leather, and minimizes the need for frequent repairs. |
| UV Protective Coatings | Transparent coatings applied to leather seats that block ultraviolet (UV) rays from the sun. | Prevents fading, cracking, and discoloration caused by sun exposure, preserving the original color and texture of the leather. |
| Leather Cleaning Robots | Autonomous robots equipped with sensors and cleaning solutions designed to automatically clean and condition leather seats. | Provides consistent and thorough cleaning, reduces the risk of human error, and saves time and effort. |
| AI-Powered Leather Analysis | Apps that use smartphone cameras and artificial intelligence algorithms to analyze the condition of leather seats and provide personalized recommendations for cleaning, conditioning, and repair. | Offers customized care routines based on the specific needs of the leather, ensures proper maintenance, and helps prevent costly damage. |
| Heated and Cooled Seats | Seats equipped with heating and cooling elements that regulate the temperature of the leather surface. | Enhances comfort in extreme weather conditions, reduces moisture buildup, and prevents cracking and stiffness caused by temperature fluctuations. |
| Biometric Leather Sensors | Sensors embedded in leather seats that monitor pressure, humidity, and temperature to provide real-time feedback on the condition of the leather. | Alerts drivers to potential issues such as excessive wear, moisture buildup, or temperature imbalances, allowing for timely maintenance and preventing long-term damage. |
| Antimicrobial Leather | Leather treated with antimicrobial agents that inhibit the growth of bacteria, mold, and mildew. | Prevents odors, stains, and health hazards caused by microbial growth, ensuring a clean and hygienic interior. |
| Sustainable Leather | Leather produced using eco-friendly tanning processes, such as vegetable tanning or chrome-free tanning, and sourced from responsibly managed farms. | Reduces the environmental impact of leather production, promotes ethical sourcing, and offers a sustainable alternative to traditional leather. |
| Wireless Leather Charging | Leather surfaces embedded with wireless charging technology that can charge smartphones and other devices placed on them. | Provides convenient and clutter-free charging, eliminates the need for cables, and integrates technology seamlessly into the interior design. |
| Customizable Leather Dyes | Dyes that can be mixed and matched to create custom colors and patterns on leather seats. | Allows for personalized interior designs, enables easy color matching for repairs, and offers a creative way to express individual style. |
Leather Seat Maintenance Checklist
| Task | Frequency | Products Needed |
|---|---|---|
| Vacuuming | Weekly | Vacuum cleaner with upholstery attachment |
| Cleaning | Monthly | Leather cleaner, soft cloths |
| Conditioning | Every 3 months | Leather conditioner, applicator pad |
| Spot Cleaning Spills | Immediately | Leather cleaner, soft cloths |
| UV Protection | Every 6 months | UV protectant spray or wipes |
| Professional Inspection | Annually | N/A (Schedule with a reputable leather specialist) |
| Checking for Wear and Tear | Monthly | Visual inspection |
| Repairing Minor Scratches and Scuffs | As needed | Leather repair kit |
| Addressing Cracks and Fading | As needed | Leather dye, crack filler |
| Protecting Seats from Extreme Temperatures | Daily | Sunshade, seat covers |
| Maintaining Humidity Levels | As needed | Car humidifier or dehumidifier |
| Applying Leather Sealant | Every 6-12 months | Leather sealant, applicator pad |
| Cleaning Stitching and Seams | Monthly | Soft brush, mild cleaner |
| Conditioning Stitching | Every 6 months | Leather conditioner |
| Inspecting and Tightening Loose Seams | As needed | Sewing kit, curved needle |
| Replacing Damaged Panels | As needed | Leather replacement panel, professional installation |
These innovations promise to revolutionize the way we care for leather car seats, making it easier and more effective than ever to maintain their beauty and longevity.
FAQ: How to Fix Ripped Car Leather Seats
-
What causes leather car seats to rip?
- Leather car seats can rip due to wear and tear, sharp objects, sun exposure, and lack of maintenance.
-
Can I repair a ripped leather car seat myself?
- Yes, small tears can be repaired with a DIY leather repair kit. Larger rips may require professional assistance.
-
What tools do I need to repair a ripped leather car seat?
- You’ll need a leather repair kit, leather cleaner, sandpaper, scissors, applicator sponges, and leather dye.
-
How do I match the color of the leather when repairing a tear?
- Use a leather dye kit with a range of colors that can be mixed. Test the dye on a hidden area before applying it to the repaired area.
-
How can I prevent future damage to my leather car seats?
- Regularly clean and condition your seats, avoid direct sunlight, use seat covers, and promptly address spills.
-
Is it cheaper to repair or replace a ripped leather car seat?
- Repairing is usually cheaper, especially for small tears. Replacing the entire seat is more expensive.
-
How long does it take to repair a ripped leather car seat?
- DIY repairs can take a few hours, while professional repairs may take a day or two.
-
Can I use household cleaners on leather car seats?
- No, household cleaners can damage leather. Use a cleaner specifically designed for leather.
-
How often should I condition my leather car seats?
- Condition your seats every 1-3 months to keep the leather supple and prevent cracking.
-
What are the benefits of hiring a professional for leather repair?
- Professionals have the skills, tools, and materials to ensure a high-quality, durable repair that blends seamlessly with the original leather.
Is your car’s leather seat torn and needs to be repaired? At CARS.EDU.VN, we understand the challenges of maintaining your vehicle’s interior. Whether you’re struggling to find reliable repair services, lacking the knowledge for regular maintenance, or simply seeking expert advice, we’re here to help. Contact us today at 456 Auto Drive, Anytown, CA 90210, United States, Whatsapp: +1 555-123-4567, or visit our website at CARS.EDU.VN. Let cars.edu.vn provide you with the solutions and support you need to keep your car looking its best!