Let’s explore How To Install Car Cover Seats and elevate your driving experience. These protective layers shield your car’s upholstery from wear and tear, spills, and sun damage. At CARS.EDU.VN, we believe keeping your car in top shape shouldn’t be a chore. By following simple steps and tips, you can achieve a snug and secure fit, ensuring both comfort and style. Discover the perfect blend of protection and aesthetics for your vehicle’s interior with our expert advice and resources on seat protectors and vehicle interior enhancement.
1. Understanding The Importance of Car Seat Covers
Car seat covers aren’t just about aesthetics; they’re a practical investment in your vehicle’s longevity and your personal comfort. Think of them as a shield against the daily grind: coffee spills, muddy paws, the wear and tear from kids, and the sun’s relentless UV rays. These elements can wreak havoc on your car’s upholstery, leading to fading, stains, and even cracks. With quality car seat covers, you’re essentially hitting the pause button on the aging process of your seats.
1.1. Protection Against Wear and Tear
Imagine your car seats as the hardworking heroes of your daily commute. They endure countless hours of sitting, shifting, and the friction of clothing. Over time, this constant pressure leads to visible wear and tear. Seat covers act as a barrier, absorbing much of this abuse. Whether it’s the constant sliding in and out, the impact of sharp objects, or the gradual breakdown of fabric fibers, seat covers take the hit, preserving the original upholstery underneath.
1.2. Protecting Against Stains and Spills
Life happens, and sometimes it happens in your car. A sudden stop can send your coffee flying, kids can be surprisingly creative with snacks, and pets… well, they have their own unique way of making a mess. Stains from spills can be incredibly difficult to remove, often requiring professional cleaning and potentially causing permanent damage. Car seat covers, especially those made from waterproof or stain-resistant materials, offer a crucial line of defense. They catch the spills, allowing you to quickly wipe them away before they penetrate the original fabric.
1.3. Shielding From UV Damage
The sun, while enjoyable, can be brutal on car interiors. Prolonged exposure to ultraviolet (UV) rays causes fading, cracking, and discoloration of your car seats. Leather and vinyl are particularly vulnerable, becoming brittle and unsightly over time. Car seat covers, especially those with UV-resistant properties, act as a sunblock for your seats. They absorb and deflect harmful rays, keeping your upholstery looking fresh and new for years to come.
1.4. Enhancing Comfort and Style
Beyond protection, car seat covers offer an opportunity to personalize your vehicle and enhance your driving experience. They come in a dazzling array of colors, patterns, and materials, allowing you to tailor your car’s interior to your personal taste. Whether you prefer the luxurious feel of leatherette, the sporty look of neoprene, or the cozy comfort of fabric, there’s a seat cover to match your style. Additionally, some seat covers come with added padding or ergonomic designs, providing extra support and comfort during long drives.
1.5. Maintaining Resale Value
When it comes time to sell or trade in your vehicle, the condition of the interior plays a significant role in determining its value. Clean, well-maintained seats give potential buyers the impression that the car has been well cared for overall. By protecting your original upholstery with seat covers, you’re preserving its pristine condition, which can translate into a higher resale price. Think of it as an investment in your car’s future value.
By understanding these key benefits, it becomes clear that car seat covers are more than just an accessory; they’re a smart and practical way to protect your investment, enhance your comfort, and express your personal style. With the right set of covers, you can keep your car looking and feeling its best for years to come. Check out CARS.EDU.VN to explore your options for vehicle upholstery protection and car seat maintenance tips!
2. Gathering Necessary Tools and Materials
Before diving into the installation process, gathering the right tools and materials is essential for a smooth and efficient experience. Think of it as preparing your workspace for a DIY project. Having everything within reach will save you time, reduce frustration, and ensure a professional-looking result. Here’s a comprehensive checklist to guide you:
2.1. The Right Car Seat Covers
This might seem obvious, but choosing the correct car seat covers is the most critical first step. Ensure that the covers are compatible with your car’s make, model, and year. Some vehicles have unique seat designs or features, such as side airbags or integrated seatbelts, which require specific types of covers.
- Universal Fit: Designed to fit a wide range of vehicles, but may not offer a snug, custom-like fit.
- Custom Fit: Made to the exact specifications of your car’s seats, ensuring a perfect fit and full functionality of all seat features.
Always check the product description and customer reviews to confirm compatibility. Consider the material based on your needs:
- Fabric: Comfortable and breathable, ideal for everyday use.
- Neoprene: Water-resistant and durable, perfect for active lifestyles and pet owners.
- Leatherette: Offers a luxurious look and feel, easy to clean and maintain.
2.2. Essential Tools
Having the right tools on hand can significantly simplify the installation process. Here are some must-haves:
- Soft Cloth or Towel: For cleaning the seats before installation and wiping away any spills or dirt during the process.
- Scissors or Utility Knife: To carefully cut small openings for headrest posts, seatbelts, or adjustment levers (use with caution and only if necessary).
- Measuring Tape: To ensure proper alignment and fit, especially for custom-fit covers.
- Hook and Loop Fasteners (Velcro): May be needed for securing loose ends or adjusting the fit of universal covers.
- Hog Ring Pliers and Hog Rings (if applicable): Some covers, particularly those designed for a more permanent installation, may require hog rings to secure them to the seat frame.
- Screwdriver Set: Depending on your car’s seat design, you may need a screwdriver to remove or adjust certain components.
- Pliers: Useful for gripping and pulling elastic straps or adjusting metal hooks.
2.3. Cleaning Supplies
Before installing your new seat covers, it’s a good idea to give your car seats a thorough cleaning. This will not only improve the overall appearance but also ensure that the covers fit smoothly and securely.
- Vacuum Cleaner: To remove loose dirt, dust, and debris from the seats and crevices.
- Upholstery Cleaner: To treat any stains or spills on the original fabric.
- Leather Conditioner (if applicable): To nourish and protect leather seats.
- Detailing Brush: To scrub hard-to-reach areas and loosen stubborn dirt.
2.4. Patience and a Helping Hand
Installing car seat covers can sometimes be a bit challenging, especially for first-timers. Patience is key to achieving a professional-looking result. If possible, enlist the help of a friend or family member. An extra set of hands can make the process much easier and faster, especially when it comes to stretching and securing the covers.
2.5. Safety First
Before you begin, take a moment to familiarize yourself with the safety features of your car seats, such as side airbags. Ensure that the seat covers you’ve chosen are compatible with these features and won’t obstruct their deployment in the event of an accident. Always disconnect the car battery before working on any electrical components, such as heated seats.
With the right tools and materials at your disposal, you’ll be well-prepared to tackle the installation process with confidence. Remember to take your time, follow the instructions carefully, and don’t be afraid to ask for help if needed. Visit CARS.EDU.VN for more tips on car care and maintenance, and discover how to keep your vehicle looking and feeling its best!
3. Prepping Your Car Seats
Before you even think about wrestling with those new car seat covers, take a moment to prep your car seats. This step is crucial for two reasons: it ensures a snug and secure fit, and it protects your original upholstery from any dirt or debris that might be trapped underneath the covers. Think of it as creating a clean canvas for your automotive masterpiece.
3.1. Thorough Cleaning
Start with a thorough cleaning of your car seats. This means grabbing your trusty vacuum cleaner and going to town on every nook and cranny. Use the upholstery attachment to remove loose dirt, dust, crumbs, and any other debris that has accumulated over time. Don’t forget to pay special attention to the seams, crevices, and areas around the seatbelts and headrests.
Once you’ve vacuumed the seats, it’s time to tackle any stains or spills. Use an appropriate upholstery cleaner for your seat material (fabric, leather, vinyl) and follow the manufacturer’s instructions carefully. For stubborn stains, you may need to apply the cleaner multiple times and use a detailing brush to gently scrub the affected area.
If you have leather seats, now is also a good time to apply a leather conditioner. This will help to nourish and protect the leather, keeping it soft and supple.
3.2. Removing Headrests
Most car seat covers require you to remove the headrests before installation. This is usually a simple process, but it can vary depending on your car’s make and model. Consult your owner’s manual for specific instructions.
In general, you’ll need to locate the release buttons or levers at the base of the headrest posts. Press or lift these while simultaneously pulling the headrest upwards. If you’re having trouble, try wiggling the headrest back and forth as you pull.
Once the headrests are removed, set them aside in a safe place where they won’t get damaged or lost.
3.3. Adjusting Seat Positions
Before you start installing the seat covers, adjust the seats to their most upright and forward positions. This will give you more room to work and make it easier to access all the necessary areas.
If your car has adjustable lumbar support or side bolsters, make sure to deflate or loosen them as much as possible. This will help the seat covers conform to the shape of the seats more easily.
3.4. Addressing Any Existing Damage
Take a close look at your car seats and identify any existing damage, such as tears, rips, or worn spots. If the damage is minor, you may be able to repair it before installing the seat covers. This will prevent the damage from worsening and ensure that the covers fit smoothly.
For small tears or rips, you can use an upholstery repair kit or a needle and thread to stitch them up. For worn spots, you can apply a fabric patch or a leather filler to restore the surface.
If the damage is more extensive, you may want to consider having the seats professionally repaired before installing the covers.
3.5. A Final Wipe-Down
Before you start installing the seat covers, give your car seats one last wipe-down with a clean, damp cloth. This will remove any remaining dust or debris and ensure that the covers adhere properly to the seats.
By taking the time to properly prep your car seats, you’ll set yourself up for a successful installation and ensure that your new seat covers look their best. For more expert tips on car care and maintenance, be sure to visit CARS.EDU.VN!
4. Installing The Front Seat Covers: A Step-by-Step Guide
Now that your car seats are prepped and ready to go, it’s time to tackle the installation of the front seat covers. This process can seem daunting at first, but with a little patience and attention to detail, you can achieve a professional-looking result. Here’s a step-by-step guide to help you through the process:
4.1. Positioning The Seat Cover
Start by carefully positioning the seat cover over the seat. Make sure the cover is oriented correctly, with the front of the cover facing the front of the seat. Align the seams and edges of the cover with the corresponding features of the seat, such as the side bolsters and lumbar support.
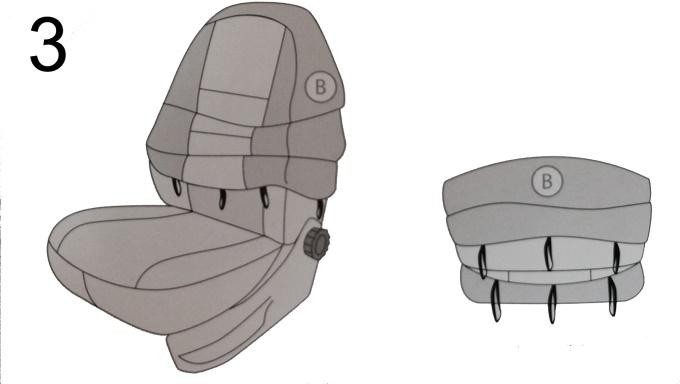
4.2. Securing The Top Portion
Begin by securing the top portion of the seat cover. This usually involves slipping the cover over the headrest posts or attaching it to the seat frame with elastic straps or hooks. Make sure the cover is pulled taut and evenly distributed across the seat back.
4.3. Working Your Way Down
Once the top portion is secured, work your way down the seat, gradually smoothing the cover over the seat back and bottom. Use your hands to tuck the edges of the cover into the crevices and seams of the seat.
If the cover has elastic straps or hooks, attach them to the underside of the seat, ensuring that they are pulled tight enough to hold the cover in place but not so tight that they cause the cover to bunch up or distort.
4.4. Dealing With Seatbelts and Levers
Most car seat covers are designed with openings or slits to accommodate seatbelts, adjustment levers, and other seat features. Carefully align these openings with the corresponding features on your seat and gently guide the seatbelts and levers through the openings.
If the openings are too small or not in the right place, you may need to use scissors or a utility knife to carefully enlarge them. However, be extremely cautious when cutting the seat cover, as you don’t want to accidentally damage it.
4.5. Attaching The Bottom Straps and Hooks
Once the seat cover is properly positioned and aligned, it’s time to attach the bottom straps and hooks. These straps and hooks are designed to secure the cover to the underside of the seat and prevent it from slipping or sliding around.
Reach underneath the seat and locate the attachment points for the straps and hooks. These may be metal bars, plastic clips, or simply loops of fabric. Attach the straps and hooks to the corresponding attachment points, ensuring that they are pulled tight enough to hold the cover in place.
4.6. Smoothing Out Wrinkles and Adjusting The Fit
Once all the straps and hooks are attached, take a step back and admire your work. Look for any wrinkles, creases, or areas where the cover is not fitting properly.
Use your hands to smooth out any wrinkles or creases and adjust the fit of the cover as needed. You may need to loosen or tighten the straps and hooks to achieve a snug and even fit.
4.7. Reattaching The Headrest
Finally, reattach the headrest to the seat. Make sure the headrest posts are properly aligned with the openings in the seat cover and gently push the headrest down until it clicks into place.
Repeat these steps for the other front seat.
With the front seat covers successfully installed, you’re well on your way to transforming your car’s interior. Stay tuned for the next section, where we’ll tackle the installation of the rear seat covers. For more expert advice on car care and customization, visit CARS.EDU.VN!
5. Installing The Rear Seat Covers: Navigating Challenges
Installing rear seat covers can present unique challenges compared to the front seats. Rear seats often have different configurations, such as split-folding seats, armrests, and integrated seatbelts, which require extra attention and care during the installation process. Here’s how to navigate these challenges and achieve a seamless fit:
5.1. Understanding Your Rear Seat Configuration
Before you begin, take a close look at your rear seat configuration. Determine whether it’s a solid bench seat or a split-folding seat. Identify the location of any armrests, seatbelts, or other features that may affect the installation process.
If you have a split-folding seat, note the configuration of the split (e.g., 60/40 or 50/50) and how the seats fold down. This will help you determine how to properly install the seat covers and maintain the functionality of the folding seats.
5.2. Removing The Rear Seat (If Possible)
In some cases, it may be easier to install the rear seat covers if you remove the rear seat from the car. This will give you more room to work and make it easier to access all the necessary areas.
Consult your owner’s manual for instructions on how to remove the rear seat. The process usually involves disconnecting a few bolts or clips and lifting the seat out of the car.
If you’re not comfortable removing the rear seat yourself, you can skip this step and install the seat covers with the seat in place.
5.3. Installing The Seat Bottom Cover
Start by installing the seat bottom cover. This usually involves positioning the cover over the seat and securing it with elastic straps or hooks.
If you have a split-folding seat, make sure to install the seat bottom cover in a way that allows the seats to fold down independently. This may require you to cut or modify the cover to accommodate the split.
5.4. Installing The Seat Back Cover
Next, install the seat back cover. This usually involves slipping the cover over the seat back and securing it with elastic straps or hooks.
If you have a split-folding seat, make sure to install the seat back cover in a way that allows the seats to fold down independently. This may require you to cut or modify the cover to accommodate the split.
If your rear seat has an armrest, you may need to remove it before installing the seat back cover. Consult your owner’s manual for instructions on how to remove the armrest. Once the seat back cover is installed, you can reattach the armrest.
5.5. Dealing With Integrated Seatbelts
Some rear seats have integrated seatbelts that are built into the seat back. These seatbelts can make it challenging to install the seat back cover.
If your rear seat has integrated seatbelts, you may need to carefully cut or modify the seat back cover to accommodate the seatbelts. Use scissors or a utility knife to create openings for the seatbelts to pass through.
Be extremely cautious when cutting the seat cover, as you don’t want to accidentally damage the seatbelts or compromise their functionality.
5.6. Securing The Covers and Smoothing Out Wrinkles
Once all the covers are installed, take a step back and admire your work. Look for any wrinkles, creases, or areas where the covers are not fitting properly.
Use your hands to smooth out any wrinkles or creases and adjust the fit of the covers as needed. You may need to loosen or tighten the straps and hooks to achieve a snug and even fit.
If you removed the rear seat from the car, now is the time to reinstall it.
With the rear seat covers successfully installed, your car’s interior is now fully protected and customized. For more expert tips on car care and customization, visit CARS.EDU.VN!
6. Final Adjustments and Ensuring a Snug Fit
You’ve put in the effort to install your new car seat covers, but the job isn’t quite done yet. The final adjustments are crucial for achieving a snug, professional-looking fit that not only enhances the appearance of your car’s interior but also ensures the covers stay in place and provide optimal protection. Let’s walk through the steps to fine-tune your installation:
6.1. Addressing Wrinkles and Creases
Wrinkles and creases can detract from the overall look of your new seat covers. Take a close look at the seats and identify any areas where the fabric is bunched up or uneven.
Use your hands to smooth out the wrinkles and creases, working from the center outwards. You may need to gently stretch the fabric to achieve a smooth, even surface.
If the wrinkles are particularly stubborn, you can try using a hairdryer on a low setting to gently warm the fabric. This will make it more pliable and easier to smooth out. Be careful not to overheat the fabric, as this could damage it.
6.2. Tightening Straps and Hooks
The straps and hooks are what keep your seat covers securely in place. Over time, they may loosen or stretch, causing the covers to shift or slide around.
Check all the straps and hooks to ensure they are properly tightened. If they are loose, adjust them as needed to achieve a snug, secure fit.
If the straps are too long, you can trim them with scissors. Be careful not to cut them too short, as you may need to readjust them in the future.
6.3. Ensuring Proper Alignment
Proper alignment is essential for both the appearance and functionality of your seat covers. Make sure the covers are aligned correctly with the seats, with the seams and edges matching up with the corresponding features of the seats.
Check that the openings for seatbelts, adjustment levers, and other seat features are properly aligned and not obstructed.
If the covers are not aligned correctly, adjust them as needed to achieve a proper fit.
6.4. Checking For Slippage
One of the most important aspects of a successful seat cover installation is preventing slippage. Slippage can not only be annoying but also potentially dangerous, as it can interfere with the proper functioning of seatbelts and other safety features.
Test the seat covers by sitting in the seats and moving around. Check to see if the covers are slipping or sliding around.
If the covers are slipping, you may need to tighten the straps and hooks or add additional fasteners, such as hook and loop fasteners (Velcro).
6.5. Addressing Any Remaining Issues
After making all the necessary adjustments, take one last look at your seat covers and address any remaining issues. This may include trimming loose threads, cleaning up any spills or stains, or making minor adjustments to the fit.
Once you’re satisfied with the final result, you can sit back and enjoy your newly protected and customized car interior.
By taking the time to make these final adjustments, you’ll ensure that your car seat covers not only look great but also provide long-lasting protection and comfort. For more expert tips on car care and customization, visit CARS.EDU.VN!
7. Maintenance Tips For Car Seat Covers
Congratulations, you’ve successfully installed your car seat covers. However, the work doesn’t stop there. To ensure your seat covers continue to look great and provide optimal protection for years to come, proper maintenance is essential. Here are some maintenance tips to help you keep your car seat covers in top condition:
7.1. Regular Cleaning
Regular cleaning is the key to keeping your car seat covers looking fresh and new. How often you need to clean your seat covers will depend on your lifestyle and how frequently you use your car. However, as a general rule, you should aim to clean them at least once a month.
To clean your seat covers, start by vacuuming them thoroughly to remove any loose dirt, dust, or debris. Use the upholstery attachment to reach into the crevices and seams.
Next, wipe down the covers with a damp cloth and a mild detergent. Be careful not to use too much water, as this could damage the fabric.
For tougher stains, you can use an upholstery cleaner specifically designed for your seat cover material. Follow the manufacturer’s instructions carefully and test the cleaner on an inconspicuous area first to ensure it doesn’t damage the fabric.
7.2. Spot Cleaning
Accidents happen, and spills are inevitable. When a spill occurs, it’s important to act quickly to prevent the stain from setting.
Blot the spill with a clean, absorbent cloth. Avoid rubbing the stain, as this could spread it and make it more difficult to remove.
Once you’ve blotted up as much of the spill as possible, apply a spot cleaner specifically designed for your seat cover material. Follow the manufacturer’s instructions carefully and test the cleaner on an inconspicuous area first to ensure it doesn’t damage the fabric.
7.3. Protecting From Sunlight
Prolonged exposure to sunlight can cause your car seat covers to fade and deteriorate over time. To protect your seat covers from sunlight, park your car in a shaded area whenever possible.
You can also use a sunshade to block out the sun’s rays when parking in direct sunlight.
If you live in a particularly sunny area, you may want to consider using seat covers made from UV-resistant materials.
7.4. Avoiding Sharp Objects
Sharp objects can easily tear or puncture your car seat covers. To avoid damaging your seat covers, be careful when carrying sharp objects in your car.
Avoid placing sharp objects directly on the seats. Instead, place them in a bag or container.
If you have pets, keep their nails trimmed to prevent them from scratching the seat covers.
7.5. Inspecting Regularly
Regularly inspect your car seat covers for any signs of wear and tear. This includes tears, rips, loose seams, and damaged fasteners.
If you notice any damage, repair it as soon as possible to prevent it from worsening.
You can repair small tears and rips with a needle and thread or an upholstery repair kit. Loose seams can be re-stitched with a sewing machine. Damaged fasteners can be replaced with new ones.
By following these maintenance tips, you can keep your car seat covers looking great and providing optimal protection for years to come. For more expert advice on car care and customization, visit CARS.EDU.VN!
8. Troubleshooting Common Installation Issues
Even with careful preparation and attention to detail, you may encounter some common issues during the installation of your car seat covers. Here’s a troubleshooting guide to help you overcome these challenges:
8.1. The Covers Don’t Fit Properly
If the seat covers don’t seem to fit properly, the first thing to do is double-check that you have the correct covers for your car’s make, model, and year. Seat covers are designed to fit specific seat configurations, so using the wrong covers can result in a poor fit.
If you have the correct covers, make sure you’re installing them in the right direction. The front seat covers should be installed on the front seats, and the rear seat covers should be installed on the rear seats.
If the covers are still not fitting properly, try loosening the straps and hooks and repositioning the covers. You may need to adjust the covers several times to achieve a snug, even fit.
8.2. The Straps and Hooks Are Too Short
If the straps and hooks are too short to reach the attachment points, you can try using extenders. Extenders are available at most auto parts stores and online retailers.
You can also try using alternative attachment points. Look for metal bars, plastic clips, or loops of fabric that you can use to secure the straps and hooks.
8.3. The Covers Are Slipping and Sliding
If the covers are slipping and sliding, make sure the straps and hooks are properly tightened. You may need to tighten them more than you initially thought.
You can also try using additional fasteners, such as hook and loop fasteners (Velcro), to secure the covers in place.
If the seats are made of a slippery material, such as leather or vinyl, you can try using a non-slip mat underneath the covers.
8.4. The Openings For Seatbelts and Levers Are Too Small
If the openings for seatbelts and levers are too small, you can carefully enlarge them with scissors or a utility knife. Be extremely cautious when cutting the seat cover, as you don’t want to accidentally damage it.
If you’re not comfortable cutting the seat cover, you can try using a seam ripper to carefully remove the stitching around the opening. This will create a larger opening without damaging the fabric.
8.5. The Covers Are Wrinkled and Creased
If the covers are wrinkled and creased, you can try using a hairdryer on a low setting to gently warm the fabric. This will make it more pliable and easier to smooth out. Be careful not to overheat the fabric, as this could damage it.
You can also try using a steamer to remove the wrinkles and creases. Follow the manufacturer’s instructions carefully and test the steamer on an inconspicuous area first to ensure it doesn’t damage the fabric.
By following these troubleshooting tips, you can overcome common installation issues and achieve a professional-looking fit for your car seat covers. For more expert advice on car care and customization, visit CARS.EDU.VN!
9. When To Consider Professional Installation
While installing car seat covers is a DIY-friendly project, there are situations where seeking professional installation becomes the smarter choice. Recognizing these circumstances can save you time, frustration, and potential damage to your vehicle.
9.1. Custom-Fit Seat Covers
Custom-fit seat covers are designed to perfectly match the contours of your car’s seats, providing a seamless, factory-installed look. However, this precision fit also means that the installation process can be more complex and challenging.
Professional installers have the expertise and specialized tools to properly stretch, align, and secure custom-fit seat covers, ensuring a flawless finish. They can also handle any modifications or adjustments that may be necessary to accommodate unique seat features.
9.2. Complex Seat Designs
Some cars have seats with complex designs, such as integrated headrests, adjustable lumbar support, or side airbags. Installing seat covers on these types of seats can be tricky, as you need to ensure that the covers don’t interfere with the functionality of these features.
Professional installers are familiar with a wide range of seat designs and know how to properly install seat covers without compromising safety or comfort.
9.3. Heated or Cooled Seats
If your car has heated or cooled seats, you need to be extra careful when installing seat covers. Improper installation can damage the heating or cooling elements, rendering them ineffective.
Professional installers have the knowledge and experience to install seat covers on heated or cooled seats without causing any damage.
9.4. Lack of Time or Expertise
Installing car seat covers can be a time-consuming project, especially if you’re not experienced. If you’re short on time or simply don’t feel confident in your DIY skills, it’s best to leave the job to the professionals.
Professional installers can complete the installation quickly and efficiently, saving you valuable time and ensuring a high-quality result.
9.5. Previous Installation Failures
If you’ve attempted to install car seat covers yourself and failed, it’s a sign that you may need professional assistance. Continuing to struggle with the installation could damage the seat covers or even your car’s seats.
Professional installers can assess the situation and correct any previous installation errors, ensuring that the seat covers are properly installed and look their best.
When deciding whether to install car seat covers yourself or hire a professional, consider your skill level, the complexity of your car’s seats, and the value of your time. In many cases, the peace of mind and guaranteed results of professional installation are well worth the investment. Remember to check out CARS.EDU.VN for tips and resources to find qualified installers in your area!
10. Exploring Additional Car Interior Accessories
Once you’ve upgraded your car seats with stylish and protective covers, why stop there? Elevate your entire driving experience by exploring the world of car interior accessories. These additions not only enhance the look and feel of your vehicle but also provide practical benefits that make every journey more enjoyable.
10.1. Floor Mats and Liners
Floor mats and liners are essential for protecting your car’s carpeting from dirt, mud, spills, and wear and tear. Choose from a variety of materials, such as rubber, carpet, or all-weather, to suit your needs and preferences.
Custom-fit floor mats and liners offer the best protection, as they are designed to precisely match the contours of your car’s floor.
10.2. Steering Wheel Covers
Steering wheel covers provide a comfortable and secure grip while also protecting your steering wheel from wear and tear. They come in a variety of materials, such as leather, suede, or silicone, and can add a touch of style to your car’s interior.
10.3. Dashboard Covers
Dashboard covers protect your dashboard from sunlight, heat, and cracking. They also reduce glare and improve visibility. Choose from a variety of materials and colors to match your car’s interior.
10.4. Seat Organizers
Seat organizers help you keep your car tidy and organized. They provide storage for items such as water bottles, snacks, books, and electronic devices. Choose from a variety of styles, such as back seat organizers, console organizers, and cargo organizers.
10.5. Car Air Fresheners
Car air fresheners keep your car smelling fresh and clean. Choose from a variety of scents, such as floral, citrus, or woodsy. You can also find air fresheners that eliminate odors caused by smoke, pets, or food.
10.6. Phone Mounts
Phone mounts allow you to safely and conveniently use your phone while driving. Choose from a variety of styles, such as dashboard mounts, vent mounts, and windshield mounts.
10.7. USB Chargers
USB chargers allow you to charge your electronic devices while on the go. Choose from a variety of styles, such as car chargers, wall chargers, and portable chargers.
10.8. Emergency Kits
Emergency kits provide you with essential supplies in case of a breakdown or accident. Kits typically include items such as jumper cables, a flashlight, a first-aid kit, and a warning triangle.
By adding these car interior accessories, you can create a comfortable, stylish, and functional driving environment. Explore the wide selection of accessories available at auto parts stores and online retailers, and customize your car to suit your individual needs and preferences. Don’t forget to visit CARS.EDU.VN for more ideas and inspiration to personalize your ride!
CARS.EDU.VN is your trusted resource for all things automotive. Whether you’re seeking expert advice on car care, detailed product reviews, or reliable service recommendations, we’re here to help you make informed decisions and enhance your driving experience. Visit our website today at cars.edu.vn or contact us at 456 Auto Drive, Anytown, CA 90210, United States, Whatsapp: +1 555-123-4567.
FAQ: Installing Car Seat Covers
1. What if my car has side airbags?
Ensure your seat covers are specifically designed with side airbag compatibility. These covers have special stitching that allows the airbags to deploy properly without obstruction.
2. Can I install seat covers on leather seats?
Yes, but choose covers made from breathable materials to prevent trapping moisture and damaging the leather. Regular cleaning and conditioning of the leather beneath the covers are still recommended.
3. How do I clean my car seat covers?
Follow the manufacturer’s instructions. Most fabric covers are machine washable, while leatherette or vinyl covers can be wiped down with a damp cloth and mild cleaner.
4. What tools do I need to install car seat covers?
Typically, you’ll need scissors or a utility knife (for making small adjustments), a soft cloth, and possibly pliers for tightening straps. Some covers may require specific tools like hog ring pliers.
5. How long does it take to install car seat covers?
Installation time varies depending on the complexity of the covers and your experience. A simple set can take as little as 30 minutes, while more intricate designs may take an hour or more.
6. Will universal-fit seat covers work on my car?
Universal-fit covers are designed to fit a wide range of vehicles, but the fit may not be perfect. For the best fit and appearance, consider custom-fit covers.
7. Can I install seat covers on heated seats?
Yes, but make sure the covers are compatible with heated seats and won’t block the heat. Breathable materials are generally recommended.
8. How do I prevent seat covers from slipping?
Tighten the straps and hooks securely. You can also use non-slip mats or Velcro strips to keep the covers in place.
9. What if my car has integrated seatbelts?
Choose seat covers specifically designed for cars with integrated seatbelts. These covers have openings and adjustments to accommodate the seatbelts without compromising safety.
10. Can I install seat covers myself, or should I hire a professional?
If you’re comfortable with DIY projects and have some experience, you can likely install seat covers yourself. However, if you’re unsure or have complex seats, professional installation is recommended.