Creating crafts from recycled materials is not only fun but also a fantastic way to teach kids about sustainability and creativity. Among the easiest and most engaging crafts is making a car from a simple toilet paper roll. This project is perfect for a rainy day activity, classroom fun, or just a creative afternoon at home with your little ones. Forget about throwing away those empty toilet paper rolls – transform them into exciting toy cars that kids will love to play with and decorate!
This guide will walk you through a simple and enjoyable method to construct a paper car using a toilet paper roll. Inspired by the need for a toy car for a clothespin doll’s Christmas tree adventure, this craft is adaptable, easy to follow, and uses minimal supplies. Let’s dive into the steps to bring your paper car to life!
Before we start building, the key to a well-proportioned paper car lies in creating a pattern. This ensures your wheels are correctly placed and the car opening is centered. Remember, toilet paper rolls can slightly vary in size, so it’s best to make a pattern based on the exact roll you’ll be using for your car.
Part 1: Crafting Your Car Pattern
This first step is crucial for making multiple cars easily or ensuring the proportions are right for your first attempt. Here’s what you’ll need to make your pattern:
Materials for Pattern Making:
- 1 Empty Toilet Paper Roll
- Pencil
- Sharp Scissors
- Paper punch or awl for making small holes
- Ruler
Step-by-Step Pattern Instructions:
- Folding the Roll: Begin by folding the toilet paper roll lengthwise in half. Open it up and fold it in half again along the other side, dividing it into quarters.
- Creating Wheel Markings: Cut along one of the folded lines to open the roll partially. Fold the roll in half again, and then fold one cut side edge to meet the closest fold line. This newly created fold will mark the spot for your wheels. Repeat this on the other cut side. These folds essentially divide a quarter of the roll into halves again, helping you find the wheel placement.
- Drawing the Pattern: Unfold the roll and lay it flat. Draw the opening for your car (a rectangle or oval shape in the center) and mark the positions for the wheels using the folds you just created. Use a ruler to ensure the wheel placements are equidistant from the edge on both sides for symmetry. A distance of 2 inches from the edge works well.
- Finalizing the Pattern: Cut out the car opening you’ve drawn and use a hole punch or awl to pierce holes at the marked wheel positions. Your pattern is now complete and should resemble the image below.
Part 2: Constructing the Paper Car Body
With your pattern ready, you can now start making as many cars as you desire! Here’s what you’ll need for each car:
Materials for One Paper Car:
- 1 Toilet Paper Roll
- Car Pattern (you just made)
- Acrylic Paint in your choice of colors
- 4 Small Brad Fasteners (for wheels)
- Cardstock for wheels, car floor, front, and back details
- White School Glue
Tools:
- Pencil
- Sharp Scissors
- Paint Brush
- 1 ½-inch Circle Paper Punch (optional, for perfect wheels)
- Small Hole Paper Punch or Awl
Building Your Car Step-by-Step:
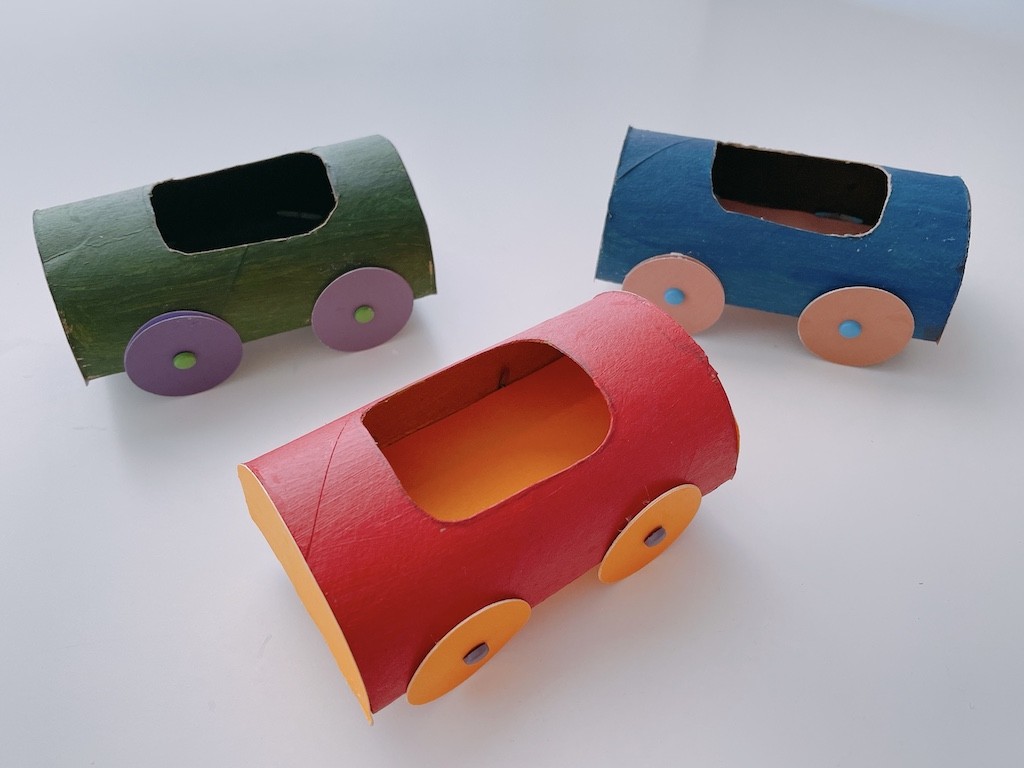
- Prepare the Car Body: Using your paper pattern, cut another toilet paper roll lengthwise. Flatten it and use the pattern to trace and mark the car opening and wheel placements. Cut out the opening and punch holes for the wheels. Fold up the cut edges to the wheel markings, giving shape to your car.
-
Painting the Car: Paint the car body inside and out with your chosen acrylic paints. It’s easier to paint one side, let it dry, and then paint the other to avoid smudging. Let it dry completely before moving to the next step.
-
Creating the Wheels: While the car body dries, prepare the wheels. Use a 1 ½-inch circle paper punch to cut out circles from cardstock. For sturdier wheels, punch twice as many circles and glue them together in pairs. If you don’t have a paper punch, simply cut out 1 ½-inch circles using scissors. Punch a small hole in the center of each wheel for the brad fastener.
Part 3: Assembling and Decorating Your Car
Now for the final touches to make your paper car complete and ready for play!
Assembly Instructions:
-
Attach the Wheels: Insert the brads through the holes in the car body and attach the wheels. Secure the brads at the back to hold the wheels in place.
-
Add the Car Floor: Cut a rectangle of cardstock to fit inside the bottom of the car to create a floor. A size of about 2 ½ x 4 inches usually works well. Apply white glue to the edges and fit it inside. You might need to hold it in place for a few moments until the glue begins to set, as the cardboard might resist staying down initially.
-
Secure and Decorate Wheels: Glue the top part of the wheels to the car body with white glue. This prevents sagging and adds extra stability, even though the wheels are primarily for design and won’t turn freely with the brads. If you prefer wheels that turn, consider searching online for tutorials on axle-based car construction – although for simplicity, gluing is perfect for this craft.
-
Front and Back Panels: Trace the front and back shapes of your car body onto cardstock and cut them out. These will act as the front and back panels of your car, giving it a more finished look. Apply glue to the edges of the toilet paper roll car body and press the cardstock panels in place. Hold until the glue sets.
Gluing Tip:
For precise gluing, especially for smaller parts like the front and back panels, dispense a bit of white glue into a small container (like a disposable sauce cup). Use a bamboo skewer or an unfolded paperclip to apply tiny amounts of glue exactly where needed. This method offers better control and avoids excess glue.
Crafting with Kids: Making it Easier
This paper car project is wonderfully adaptable for crafting with children. Younger children might need help with cutting and gluing, particularly with smaller components. To simplify the process when crafting with kids:
- Preparation is Key: Pre-cut the car openings and punch the wheel holes in advance.
- Kids Can Take Over: Let children handle the painting and inserting the wheels – these are fun and less fiddly tasks.
- Assistance with Gluing: You can manage gluing the car floor and the front and back panels, or assist younger children closely.
- Decoration Station: Set up a decoration station with markers, stickers, and other embellishments for kids to personalize their cars.
Explore More Toilet Paper Roll Crafts
Looking for more creative ideas using toilet paper rolls? Websites like Pinterest are treasure troves of inspiration! You’ll find countless projects ranging from animals to decorations all using simple toilet paper rolls. This paper car is just the beginning of what you can create!
Enjoy crafting your paper cars! They are not just toys but also adorable keepsakes and a testament to fun, resourceful crafting.