You guys!!! This project is super exciting. Imagine creating a LEGO car that’s not just for show, but actually moves using solar power! Yes, it’s possible, and it’s an incredibly rewarding experience. I had this amazing idea to build a solar-powered LEGO car, and while it was more challenging than I initially thought, the result was absolutely worth it. It took some time to get everything working perfectly, but I finally made it happen! With just a few readily available parts and some strong glue, you can embark on this exciting journey too. This project is not only fun but also a fantastic STEM activity, perfect for celebrating Earth Day or any day you want to spark curiosity and learning in kids.
If you’re interested in more LEGO car projects, don’t miss my guide on building a LEGO Balloon Powered Car.
(This post is in partnership with Elmer’s. While this is a sponsored post, all ideas and opinions are my own. I received compensation and free products in exchange for sharing this project.)
Want to Learn How to Make a LEGO Car Powered by the Sun?
Of course, you do! And guess what? Your kids will think you’re absolutely awesome when you build this amazing solar-powered LEGO car with them. It’s a fantastic way to combine creativity, engineering, and a bit of environmental science into one engaging project.
To get started on your solar-powered LEGO car, you’ll need to gather a few key components. First, you’ll need a selection of LEGO parts, including gears and axles to build the car’s chassis and drivetrain. Then, you’ll need a small 9V solar panel and a mini 6V motor, both equipped with pre-attached wires for easy connection. Finally, you’ll require some extra-strong glue, like Krazy Glue from Elmer’s, to securely assemble certain parts.
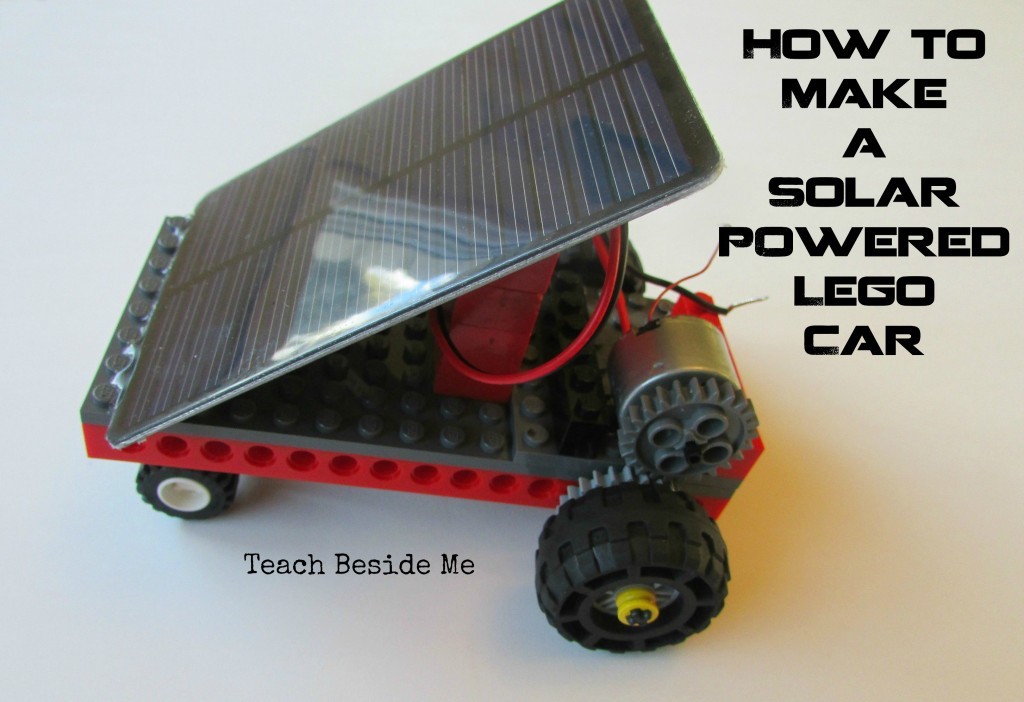
Let’s begin building our car! We started by constructing the car’s base. A long baseplate serves as the foundation, and we used two sets of wheels – smaller ones for the front and larger ones for the rear – to give it a classic car look. To mount the solar panel at the front, we built a support structure using stacked LEGO bricks. A strip of glue along the front edge helps to keep the solar panel firmly in place. For the motor, we created a small compartment near the rear wheels, ensuring it was positioned to drive the axle. We used glue to secure the motor in this compartment for stability.
The most challenging aspect of this project was definitely figuring out how to effectively transfer the motor’s rotation to the wheels. This requires a bit of mechanical ingenuity, but with the right approach, it’s totally achievable.
To solve this, I utilized long LEGO bricks with holes on the sides and inserted axles through these holes to create a rotating axis for the wheels. Gears are essential for transferring motion: I placed one gear on the wheel axle and another connected to the motor’s shaft. Since the motor shaft is quite thin, I used a small piece of tubing from a LEGO set to act as an adapter, fitting it onto the motor shaft and then into the center of the gear. This ensures a snug and effective connection.
During assembly, I realized that my axle wasn’t long enough to span the car’s width. To overcome this, we creatively joined two axles together underneath the car using a connector piece. A dab of glue at the joint provided extra security. Sometimes, LEGO building requires a bit of improvisation and problem-solving!
Here’s a closer look at the gear and motor connection from another angle, giving you a better view of how these parts interact to drive the wheels.
Another challenge I faced was selecting the right solar panel and motor voltage. My first attempt used solar panels that were too weak and didn’t generate enough power to turn the motor. It’s important to get the voltage compatibility right. The second set of solar panels worked perfectly! The moment the wheels started spinning, it was a moment of pure excitement and success!
And here it is, all assembled and ready to roll! (Note that the wires aren’t connected in these photos to prevent it from moving unintentionally.) To get your solar LEGO car moving, simply connect the wires from the solar panel to the motor and place the car in direct sunlight for about 10 minutes to charge up. We even used a portable lamp to keep it moving by following the light source. Occasionally, it might need a little jump start, which we provided by briefly touching the wires to a battery.
Here’s another angle of the finished solar LEGO car, highlighting different aspects of its design and construction.
Looking for More Fun LEGO Projects?
If you enjoyed building this solar-powered LEGO car, you might also love these other creative LEGO projects:
Balloon Powered Lego Car – Explore alternative power sources for your LEGO vehicles!
How To Make a Lego Chess Set – Combine LEGOs with strategy in this classic game.
LEGO City Earthquake – Learn about science and build a LEGO earthquake simulator.
Edible Math With LEGO Candy – Make math delicious with LEGO-shaped candies.
LEGO Tessellation Puzzle – Discover patterns and geometry with LEGO tessellations.