Crafting a rubber band car is an engaging project that combines fun with learning. This guide, brought to you by CARS.EDU.VN, explores the exciting world of DIY car construction, offering a creative way to understand basic physics and engineering principles. From selecting the right materials to fine-tuning your creation for optimal performance, discover how building a miniature vehicle can spark curiosity and innovation while exploring automotive concepts.
1. Gather Your Supplies For Your Rubber Band Car Project
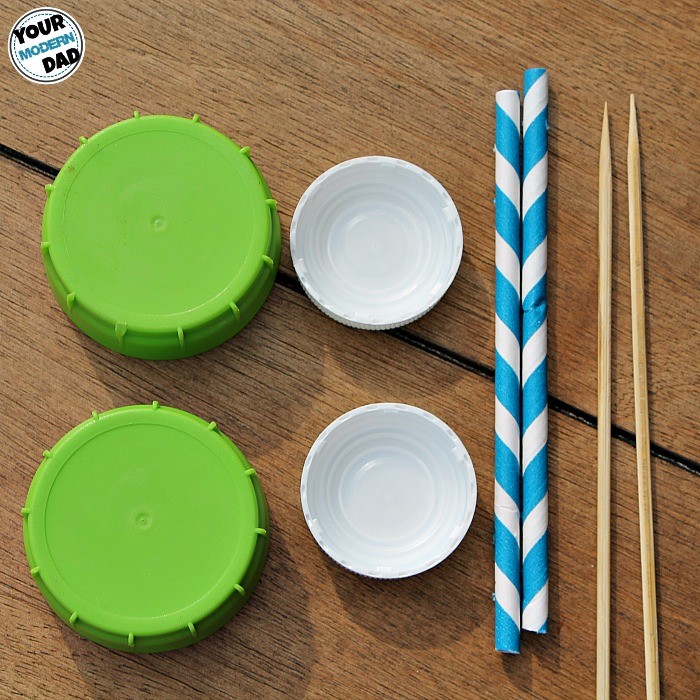
Before you embark on this exciting DIY adventure, it’s crucial to gather all the necessary materials. The beauty of this project lies in its simplicity and accessibility, often utilizing items you can find right in your home. Here’s a detailed list to ensure you’re well-prepared:
- Straws (2): These will serve as the primary frame of your car. Recycled paper straws are an excellent, eco-friendly choice.
- Toothpicks or Wooden Skewers (4): These will act as axles and structural supports for your car. Paper clips can also be used as a substitute.
- Container Lids (4): Milk container lids or prescription bottle caps are ideal for creating the wheels.
- Rubber Band: This is the heart of your car’s propulsion system. Experiment with different sizes and thicknesses to see how they affect performance. Consider using Rainbow Loom bands as a colorful alternative.
- Hot Glue Gun: Essential for securely assembling the components. If children are involved, use a low-temperature glue gun to prevent burns.
- Drill: For creating precise holes in the straws and container lids. Select drill bits appropriate for the size of the toothpicks.
- Ruler: To measure and mark the placement of holes accurately on the straws.
- Pencil or Marker: For marking the spots where you’ll drill holes.
- Scissors or Wire Cutters: To trim the toothpicks to the desired length.
- Optional Decorations: Paint, markers, stickers, or other decorative items to personalize your car.
2. Preparing The Straws For The Chassis Of Your Rubber Band Car
The straws form the backbone of your rubber band car, providing structure and support for the wheels and propulsion system. Accurate preparation is key to a stable and functional chassis.
-
Measure and Mark: Use a ruler to precisely measure and mark the locations for the holes on each straw. Each straw will require four holes in total. Two holes should be drilled at each end.
-
Hole Placement: On each end of the straw, mark the first hole 1/2 inch from the end. The second hole should be marked 1 inch from the end. Repeat this process on the opposite side of the straw, ensuring that both straws are identical.
-
Drill the Holes: Use a drill with appropriately sized drill bits to create the holes.
- Axle Holes (1/2 inch from the end): These holes need to be slightly larger to allow the toothpicks (axles) to rotate freely, enabling smooth wheel movement.
- Structural Support Holes (1 inch from the end): These holes should be smaller, providing a snug fit for the toothpicks to ensure structural integrity.
-
Repeat: Duplicate this process for the second straw to ensure uniformity in the chassis.
3. Assembling The Car Frame For Your Rubber Band Car
With the straws prepared, it’s time to assemble the car frame. This step involves connecting the straws with toothpicks to create a sturdy structure that will support the wheels and the rubber band mechanism.
- Insert Toothpicks: Take the toothpicks and insert them through the structural support holes (the holes marked at 1 inch or the 2nd hole from the end) in both straws. Ensure that the pointed tips of the toothpicks protrude from both sides of the straws.
- Secure with Glue: Apply hot glue to the areas where the toothpicks meet the straws. Start by gluing the inside portion of the connection, allowing it to dry completely.
- Trim Excess: Once the glue has dried on the inside, use scissors or wire cutters to carefully trim the pointed ends off the toothpicks.
- Reinforce: Apply a small amount of additional hot glue to the outside section of the straw where the toothpick is inserted. This will further secure the frame and ensure its durability.
4. Preparing The Wheels For Your Rubber Band Car
The wheels are crucial for the car’s mobility, and their preparation involves creating a central hole through which the axles (toothpicks) will pass.
- Locate the Center: Most container lids have a mark in the center, which serves as an ideal guide for drilling. If not, use a ruler to measure and mark the exact center of each lid.
- Drill Holes: Drill a hole in the center of each lid. The hole should be just large enough for the toothpicks to fit snugly, allowing the wheels to rotate without wobbling.
- Ensure Uniformity: Make sure the holes are consistently sized across all four lids for balanced performance.
5. Creating The Peg Axle For Winding In Your Rubber Band Car
The peg axle is a clever addition that simplifies the process of winding the rubber band, making it easier to store and release energy for propulsion.
- Drill a Pilot Hole: Take one of the toothpicks and carefully drill a very small hole in the center of one end. This hole will serve as the anchor for the peg.
- Insert Peg: Take one of the pointed tips that you cut off from the toothpicks earlier and insert it into the small hole you just drilled. This will act as a peg that you can easily grip to wind up the rubber band.
- Secure Peg: Use a tiny amount of hot glue to secure the peg in place, ensuring it won’t come loose during winding.
6. Assembling The Wheels And Axles In Your Rubber Band Car
Now that all the components are ready, it’s time to assemble the wheels and axles onto the car frame. This step requires precision to ensure the wheels are aligned and can rotate smoothly.
- Start with the Rear Axle: Take the toothpick with the peg attached (the rear axle) and insert it through the axle holes in the straws.
- Attach Wheels: Place a wheel on each end of the toothpick, ensuring the peg is positioned in the center.
- Glue Wheels in Place: Apply hot glue to the points where the wheels meet the toothpick to secure them. Make sure the wheels are straight and aligned properly.
- Repeat for Front Axle: Repeat the same process for the front axle, inserting the toothpick through the axle holes and attaching the remaining two wheels.
- Ensure Free Rotation: After the glue has dried, check that all four wheels rotate freely without any obstructions.
7. Adding Weight To The Rear Axle In Your Rubber Band Car
To prevent the wheels from spinning without traction, adding weight to the rear axle can significantly improve the car’s performance.
- Apply More Glue: Add an extra layer of hot glue to the caps on the rear axle. This will provide additional weight and help the wheels grip the surface.
- Use Playdough: Alternatively, pack a small amount of Playdough inside the caps to add weight. This is a fun and easy way to experiment with different weight distributions.
- Test and Adjust: Test the car on a smooth surface and observe how the wheels perform. Adjust the amount of weight as needed to achieve optimal traction.
8. Attaching The Rubber Band For Propulsion In Your Rubber Band Car
The final step is attaching the rubber band, which will provide the power to propel your car forward.
- Attach to Front Structure: Secure one end of the rubber band to the front structural support of the car frame. If you don’t have a rubber band, you can create one using Rainbow Loom bands, as demonstrated in the original guide.
- Connect to Peg Axle: Stretch the rubber band and attach the opposite end to the peg on the rear axle.
- Test the Mechanism: Slowly wind up the tires by rotating the rear axle peg. Observe how the rubber band tightens and stores potential energy.
- Release and Observe: Place the car on the ground and release the rear axle. The stored energy in the rubber band will transfer to the wheels, propelling the car forward.
9. Decorate And Personalize Your Rubber Band Car
Now that your rubber band car is fully functional, it’s time to unleash your creativity and add some personal touches.
- Paint: Use acrylic paints to add color and designs to the car frame and wheels.
- Markers: Draw patterns, logos, or racing stripes with permanent markers.
- Stickers: Apply stickers to create a unique and eye-catching look.
- Flags: Create miniature flags and attach them to the car for a patriotic theme.
- Babble Dabble: Let your kids express their creativity with a free-form painting session.
10. The Science Behind Your Rubber Band Car
Building a rubber band car is not just a fun activity; it’s also an excellent way to learn about fundamental principles of physics and engineering. Here are some key concepts that come into play:
- Potential Energy: When you wind up the rubber band, you are storing potential energy. This is energy that is waiting to be released.
- Kinetic Energy: When you release the car, the potential energy in the rubber band is converted into kinetic energy, the energy of motion.
- Force: The force of the rubber band unwinding is what propels the car forward.
- Motion: The car’s movement is a direct result of the force applied by the rubber band.
- Friction: Friction between the wheels and the ground affects the car’s speed and distance.
- Recycling: Using recycled materials for the car promotes environmental awareness and reduces waste.
- Engineering Design: The process of building the car involves problem-solving, design, and construction, all of which are essential aspects of engineering.
By building and experimenting with your rubber band car, you can gain a hands-on understanding of these important scientific and engineering concepts.
11. Optimizing Your Rubber Band Car For Speed And Distance
To get the most out of your rubber band car, consider these optimization tips:
- Rubber Band Tension: Experiment with different rubber bands to find the one that provides the best balance of tension and elasticity. A stronger rubber band will store more potential energy but may also cause the wheels to spin without traction.
- Wheel Size and Weight: Larger wheels cover more distance per rotation but may require more torque. Lighter wheels reduce inertia, allowing the car to accelerate faster.
- Weight Distribution: Adjust the weight distribution to maximize traction and stability. Adding more weight to the rear axle can improve traction, while balancing the weight can prevent the car from tipping over.
- Friction Reduction: Minimize friction by ensuring the axles rotate freely and the wheels are properly aligned. Lubricating the axles with a small amount of oil can also help.
- Aerodynamics: Streamline the car’s design to reduce air resistance. A more aerodynamic shape will allow the car to travel faster and farther.
- Surface Traction: Test the car on different surfaces to find the one that provides the best traction. Smooth, hard surfaces generally work best.
By experimenting with these factors, you can fine-tune your rubber band car for maximum speed and distance.
12. Troubleshooting Common Issues With Your Rubber Band Car
Even with careful construction, you may encounter some common issues with your rubber band car. Here are some troubleshooting tips:
-
Wheels Spinning Without Moving:
- Cause: Insufficient traction.
- Solution: Add weight to the rear axle using glue or Playdough. Try using rubber bands with more tension.
-
Car Not Moving Straight:
- Cause: Misaligned wheels or uneven weight distribution.
- Solution: Check that the wheels are properly aligned and securely attached. Adjust the weight distribution to balance the car.
-
Rubber Band Breaking:
- Cause: Excessive tension or a weak rubber band.
- Solution: Use a stronger rubber band or reduce the amount of tension when winding.
-
Car Stopping Abruptly:
- Cause: Excessive friction or an obstruction in the wheel rotation.
- Solution: Ensure the axles rotate freely and the wheels are not rubbing against the frame. Lubricate the axles if necessary.
-
Car Moving Slowly:
- Cause: Insufficient power or excessive weight.
- Solution: Use a stronger rubber band, reduce the weight of the car, or optimize the wheel size for better torque.
13. Advanced Modifications To Upgrade Your Rubber Band Car
For those looking to take their rubber band car to the next level, here are some advanced modifications:
- Gear Ratios: Incorporate a simple gear system to increase torque or speed. Use different-sized gears to adjust the gear ratio according to your desired performance.
- Adjustable Axles: Design adjustable axles to fine-tune the wheel alignment and camber. This can improve the car’s handling and stability.
- Suspension System: Add a basic suspension system using springs or flexible materials to absorb shocks and improve traction on uneven surfaces.
- Steering Mechanism: Implement a steering mechanism to allow the car to turn. This could be as simple as a manually adjustable front axle or a more complex remote-controlled system.
- Aerodynamic Body: Design and build a custom body for the car using lightweight materials like foam or balsa wood. Shape the body to minimize air resistance and improve aerodynamics.
By incorporating these advanced modifications, you can transform your simple rubber band car into a high-performance machine.
14. Exploring Different Rubber Band Car Designs
The basic rubber band car design can be adapted and modified in countless ways to create unique and innovative vehicles. Here are some ideas to spark your imagination:
- Three-Wheeled Car: Build a car with three wheels instead of four. Experiment with different wheel arrangements to see how they affect stability and maneuverability.
- Off-Road Car: Design a car with large, knobby wheels and a raised chassis to tackle rough terrain. Add a suspension system to absorb shocks and improve traction.
- Miniature Car: Create a tiny rubber band car using small components like miniature straws, toothpicks, and bottle caps.
- Long-Distance Car: Optimize your car for maximum distance by focusing on reducing friction, improving aerodynamics, and maximizing the efficiency of the rubber band mechanism.
- Speed Car: Design a car for maximum speed by using lightweight materials, a high-tension rubber band, and a low gear ratio.
15. Rubber Band Car Competitions And Challenges
Organizing a rubber band car competition or challenge is a fun and engaging way to test your engineering skills and compete with friends and family. Here are some ideas for competitions:
- Distance Challenge: The goal is to build a car that travels the farthest distance on a single winding.
- Speed Challenge: The goal is to build a car that covers a set distance in the shortest amount of time.
- Obstacle Course Challenge: The goal is to build a car that can navigate a challenging obstacle course with turns, ramps, and other obstacles.
- Design Challenge: The goal is to build the most innovative and visually appealing rubber band car based on specific design criteria.
16. The Educational Benefits Of Building A Rubber Band Car
Building a rubber band car offers a wide range of educational benefits for children and adults alike. Here are some key learning outcomes:
- STEM Education: The project integrates science, technology, engineering, and mathematics concepts in a hands-on and engaging way.
- Problem-Solving Skills: Building and optimizing the car requires problem-solving skills to overcome challenges and improve performance.
- Creativity and Innovation: The project encourages creativity and innovation in design and construction.
- Critical Thinking: Analyzing the car’s performance and identifying areas for improvement requires critical thinking skills.
- Fine Motor Skills: Assembling the car requires precise movements and coordination, which helps develop fine motor skills.
- Teamwork: Working on the project with others promotes teamwork and collaboration skills.
- Patience and Persistence: Building a successful rubber band car requires patience and persistence to overcome challenges and achieve the desired results.
- Understanding of Physics: The project provides a hands-on way to learn about concepts such as potential energy, kinetic energy, force, and friction.
17. Materials Beyond The Basics: Rubber Band Car Innovation
While the standard rubber band car relies on simple materials, venturing beyond the basics can unlock new levels of innovation. Explore these options for enhanced performance and creative design:
- Exotic Woods: Swap out straws for balsa wood or basswood. These lightweight woods offer superior strength and can be easily shaped for aerodynamic designs.
- 3D-Printed Components: Design and 3D-print custom wheels, gears, and chassis components for precise specifications and unique aesthetics.
- High-Performance Rubber: Invest in specialized rubber bands designed for model propulsion. These offer superior elasticity and longevity, maximizing the car’s power output.
- Miniature Bearings: Integrate miniature bearings into the wheel axles to drastically reduce friction, allowing for smoother and faster rotation.
- Carbon Fiber Reinforcements: Incorporate carbon fiber rods or sheets into the chassis for unparalleled strength and lightweight construction.
- Solar Panels: Attach small solar panels to charge a capacitor that assists the rubber band, adding a sustainable energy component.
- Electronic Speed Control (ESC): For advanced enthusiasts, an ESC can regulate the rubber band’s release, providing controlled acceleration and top speed.
18. Rubber Band Car Aerodynamics: Streamlining For Speed
Aerodynamics play a crucial role in maximizing the speed and distance of a rubber band car. Understanding and applying aerodynamic principles can significantly enhance performance.
- Teardrop Shape: Mimic the teardrop shape, known for its minimal drag coefficient. This involves a rounded front and a tapering rear to smoothly guide airflow.
- Enclosed Wheels: Partially or fully enclose the wheels to reduce turbulence and air resistance. Wheel covers can be 3D-printed or crafted from lightweight materials.
- Smooth Surfaces: Ensure all surfaces are smooth and free of protrusions that could disrupt airflow. Sanding and polishing can significantly reduce drag.
- Airfoils: Incorporate small airfoils or wings to generate downforce, improving traction and stability at higher speeds. Experiment with different airfoil designs to find the optimal balance.
- Wind Tunnel Testing: Use a homemade or professional wind tunnel to visualize airflow and identify areas for improvement. Smoke or streamers can help reveal turbulence and drag.
- Adjustable Spoilers: Add adjustable spoilers to fine-tune the car’s aerodynamics based on track conditions and desired performance characteristics.
- Venturi Ducts: Integrate venturi ducts to accelerate airflow around specific areas of the car, reducing pressure and drag.
19. Safety Considerations When Building Rubber Band Cars
While rubber band cars are generally safe, it’s important to take certain precautions to avoid injuries.
- Supervision: Always supervise children when they are using tools or handling small parts.
- Eye Protection: Wear safety glasses to protect your eyes from flying debris.
- Hot Glue Gun Safety: Use a low-temperature glue gun to prevent burns. Avoid touching the hot nozzle or molten glue.
- Sharp Tools: Use sharp tools like scissors or wire cutters with caution. Keep your fingers away from the cutting edge.
- Small Parts: Keep small parts away from young children to prevent choking hazards.
- Rubber Band Safety: Avoid stretching the rubber band too far, as it could snap and cause injury.
- Work Area: Keep your work area clean and organized to prevent accidents.
- Ventilation: Work in a well-ventilated area when using paints, glues, or other chemicals.
20. The Online Community: Rubber Band Car Enthusiasts Unite
Connect with a global community of rubber band car enthusiasts online. These platforms offer a wealth of knowledge, inspiration, and support for builders of all skill levels:
- Online Forums: Engage in discussions, share your projects, and seek advice on dedicated forums like Instructables or Reddit’s r/RubberBand.
- Social Media Groups: Join Facebook groups or follow Instagram accounts dedicated to rubber band cars for daily inspiration and project showcases.
- YouTube Channels: Subscribe to channels featuring tutorials, design tips, and competition footage to enhance your building techniques.
- Online Competitions: Participate in virtual rubber band car competitions, showcasing your creations and competing against builders worldwide.
- Collaborative Projects: Connect with other enthusiasts to collaborate on ambitious rubber band car projects, pooling resources and expertise.
- Online Marketplaces: Explore online marketplaces like Etsy or eBay for unique rubber band car components, designs, and finished models.
- Educational Resources: Access online educational resources, including articles, videos, and simulations, to deepen your understanding of the science behind rubber band cars.
21. Rubber Band Cars: A Stepping Stone To Automotive Careers
The skills and knowledge gained from building rubber band cars can serve as a valuable stepping stone towards a career in the automotive industry.
- Engineering: Understanding the principles of mechanics, aerodynamics, and materials science can lead to careers in automotive engineering, design, or research and development.
- Design: The creativity and problem-solving skills involved in designing rubber band cars can translate into careers in automotive styling, product design, or user interface design.
- Manufacturing: The hands-on experience of building rubber band cars can be valuable for careers in automotive manufacturing, assembly, or quality control.
- Repair and Maintenance: The knowledge of how mechanical systems work can be applied to careers in automotive repair, maintenance, or diagnostics.
- Sales and Marketing: A passion for cars and a knowledge of their workings can be beneficial for careers in automotive sales, marketing, or customer service.
- Motorsports: The competitive spirit and engineering skills developed through rubber band car competitions can lead to careers in motorsports, such as racing, team management, or engineering support.
- Education: Sharing your knowledge and passion for rubber band cars can lead to careers in education, such as teaching science, technology, engineering, or mathematics.
22. The Future Of Rubber Band Car Technology
As technology continues to advance, the future of rubber band car technology is full of exciting possibilities.
- Smart Materials: Using smart materials that can change their properties in response to external stimuli, such as temperature or pressure, could allow for more advanced and adaptive car designs.
- Micro Robotics: Integrating micro robotic components could enable the creation of tiny, highly maneuverable rubber band cars capable of performing complex tasks.
- Artificial Intelligence: Incorporating artificial intelligence could allow rubber band cars to learn and adapt to their environment, optimizing their performance in real-time.
- Sustainable Materials: Using sustainable and biodegradable materials could make rubber band cars more environmentally friendly.
- Virtual Reality: Simulating rubber band car designs and performance in virtual reality could allow for faster and more efficient prototyping.
- 3D Printing: 3D printing could enable the creation of complex and customized rubber band car components with unprecedented precision.
- Crowd Sourcing: Leveraging crowd sourcing platforms could allow enthusiasts to collaborate on the design and development of new rubber band car technologies.
23. How Cars.Edu.Vn Supports Your Automotive Journey
At CARS.EDU.VN, we understand the passion and curiosity that drives automotive enthusiasts. Whether you’re tinkering with a rubber band car or dreaming of your next vehicle, we provide comprehensive resources to support your journey.
- Expert Reviews: Access in-depth reviews of the latest car models, providing unbiased insights into performance, safety, and features.
- Maintenance Guides: Learn essential maintenance tips and step-by-step guides to keep your vehicle running smoothly and extend its lifespan.
- Repair Solutions: Find solutions to common car problems with our troubleshooting guides and expert advice.
- Community Forum: Connect with fellow car enthusiasts in our community forum, sharing experiences, asking questions, and learning from others.
- Educational Articles: Explore a wide range of educational articles covering topics such as automotive technology, history, and industry trends.
- Service Directory: Locate trusted and reliable car service providers in your area with our comprehensive service directory.
- Car Buying Advice: Get expert advice on buying a new or used car, including tips on financing, negotiation, and avoiding common pitfalls.
24. Frequently Asked Questions (FAQ) About Rubber Band Cars
-
Q1: What is a rubber band car?
- A rubber band car is a simple vehicle powered by the elastic energy stored in a wound rubber band.
-
Q2: What materials are needed to build a rubber band car?
- Common materials include straws, toothpicks, container lids, rubber bands, hot glue, and a drill.
-
Q3: How does a rubber band car work?
- Winding the axle stores potential energy in the rubber band, which is then released to turn the wheels and propel the car forward.
-
Q4: How can I make my rubber band car go faster?
- Reduce friction, use a stronger rubber band, and optimize the car’s aerodynamics and weight distribution.
-
Q5: What are some common problems with rubber band cars?
- Common problems include wheels spinning without moving, the car not moving straight, and the rubber band breaking.
-
Q6: What are some advanced modifications I can make to my rubber band car?
- Advanced modifications include adding gears, adjustable axles, suspension systems, and steering mechanisms.
-
Q7: Are rubber band cars safe?
- Yes, but it’s important to take precautions such as supervising children, wearing eye protection, and using hot glue guns and sharp tools carefully.
-
Q8: What can I learn from building a rubber band car?
- Building a rubber band car can teach you about STEM concepts, problem-solving, creativity, and critical thinking.
-
Q9: Where can I find more information and inspiration for building rubber band cars?
- Online forums, social media groups, YouTube channels, and educational resources offer a wealth of information and inspiration.
-
Q10: Can building a rubber band car help me pursue a career in the automotive industry?
- Yes, the skills and knowledge gained can be a valuable stepping stone towards careers in engineering, design, manufacturing, and more.
25. Additional Resources For Car Enthusiasts At CARS.EDU.VN
Ready to dive deeper into the world of automobiles? CARS.EDU.VN offers a treasure trove of resources to fuel your passion and expand your knowledge.
- Detailed Car Comparisons: Make informed decisions with our comprehensive car comparison tool. Evaluate different models side-by-side, examining specs, features, and pricing to find the perfect fit for your needs and budget.
- Troubleshooting Guides: Tackle common car problems with confidence using our detailed troubleshooting guides. From diagnosing engine issues to resolving electrical glitches, we provide step-by-step solutions to get you back on the road.
- Maintenance Schedules: Keep your car running smoothly with our customizable maintenance schedules. Tailored to your vehicle’s make and model, these schedules ensure you never miss a crucial service.
- Automotive News and Trends: Stay ahead of the curve with our up-to-date coverage of automotive news and trends. From electric vehicles to autonomous driving, we keep you informed about the latest innovations shaping the industry.
- Car Care Tips and Tricks: Discover insider tips and tricks to keep your car looking its best. From washing and waxing to detailing and paint protection, we share expert techniques for maintaining your vehicle’s appearance.
- DIY Repair Tutorials: Save money and gain valuable skills with our DIY repair tutorials. Learn how to perform basic maintenance tasks, such as changing oil, replacing filters, and swapping out brake pads.
- Interactive Diagrams: Visualize complex car systems with our interactive diagrams. These diagrams provide a detailed breakdown of each component, helping you understand how your vehicle works.
Do you have a knack for cars and a thirst for knowledge? CARS.EDU.VN is your ultimate destination.
Address: 456 Auto Drive, Anytown, CA 90210, United States
Whatsapp: +1 555-123-4567
Website: CARS.EDU.VN
Building a rubber band car is just the beginning. At cars.edu.vn, we’re committed to fueling your automotive journey every step of the way. Visit our website today and unlock a world of knowledge, inspiration, and support. Let’s drive the future of automotive enthusiasm together!