Tired of that lingering gym sock smell or the ghost of last week’s takeout in your car? We’ve all been there. You hop into your vehicle, hoping for a fresh start to your commute or errands, only to be greeted by unpleasant odors. Those generic, overpowering tree fresheners from the gas station might mask the smell, but they often come with a synthetic scent that’s just as off-putting. If you’re craving a truly fresh and natural car environment, you’re in the right place.
This guide will walk you through creating your very own DIY car freshener using essential oils. It’s a simple, affordable, and customizable way to keep your car smelling great without harsh chemicals or artificial fragrances. Say goodbye to mystery smells and hello to a naturally refreshed ride!
What You’ll Need to Make a Homemade Car Freshener
Creating your own car freshener is surprisingly easy and requires just a few simple supplies. You probably already have some of these items at home! Here’s a breakdown of what you’ll need to get started:
Ingredients for Your DIY Car Freshener
- Carrier Oil: 1 Tablespoon. This helps to dilute the essential oils and allows them to disperse slowly. Good options include:
- Canola Oil
- Olive Oil
- Almond Oil
- Coconut Oil (fractionated is best to avoid solidification in cooler temperatures)
- Essential Oils: 15 drops. This is where you get to customize your scent! Choose your favorite single oils or create a blend. Consider these popular options for car fresheners:
- Lavender
- Lemon
- Peppermint
- Sweet Orange
- Eucalyptus
- Pine
Supplies for Assembling Your Car Freshener
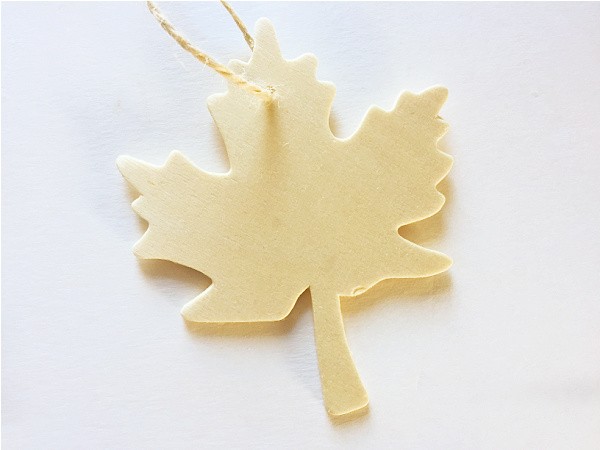
- Thin Wood Ornament: Choose any shape you like! Unfinished wood works best as it absorbs the oil well. Craft stores and online marketplaces offer a wide variety of wooden ornaments.
- Twine or String: For hanging your freshener in your car.
- Small Glass or Ceramic Bowl: For mixing your oil blend. Avoid plastic as essential oils can degrade some plastics.
- Small Paintbrush: To apply the oil mixture to the wood ornament.
- Ziploc Bag: To allow the wood to fully absorb the oils.
- Hammer and Nail (optional): If your chosen wood ornament doesn’t already have a hole for hanging.
Step-by-Step Guide: How to Make Your DIY Car Freshener
Now for the fun part – putting it all together! Follow these simple steps to create your own natural car freshener:
-
Prepare the Ornament: If your wood ornament doesn’t have a hole, carefully create one using a hammer and nail. Thread the twine or string through the hole and tie it to create a loop for hanging.
-
Mix Your Oil Blend: In your glass or ceramic bowl, combine 1 tablespoon of carrier oil with 15 drops of your chosen essential oil(s). Stir gently to mix the oils together.
-
Apply the Oil Mixture: Using your small paintbrush, generously brush the oil mixture onto both sides of the wood ornament. Ensure the wood is well coated to maximize scent absorption and longevity.
-
Allow Absorption: Place the oil-covered wood ornament into a Ziploc bag. Seal the bag and let it sit for a few hours, or ideally overnight. This allows the wood to fully absorb the oil mixture, creating a long-lasting scent.
-
Hang and Enjoy: Remove the freshener from the Ziploc bag and hang it in your car. A great place to hang it is from your rearview mirror (check local laws regarding hanging items from your rearview mirror) or from an air vent using a small Command hook. The airflow from the vent will help to disperse the scent throughout your car.
-
Refresh as Needed: Essential oils naturally dissipate over time. When you notice the scent fading, simply add a few more drops of essential oil directly onto the wood ornament to refresh the fragrance. There’s no need to reapply the carrier oil each time.
Tips for Customizing Your DIY Car Freshener
One of the best things about making your own car freshener is the ability to customize it to your preferences! Here are a few ideas to personalize your DIY:
- Scent Blends: Experiment with different essential oil combinations to create your perfect car aroma. Consider blends like:
- Invigorating: Peppermint and Lemon
- Relaxing: Lavender and Sweet Orange
- Clean & Fresh: Eucalyptus and Pine
- Uplifting: Grapefruit and Bergamot
- Wood Ornament Variety: Get creative with your wood ornaments! Try different shapes, sizes, or even use natural wood slices for a rustic look.
- Carrier Oil Alternatives: While the oils listed above are great options, you can also explore other carrier oils like jojoba oil or grapeseed oil.
- Scent Intensity: Adjust the number of essential oil drops to control the strength of the scent. Start with 15 drops and adjust to your preference.
Common Questions About Making Your Own Car Freshener
Let’s address some frequently asked questions about creating your own DIY car freshener:
How Can I Effectively Eliminate Odors from My Car?
This DIY car freshener is designed to freshen your car and mask odors with pleasant scents. However, if you’re dealing with persistent or strong odors, you might need a more odor-absorbing solution. For odor elimination, consider using baking soda. You can place an open container of baking soda in your car to absorb odors, or explore DIY air freshener recipes that incorporate baking soda or activated charcoal for odor removal.
Which Essential Oils Should I Avoid in a Homemade Car Freshener?
While you can generally use any essential oil you enjoy, some oils are better suited for car fresheners than others. Citrus oils, for example, have wonderfully fresh scents, but they tend to evaporate quickly. If you want to use citrus oils, consider blending them with longer-lasting oils like lavender or woodsy oils to help anchor the scent. Also, be mindful of photosensitivity with some citrus oils – avoid direct skin contact with undiluted citrus oils and be aware of potential sun sensitivity.
It’s also worth noting that very strong scents might be overwhelming in a confined car space. Start with milder essential oils or use a lower concentration to gauge your preference.
What Are the Benefits of Making My Own DIY Car Freshener?
Making your own car freshener offers several advantages over store-bought options:
- Natural Ingredients: You control exactly what goes into your freshener, using natural essential oils and avoiding synthetic fragrances and potentially harmful chemicals found in many commercial air fresheners.
- Customizable Scents: Create your perfect scent blend to match your mood or preferences.
- Cost-Effective: DIY car fresheners can be more budget-friendly than constantly buying disposable air fresheners.
- Eco-Friendly: Reduces waste compared to disposable fresheners.
- Healthier Option: Avoid potential respiratory irritation or allergies associated with synthetic fragrances.
By making your own DIY car freshener, you can enjoy a naturally fresh and inviting car environment while knowing exactly what you’re breathing in. It’s a simple and rewarding project that enhances your daily drive!
DIY Car Freshener Recipe
Use essential oils to create a naturally scented car freshener.
Print Recipe Pin Recipe
Ingredients
- 1 Tablespoon Carrier Oil (Canola, Olive, Almond, Coconut, etc.)
- 15 Drops Essential Oil(s) of your choice
Supplies
- Thin Wood Ornament
- Twine or String
- Small Glass or Ceramic Bowl
- Small Paintbrush
- Ziploc Sandwich Bag
- Hammer and Nail (optional)
Instructions
- If needed, create a hole in the wood ornament using a hammer and nail. Thread twine through the hole and tie to make a loop.
- Add carrier oil to a small glass or ceramic bowl.
- Stir in 15 drops of essential oil(s).
- Using a small paintbrush, paint the oil mixture onto both sides of the wood ornament.
- Place the ornament in a Ziploc bag and let the oil absorb for several hours or overnight.
- Remove from bag and hang in your car.
- Refresh scent by adding a few drops of essential oil directly to the ornament as needed.