How To Make Remote Control Car? Creating a remote control car can be an exciting project. CARS.EDU.VN offers in-depth guides and expert advice to help you successfully build your own remote control vehicle. Whether you’re a beginner or experienced builder, explore remote control conversion, DIY car projects, and model car customization for a rewarding experience.
Table of Contents
- Understanding the Basics of Remote Control Cars
- Gathering the Necessary Materials and Tools
- Selecting the Right Motor for Your RC Car
- Choosing the Best Battery and Power Source
- Understanding Radio Control Systems
- Building the Chassis and Frame
- Attaching the Wheels and Steering Mechanism
- Wiring the Motor and Electronics
- Installing the Receiver and Antenna
- Programming and Testing the RC Car
- Troubleshooting Common Issues
- Advanced Customization and Upgrades
- Safety Precautions and Best Practices
- Exploring Different Types of RC Cars
- Maintenance Tips for Long-Lasting Performance
- Frequently Asked Questions (FAQs)
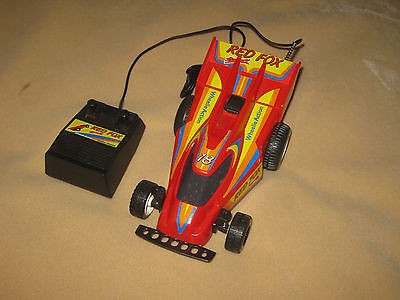
1. Understanding the Basics of Remote Control Cars
Remote control (RC) cars have captured the imagination of enthusiasts for decades. Before diving into a build, grasp the foundational concepts that make these miniature vehicles tick. This involves familiarizing yourself with the core components and their functions.
- Chassis: The structural base of the RC car, providing a platform for mounting all other components.
- Motor: The power plant that drives the wheels, converting electrical energy into mechanical motion.
- Battery: The energy source that powers the motor and electronics.
- Receiver: The electronic component that receives signals from the remote control transmitter.
- Servo: A small motor that controls the steering mechanism.
- Transmitter: The handheld remote control used to send commands to the car.
- Electronic Speed Controller (ESC): Regulates the amount of power delivered to the motor, controlling the car’s speed.
Understanding these elements ensures a smooth build. Consider the scale and type of RC car you want to create. Different scales (e.g., 1/10, 1/16) require different components.
- On-road cars: Designed for smooth surfaces and speed.
- Off-road cars: Built for rugged terrain and durability.
Understanding these fundamentals sets the stage for a rewarding RC car building experience.
2. Gathering the Necessary Materials and Tools
Before you start building your RC car, it’s essential to gather all the necessary materials and tools. Having everything on hand will streamline the building process and prevent unnecessary delays. Here’s a comprehensive list of what you’ll need:
Materials:
| Material | Description |
|---|---|
| DC Motor | The powerhouse of your RC car. Choose one based on your desired speed and torque. |
| Wheels and Tires | Select based on the type of terrain you plan to drive on. |
| Chassis or Base Platform | Provides the structural foundation for your car. |
| Battery Pack | Powers the motor and electronic components. Consider voltage and capacity. |
| Remote Control Transmitter | Sends signals to control the car. |
| Receiver Unit | Receives signals from the transmitter and relays them to the ESC and servo. |
| Electronic Speed Controller (ESC) | Regulates the motor’s speed based on the signal from the receiver. |
| Servo Motor | Controls the steering mechanism. |
| Wires and Connectors | Used to connect all electronic components. |
| Gears | To transmit power from the motor to the wheels. |
| Axles | Supports the wheels and allows them to rotate. |
| Screws and Bolts | To fasten components together securely. |
Tools:
| Tool | Description |
|---|---|
| Screwdrivers | Various sizes for different screws. |
| Pliers | For cutting, stripping, and bending wires. |
| Wire Strippers | To remove insulation from wires without damaging them. |
| Soldering Iron | To create secure and lasting connections between wires and electronic components. |
| Solder | Used with the soldering iron to create electrical connections. |
| Multimeter | To test voltage, current, and resistance in electronic circuits. |
| Hot Glue Gun | For securing components and insulating connections. |
| Drill | To create holes for mounting components. |
| Hacksaw or Cutter | To cut the chassis or other materials to the desired size and shape. |
| Measuring Tape/Ruler | For accurate measurements when cutting and assembling components. |
Having these materials and tools ready will ensure a smooth and efficient building process. For more detailed guidance and tips, visit CARS.EDU.VN.
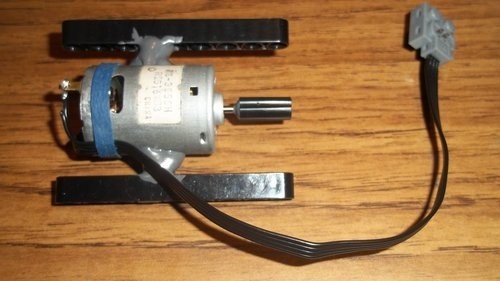
3. Selecting the Right Motor for Your RC Car
Choosing the right motor is crucial for determining the performance of your RC car. Different motors offer varying levels of speed, torque, and efficiency. Here’s a guide to help you select the best motor for your project:
Types of Motors
- Brushed Motors:
- Description: These are the most common and affordable type of motor. They use brushes to conduct electricity to the commutator, which in turn rotates the motor.
- Pros:
- Inexpensive
- Easy to control
- Cons:
- Lower efficiency
- Requires more maintenance due to brush wear
- Shorter lifespan
- Brushless Motors:
- Description: These motors don’t use brushes, which reduces friction and increases efficiency. They are controlled by an Electronic Speed Controller (ESC).
- Pros:
- Higher efficiency
- Longer lifespan
- Less maintenance
- Higher power-to-weight ratio
- Cons:
- More expensive
- Requires an ESC for control
Factors to Consider
- Voltage: Ensure the motor’s voltage matches your battery pack’s voltage.
- RPM (Revolutions Per Minute): Higher RPM means faster speed but may reduce torque.
- Torque: Higher torque is needed for climbing or carrying heavy loads.
- Size and Weight: Consider the space available in your chassis and the overall weight you want to achieve.
- Efficiency: Brushless motors are generally more efficient, providing longer run times.
- Cost: Brushed motors are more budget-friendly, while brushless motors offer better performance at a higher price.
Motor Size and Scale
The size of the motor should be proportional to the scale of your RC car. Common sizes include:
- 1/10 Scale: 540 size motors are common.
- 1/16 Scale: 380 or 390 size motors are suitable.
- 1/18 Scale: 280 size motors are often used.
Recommendations
For beginners, a brushed motor is a good starting point due to its simplicity and lower cost. As you gain experience, upgrading to a brushless motor can significantly improve performance.
Table: Motor Comparison
| Feature | Brushed Motor | Brushless Motor |
|---|---|---|
| Cost | Lower | Higher |
| Efficiency | Lower | Higher |
| Maintenance | Higher | Lower |
| Lifespan | Shorter | Longer |
| Performance | Moderate | High |
By carefully considering these factors, you can select the ideal motor for your RC car project. For more expert advice and detailed guides, visit CARS.EDU.VN.
4. Choosing the Best Battery and Power Source
Selecting the appropriate battery and power source is vital for your RC car’s performance and runtime. Different battery types offer unique advantages and disadvantages. Here’s a guide to help you make the right choice:
Types of Batteries
- Nickel-Cadmium (NiCd):
- Description: An older technology known for its durability.
- Pros:
- Durable
- Can handle high discharge rates
- Cons:
- Lower energy density
- Suffers from “memory effect” (reduced capacity if not fully discharged before recharging)
- Environmentally unfriendly
- Nickel-Metal Hydride (NiMH):
- Description: A more advanced alternative to NiCd batteries.
- Pros:
- Higher energy density than NiCd
- Less prone to memory effect
- More environmentally friendly than NiCd
- Cons:
- Higher self-discharge rate
- Can overheat if overcharged
- Lithium Polymer (LiPo):
- Description: The most popular choice for RC cars due to their high performance.
- Pros:
- Very high energy density
- Lightweight
- High discharge rates
- Cons:
- More expensive
- Requires careful handling and charging
- Can be dangerous if mishandled (risk of fire or explosion)
- Lithium-Ion (Li-Ion):
- Description: Similar to LiPo but generally safer and more stable.
- Pros:
- High energy density
- Longer lifespan compared to LiPo
- Safer than LiPo
- Cons:
- Lower discharge rates compared to LiPo
- More expensive than NiMH
Key Factors to Consider
- Voltage: Match the battery voltage to your motor’s requirements. Common voltages are 7.2V, 7.4V, 11.1V, and 14.8V.
- Capacity (mAh): Higher mAh ratings provide longer runtimes.
- Discharge Rate (C-Rating): Indicates how quickly the battery can discharge its energy. Higher C-ratings are needed for high-performance motors.
- Size and Weight: Ensure the battery fits within your RC car’s chassis and doesn’t add excessive weight.
- Safety: LiPo batteries require special chargers and careful handling to avoid hazards.
Recommendations
- Beginners: NiMH batteries are a good starting point due to their safety and ease of use.
- Advanced Users: LiPo batteries offer superior performance for those who are comfortable with their handling requirements.
Table: Battery Comparison
| Feature | NiCd | NiMH | LiPo | Li-Ion |
|---|---|---|---|---|
| Energy Density | Low | Moderate | High | High |
| Memory Effect | High | Low | None | None |
| Discharge Rate | High | Moderate | Very High | Moderate |
| Safety | Moderate | Moderate | Low | High |
| Cost | Low | Moderate | High | High |
Choosing the right battery ensures your RC car runs efficiently and safely. For more detailed information and expert recommendations, visit CARS.EDU.VN.
5. Understanding Radio Control Systems
Radio control (RC) systems are the backbone of any remote-controlled vehicle. Understanding how these systems work is essential for building and operating your RC car effectively. This section covers the key components and principles of RC systems.
Components of an RC System
-
Transmitter (Remote Control):
- Description: The handheld device used to send commands to the RC car.
- Functions: Controls the car’s speed, steering, and other functions.
- Types:
- Stick Transmitters: Feature two joysticks for controlling throttle and steering.
- Wheel Transmitters: Use a steering wheel for steering and a trigger for throttle.
-
Receiver:
- Description: Installed in the RC car, the receiver picks up signals from the transmitter.
- Functions: Decodes the signals and relays them to the Electronic Speed Controller (ESC) and servo motor.
- Channels: The number of independent functions the receiver can control (e.g., throttle, steering, lights).
-
Electronic Speed Controller (ESC):
- Description: Regulates the amount of power sent to the motor.
- Functions: Controls the car’s speed and acceleration.
- Types:
- Brushed ESCs: Designed for use with brushed motors.
- Brushless ESCs: Designed for use with brushless motors and offer more precise control.
-
Servo Motor:
- Description: A small motor that controls the steering mechanism.
- Functions: Moves the wheels left or right in response to the driver’s input.
- Types:
- Standard Servos: Common for basic RC car steering.
- High-Torque Servos: Provide more force for precise control.
- Digital Servos: Offer faster response times and programmable settings.
Frequencies and Protocols
- Frequencies: RC systems operate on different radio frequencies, such as 27 MHz, 49 MHz, and 2.4 GHz.
- 2.4 GHz: The most common frequency for modern RC systems due to its reliability and resistance to interference.
- Protocols: Digital protocols like FHSS (Frequency Hopping Spread Spectrum) and DSM (Digital Spectrum Modulation) ensure secure and reliable communication between the transmitter and receiver.
Binding
- Definition: The process of linking the transmitter and receiver so they communicate exclusively with each other.
- Importance: Prevents interference from other RC systems operating in the same area.
- Process: Usually involves pressing a button on the receiver and transmitter simultaneously.
Recommendations
- Beginners: Opt for a 2.4 GHz system for its reliability and ease of use.
- Advanced Users: Consider programmable transmitters with multiple channels and adjustable settings.
Table: RC System Components
| Component | Description | Function |
|---|---|---|
| Transmitter | Handheld control device | Sends commands to the RC car |
| Receiver | Installed in the RC car | Receives and decodes signals from the transmitter |
| ESC | Regulates power to the motor | Controls the car’s speed and acceleration |
| Servo | Controls the steering mechanism | Moves the wheels left or right in response to commands |
Understanding RC systems is crucial for a successful RC car build. For further details, expert advice, and product recommendations, visit CARS.EDU.VN.
6. Building the Chassis and Frame
The chassis and frame form the structural foundation of your RC car. Building a robust and well-designed chassis is critical for performance and durability. Here’s a comprehensive guide to help you construct a solid base for your RC car:
Materials for Chassis Construction
- Aluminum:
- Pros: Lightweight, strong, and corrosion-resistant.
- Cons: Can be more expensive and requires specialized tools for cutting and drilling.
- Carbon Fiber:
- Pros: Extremely lightweight and strong, offering excellent performance.
- Cons: Very expensive and can be brittle. Requires special cutting tools to avoid splintering.
- Plastic (ABS, PVC):
- Pros: Inexpensive, easy to work with, and readily available.
- Cons: Not as strong or durable as metal or carbon fiber.
- Wood (Plywood, Balsa):
- Pros: Lightweight and easy to cut and shape. Suitable for beginner projects.
- Cons: Not very durable and can be affected by moisture.
Design Considerations
- Size and Scale: The chassis size should match the scale of your RC car (e.g., 1/10, 1/16).
- Weight Distribution: Aim for a balanced weight distribution to improve handling.
- Mounting Points: Plan for mounting points for the motor, battery, receiver, servo, and suspension components.
- Ground Clearance: Consider the ground clearance needed for the type of terrain you plan to drive on.
- Durability: Choose materials and designs that can withstand impacts and stress.
Step-by-Step Construction Guide
- Planning and Design:
- Sketch a detailed design of your chassis, including dimensions and mounting points.
- Use CAD software for precise designs, if available.
- Cutting the Material:
- Use a hacksaw, cutter, or laser cutter to cut the chassis material to the desired shape.
- Ensure accurate measurements to avoid errors.
- Drilling Holes:
- Drill holes for mounting the motor, battery, receiver, servo, and suspension components.
- Use a drill press for accurate and clean holes.
- Assembling the Chassis:
- Use screws, bolts, or epoxy to assemble the chassis components.
- Ensure all joints are secure and aligned properly.
- Reinforcement:
- Add reinforcement to critical areas, such as the suspension mounting points and motor mount.
- Use metal brackets or carbon fiber strips for added strength.
Tips for Success
- Accuracy: Precise measurements and cuts are essential for a well-aligned chassis.
- Stability: Ensure the chassis is rigid and doesn’t flex excessively.
- Protection: Design the chassis to protect the electronic components from impacts and debris.
Table: Chassis Material Comparison
| Material | Pros | Cons |
|---|---|---|
| Aluminum | Lightweight, strong, corrosion-resistant | More expensive, requires specialized tools |
| Carbon Fiber | Extremely lightweight and strong | Very expensive, brittle, requires special tools |
| Plastic | Inexpensive, easy to work with | Not as strong or durable |
| Wood | Lightweight, easy to cut and shape | Not very durable, affected by moisture |
Building a solid chassis is crucial for your RC car’s performance and longevity. For detailed plans, material recommendations, and expert tips, visit CARS.EDU.VN.
7. Attaching the Wheels and Steering Mechanism
Attaching the wheels and steering mechanism correctly is essential for your RC car’s maneuverability and control. This section provides a detailed guide on how to securely attach the wheels and implement a functional steering system.
Attaching the Wheels
- Axles:
- Description: The rods that support the wheels and allow them to rotate.
- Types:
- Solid Axles: Simple and durable, suitable for basic RC cars.
- Independent Axles: Allow each wheel to move independently, improving handling on uneven surfaces.
- Wheel Hubs:
- Description: Connect the wheels to the axles.
- Types:
- Pin Mount: Uses a pin to secure the wheel to the hub.
- Hex Mount: Uses a hexagonal shape for a more secure connection.
- Wheel Nuts:
- Description: Fasten the wheels to the hubs.
- Types:
- Standard Nuts: Require a wrench to tighten.
- Lock Nuts: Feature a nylon insert to prevent loosening.
Step-by-Step Wheel Attachment
- Mount the Axles:
- Attach the axles to the chassis using bearings or bushings to ensure smooth rotation.
- Attach the Wheel Hubs:
- Slide the wheel hubs onto the axles and secure them with screws or pins.
- Mount the Wheels:
- Place the wheels onto the hubs, aligning the holes.
- Secure the Wheels:
- Tighten the wheel nuts to secure the wheels to the hubs.
- Use lock nuts to prevent loosening during operation.
Implementing the Steering Mechanism
- Servo Saver:
- Description: Protects the servo from damage during impacts.
- Functions: Absorbs shocks and prevents the servo from over-rotating.
- Steering Linkage:
- Description: Connects the servo to the steering knuckles.
- Types:
- Pushrods: Simple and effective for basic steering systems.
- Bellcranks: Provide more precise steering and adjustable geometry.
- Steering Knuckles:
- Description: Connect the steering linkage to the wheels.
- Functions: Allow the wheels to pivot for steering.
Step-by-Step Steering Mechanism Installation
- Mount the Servo:
- Attach the servo to the chassis using screws.
- Install the Servo Saver:
- Attach the servo saver to the servo horn.
- Connect the Steering Linkage:
- Connect the steering linkage to the servo saver and steering knuckles.
- Adjust the Steering Geometry:
- Adjust the length of the steering links to achieve proper alignment and steering response.
- Test the Steering:
- Ensure the wheels turn smoothly and evenly in both directions.
Tips for Success
- Alignment: Proper wheel alignment is crucial for handling and tire wear.
- Clearance: Ensure there is adequate clearance between the wheels and chassis to prevent rubbing.
- Secure Connections: Use lock nuts and thread-locking compounds to prevent loosening.
Table: Steering System Components
| Component | Description | Function |
|---|---|---|
| Servo Saver | Protects the servo from damage | Absorbs shocks and prevents over-rotation |
| Steering Linkage | Connects the servo to the steering knuckles | Transfers motion from the servo to the wheels |
| Steering Knuckles | Connect the steering linkage to the wheels | Allow the wheels to pivot for steering |
Properly attaching the wheels and steering mechanism is essential for your RC car’s performance. For detailed diagrams, product recommendations, and expert guidance, visit CARS.EDU.VN.
8. Wiring the Motor and Electronics
Wiring the motor and electronics correctly is essential for your RC car to function properly. This section provides a step-by-step guide on how to connect the various electronic components and ensure a reliable electrical system.
Components to Wire
- Motor:
- Description: The power source that drives the wheels.
- Wiring: Connect the motor to the Electronic Speed Controller (ESC).
- Electronic Speed Controller (ESC):
- Description: Regulates the power supplied to the motor.
- Wiring: Connect the ESC to the motor, battery, and receiver.
- Receiver:
- Description: Receives signals from the transmitter.
- Wiring: Connect the receiver to the ESC and servo.
- Battery:
- Description: Provides power to the entire system.
- Wiring: Connect the battery to the ESC.
- Servo:
- Description: Controls the steering mechanism.
- Wiring: Connect the servo to the receiver.
Tools and Materials
- Wire Strippers: To remove insulation from wires.
- Soldering Iron: To create secure electrical connections.
- Solder: To bond the wires together.
- Heat Shrink Tubing: To insulate and protect the connections.
- Multimeter: To test the voltage and continuity of the connections.
- Wires: Use appropriate gauge wires for the current requirements.
- Connectors: Use connectors that match the components (e.g., JST, Deans).
Step-by-Step Wiring Guide
- Prepare the Wires:
- Cut the wires to the appropriate length.
- Strip the insulation from the ends of the wires.
- Solder the Connectors:
- Solder the connectors to the ends of the wires.
- Ensure the connections are clean and secure.
- Connect the Motor to the ESC:
- Solder the motor wires to the ESC terminals.
- Follow the ESC’s instructions for proper polarity.
- Connect the ESC to the Battery:
- Connect the battery connector to the ESC connector.
- Ensure the polarity is correct to avoid damage.
- Connect the ESC to the Receiver:
- Plug the ESC signal wire into the throttle channel on the receiver.
- Connect the Servo to the Receiver:
- Plug the servo connector into the steering channel on the receiver.
- Insulate the Connections:
- Use heat shrink tubing to insulate the soldered connections.
- Heat the tubing with a heat gun to shrink it around the connections.
- Test the Connections:
- Use a multimeter to test the voltage and continuity of the connections.
- Ensure there are no shorts or open circuits.
Tips for Success
- Polarity: Always double-check the polarity before connecting the battery to avoid damaging the components.
- Wire Management: Keep the wires organized and out of the way of moving parts.
- Secure Connections: Ensure all connections are secure and properly insulated.
Table: Wiring Connections
| Component | Connection To | Purpose |
|---|---|---|
| Motor | ESC | Drives the wheels |
| ESC | Motor, Battery, Receiver | Regulates power to the motor and receives signals |
| Receiver | ESC, Servo | Receives signals from the transmitter |
| Battery | ESC | Provides power to the system |
| Servo | Receiver | Controls the steering mechanism |
Proper wiring is essential for a functional and reliable RC car. For detailed diagrams, safety tips, and expert guidance, visit CARS.EDU.VN.
9. Installing the Receiver and Antenna
Properly installing the receiver and antenna is crucial for reliable communication between the transmitter and your RC car. This section outlines the steps to ensure optimal signal reception and minimize interference.
Understanding the Receiver
- Function:
- The receiver captures radio signals from the transmitter and translates them into commands for the ESC and servo.
- Channels:
- Receivers have multiple channels, each controlling a specific function (e.g., throttle, steering, auxiliary functions).
- Placement:
- The receiver should be placed in a location that is protected from impacts and moisture.
Antenna Installation
- Function:
- The antenna receives radio signals from the transmitter.
- Orientation:
- The antenna should be oriented vertically and away from metal parts to maximize signal reception.
- Routing:
- Route the antenna wire away from motors, batteries, and other electronic components to minimize interference.
Step-by-Step Installation Guide
- Mount the Receiver:
- Choose a suitable location for the receiver inside the chassis.
- Secure the receiver with double-sided tape or a mounting bracket.
- Connect the Wires:
- Plug the ESC and servo connectors into the appropriate channels on the receiver.
- Ensure the connectors are fully seated and secure.
- Route the Antenna:
- Carefully route the antenna wire through the chassis, avoiding sharp bends and contact with metal parts.
- Use a plastic tube or antenna mount to support the antenna wire.
- Secure the Antenna:
- Attach the antenna to the antenna mount or secure it with tape.
- Ensure the antenna is oriented vertically.
- Test the Connection:
- Turn on the transmitter and receiver.
- Test the throttle, steering, and other functions to ensure they are working properly.
Tips for Success
- Antenna Length: Do not cut or modify the antenna wire, as this can affect its performance.
- Interference: Keep the antenna away from sources of interference, such as motors, batteries, and ESCs.
- Range: Test the range of the RC system to ensure it is adequate for your needs.
- Secure Mounting: Ensure the receiver and antenna are securely mounted to prevent them from coming loose during operation.
Table: Receiver and Antenna Installation
| Component | Installation Step | Purpose |
|---|---|---|
| Receiver | Mount securely in the chassis | Protect from impacts and moisture |
| Receiver | Connect ESC and servo wires | Establish communication with other components |
| Antenna | Route vertically away from metal | Maximize signal reception |
| Antenna | Secure with mount or tape | Prevent damage and maintain orientation |
Proper installation of the receiver and antenna is crucial for reliable RC car operation. For detailed diagrams, troubleshooting tips, and expert guidance, visit CARS.EDU.VN.
10. Programming and Testing the RC Car
Programming and testing are critical steps in ensuring your RC car performs as expected. This section covers the basics of setting up your electronic speed controller (ESC) and testing the overall functionality of your RC car.
Programming the ESC
- Importance:
- Properly programming the ESC ensures smooth acceleration, braking, and reverse functionality.
- Methods:
- Button Programming: Many ESCs have a button that allows you to cycle through the programming options.
- Programming Card: Some ESCs come with a programming card that simplifies the setup process.
- Software Programming: Advanced ESCs can be programmed using a computer and specialized software.
- Key Settings:
- Battery Type: Set the correct battery type (LiPo, NiMH, etc.) to prevent over-discharging.
- Cutoff Voltage: Set the voltage at which the ESC will stop delivering power to protect the battery.
- Brake Force: Adjust the strength of the brakes.
- Reverse Speed: Set the speed at which the car will move in reverse.
- Throttle Profile: Customize the throttle response curve.
Testing the RC Car
- Pre-Test Checks:
- Ensure all wires are securely connected.
- Check that the wheels are properly attached and aligned.
- Verify that the battery is fully charged.
- Basic Functionality Test:
- Turn on the transmitter and receiver.
- Test the throttle: the motor should accelerate smoothly.
- Test the steering: the wheels should turn left and right in response to the steering input.
- Test the brakes: the car should stop when you apply the brakes.
- Test the reverse: the car should move backward when you apply reverse throttle.
- Range Test:
- Walk away from the RC car while operating the controls to ensure the signal is strong and reliable.
- Performance Test:
- Drive the RC car on a variety of surfaces to assess its handling, speed, and stability.
- Make adjustments to the suspension, steering, and ESC settings as needed.
Troubleshooting Common Issues
- Motor Not Responding: Check the battery, ESC, and motor connections.
- Steering Not Working: Check the servo connections and servo saver.
- Erratic Behavior: Check for loose wires, interference, or low battery voltage.
Tips for Success
- Read the Manual: Always read the ESC manual before programming to understand the available settings and their effects.
- Start Simple: Begin with basic settings and gradually adjust them to fine-tune the performance.
- Test Thoroughly: Test the RC car in a safe area before using it in a more challenging environment.
Table: Programming and Testing Checklist
| Step | Action | Purpose |
|---|---|---|
| ESC Programming | Set battery type, cutoff voltage, brake force | Protect battery and optimize performance |
| Pre-Test Checks | Verify connections, wheel alignment, battery charge | Ensure all components are properly connected and ready |
| Functionality | Test throttle, steering, brakes, reverse | Verify basic operations are working correctly |
| Range Test | Walk away while operating controls | Ensure strong and reliable signal |
| Performance Test | Drive on various surfaces | Assess handling, speed, and stability |
Proper programming and testing are essential for optimal RC car performance. For detailed guides, troubleshooting tips, and expert advice, visit cars.edu.vn.
11. Troubleshooting Common Issues
Even with careful construction, RC cars can encounter issues. This section provides a guide to troubleshoot common problems and keep your RC car running smoothly.
Common Problems and Solutions
- Motor Not Working:
- Possible Causes:
- Dead battery
- Loose wiring
- Faulty ESC
- Burned-out motor
- Solutions:
- Charge or replace the battery
- Check and secure all wiring connections
- Test the ESC with a known good motor
- Replace the motor
- Possible Causes:
- Steering Not Working:
- Possible Causes:
- Dead servo
- Loose servo connections
- Damaged servo saver
- Binding in the steering linkage
- Solutions:
- Replace the servo
- Check and secure all servo connections
- Replace the servo saver
- Adjust the steering linkage to eliminate binding
- Possible Causes:
- Erratic Behavior:
- Possible Causes:
- Interference
- Low battery voltage
- Loose wiring
- Faulty receiver
- Solutions:
- Move to an area with less interference
- Charge or replace the battery
- Check and secure all wiring connections
- Replace the receiver
- Possible Causes:
- Overheating:
- Possible Causes:
- Overgearing
- Insufficient cooling
- Overloaded motor
- Solutions:
- Use a lower gear ratio
- Install a motor heatsink or fan
- Reduce the load on the motor
- Possible Causes:
- Short Run Times:
- Possible Causes:
- Old or damaged battery
- Inefficient motor
- Overgearing
- Solutions:
- Replace the battery
- Upgrade to a more efficient motor
- Use a lower gear ratio
- Possible Causes:
- Poor Handling:
- Possible Causes:
- Misaligned wheels
- Worn tires
- Loose suspension components
- Incorrect suspension settings
- Solutions:
- Align the wheels
- Replace the tires
- Tighten or replace loose suspension components
- Adjust the suspension settings
- Possible Causes:
Troubleshooting Tips
- Visual Inspection: Start by visually inspecting all components for damage