Want to personalize your radio control car? How To Paint Rc Car Body is a skill that allows you to customize its appearance. CARS.EDU.VN offers detailed guidance on prepping, painting, and finishing, ensuring a professional-looking result. By mastering these techniques, you enhance your RC car’s aesthetics and performance. Let’s delve into the art of RC car body painting, exploring spray painting tips and custom paint jobs.
1. Essential Tools And Materials For Painting RC Car Bodies
Achieving a stellar paint job on your RC car body requires gathering the right tools and materials. Proper preparation and selection of supplies can significantly impact the final outcome. Let’s explore the essentials you’ll need to transform your RC car body into a work of art.
1.1. Required Items List
Before you start, gather these essential supplies:
- Unpainted Clear Body: Choose a clear polycarbonate body designed for your RC vehicle model.
- Lexan/Polycarbonate Compatible Paint: Essential for flexibility and adhesion. Brands like Duratrax, Tamiya, and Proline offer excellent options.
- Straight and Curved Body Scissors: Use for precise cutting of the body and trimming excess material.
- Body Reamer, Drill, or Dremel: Required for creating precise mounting holes for the body posts.
- Sharp Hobby Knife: Needed for intricate detailing, trimming masks, and fine adjustments.
- Masking Tape or Liquid Mask: Use masking tape for straightforward designs, while liquid mask is perfect for complex patterns.
- Dish Soap: Necessary for cleaning the body, removing residues, and ensuring proper paint adhesion.
- Paper Towel or Clean Cloth: Use to dry the body after washing and to wipe off any excess cleaning residue.
- Permanent Marker: Use to mark areas for cutting, drilling, or designing patterns on the body.
- Medium Grit Sandpaper or Sanding Drum: Helps smooth rough edges after cutting and drilling, enhancing durability.
- Window Masks and Decal Sheet: Included with the body, these help protect windows and add finishing touches.
- Wing Mounting Hardware: If applicable, for attaching the wing or spoiler securely to the body.
1.2. Safety Gear Essentials
Safety should always be a top priority when painting. Ensure you have the following safety gear:
- Respirator or Mask: To protect against inhaling harmful paint fumes.
- Gloves: To keep your hands clean and protected from the chemicals in the paint.
- Eye Protection: Safety glasses or goggles to prevent paint or debris from entering your eyes.
- Well-Ventilated Area: Work in a space with good airflow to reduce exposure to fumes.
1.3. Where To Find Quality Supplies
You can source quality painting supplies from various retailers:
- Local Hobby Shops: Visit local hobby shops for expert advice and hands-on product selection.
- Online Retailers: Check out online retailers like Horizon Hobby, Tower Hobbies, and Amazon for a wide range of paints and tools.
- Specialty RC Stores: These stores often carry specific brands and high-quality products tailored for RC enthusiasts.
By gathering all the necessary tools, prioritizing safety, and knowing where to find the best supplies, you’ll be well-prepared to achieve a professional and stunning paint job on your RC car body. For more detailed guides and service information, check out CARS.EDU.VN.
2. Step-By-Step Guide To Prepping Your RC Car Body
Preparing your RC car body correctly is essential for a professional and lasting paint job. This process involves cleaning, cutting, and masking, which ensures proper adhesion and crisp lines. Let’s explore each step in detail to help you achieve the best results.
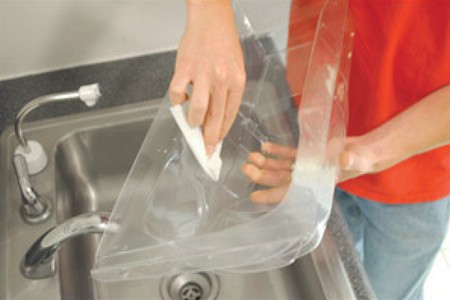
2.1. Cleaning And Washing The Body
- Thorough Cleaning: Begin by washing the RC car body with household dish soap and warm water to remove any mold release agents, oils, or residues. These contaminants can prevent the paint from adhering properly.
- Scrubbing: Use a soft sponge or paper towel to scrub the inside of the body gently. Pay close attention to corners and tight areas where residues tend to accumulate.
- Rinsing: Rinse the body thoroughly with clean, warm water to ensure all soap residue is removed.
- Drying: Dry the body with a clean, lint-free cloth or a hair dryer on a low setting. Ensure the body is completely dry before proceeding to the next step.
2.2. Cutting And Trimming Excess Material
- Wing Removal: If your body has a wing or spoiler molded into the excess material, carefully cut it off using straight and curved body scissors. Some wings may be molded in the opposite direction of the body, so remove the protective film and paint the reverse side if necessary.
- Precise Trimming: Use straight scissors to trim the lower lines of the body and curved scissors for the wheel wells. This step ensures a clean and professional look.
- Sanding Edges: After cutting, use medium-grit sandpaper or a sanding drum to smooth all rough and sharp edges. This enhances the body’s durability and prevents cracking.
2.3. Marking Body Posts And Wheel Wells
- Body Post Marking: If your body doesn’t have pre-marked mounting holes, place it over your chassis and center it. Use a permanent marker to mark the locations of the body posts.
- Wheel Well Marking: While the body is over the chassis, mark the wheel wells if necessary. Touring car and on-road bodies often lack rear wheel well outlines, allowing you to customize the fit for your chassis.
2.4. Applying Window Masks
- Using Window Lines: Use the molded window lines as a guide to apply the window masks to the inside of the body.
- Secure Edges: Press down firmly on all edges of the masks to prevent paint from seeping underneath, ensuring clean, clear windows.
2.5. Choosing Between Masking Tape And Liquid Mask
- Masking Tape: Most commonly used for its accessibility and ease of application. It requires no drying time and can be easily cut to shape. However, it may bleed in tight corners if not fully pressed down.
- Liquid Mask: Applied in liquid form and dries to create a peelable barrier between the body and the paint. It offers crisper lines and less bleeding than masking tape but requires drying time. Liquid masking is often preferred for intricate designs.
2.6. Liquid Mask Application Techniques
- Application: Apply liquid mask directly to the body or use a spray gun.
- Coats: Apply 2-3 wet coats to the inside of the clean, prepped body. Allow each coat to dry completely before applying the next.
- Designing: Design your paint scheme on the outer protective film, then score the dry liquid mask with a sharp blade.
- Peeling: Peel the mask from the desired sections to expose the areas you want to paint.
Proper preparation is key to achieving a professional-looking paint job on your RC car body. By following these detailed steps, you’ll ensure that your paint adheres well, your lines are crisp, and your final result is stunning. For more expert tips and service information, visit CARS.EDU.VN.
3. Mastering The Art Of Painting: Techniques And Tips
Painting an RC car body requires precision and technique to achieve professional results. From selecting the right paint to applying it in even coats, mastering these skills will elevate your RC car’s appearance. Let’s delve into the essential techniques and tips for painting like a pro.
3.1. Choosing The Right Paint
- Lexan/Polycarbonate Compatibility: Always use paints specifically designed for Lexan or polycarbonate RC car bodies. These paints are flexible and adhere well to the plastic, preventing cracking and flaking.
- Recommended Brands: Top brands include Duratrax Polycarb Spray, Tamiya Polycarbonate PS Spray, and Proline RC Body Paint. Sticking to one brand helps avoid unwanted interactions between different paint formulations.
- Specialty Paints: Consider using candy or translucent colors for unique effects. Remember that these colors require a backing color (like white or silver) to truly stand out.
3.2. Layering And Applying Paint
- Light Coats: Apply paint in light, even coats. Avoid heavy coats, which can lead to runs, drips, and uneven coverage.
- Tack Time: Allow each coat to tack up (become slightly sticky) before applying the next. This typically takes about 10-20 minutes, depending on the paint and ambient temperature.
- Multiple Coats: Apply multiple light to medium coats to build up the desired color intensity. If additional coats are needed, apply them lightly to avoid creating buildup on the masking tape, which can make it difficult to remove cleanly.
3.3. Achieving Smooth And Even Coats
- Spray Technique: Hold the spray can about 8-12 inches from the body and move it in smooth, consistent strokes. Overlap each stroke slightly to ensure even coverage.
- Consistent Pressure: Maintain consistent pressure on the spray nozzle to avoid splatters or uneven paint distribution.
- Rotation: Rotate the body as you paint to reach all areas easily. Consider using a rotating stand for better access and control.
3.4. Dealing With Paint Runs And Imperfections
- Prevention: Prevent runs by applying thin, even coats. Avoid holding the spray can too close to the body or applying too much paint at once.
- Correcting Runs: If you notice a run while the paint is still wet, immediately wipe it away with a clean, lint-free cloth. Allow the area to dry completely, then lightly sand it smooth before reapplying paint.
- Addressing Imperfections: For minor imperfections like dust particles, lightly sand the area with fine-grit sandpaper after the paint is dry. Clean the surface thoroughly and apply another light coat of paint.
3.5. Advanced Painting Techniques
- Color Backing: Backing your paint job with white or silver can enhance the vibrancy and opacity of your colors, especially when using translucent or candy paints.
- Two-Tone Effects: Use masking tape or liquid mask to create two-tone or multi-color designs. Apply the darker color first, then mask it off before applying the lighter color.
- Fade Effects: Achieve fade effects by gradually blending two colors together. Use light, feathered strokes and blend the colors in a small area to create a seamless transition.
3.6. Painting Stripes Effectively
- High-Quality Tape: Use high-quality masking tape to create clean, crisp lines for stripes. Ensure the tape is firmly pressed down to prevent paint bleed.
- Taping Sequence: Mask off the area you want to paint last. Fill in the area you want to paint with your second color. Painting from dark to light is ideal, so leave the darkest section clear and paint this first.
- Removing Tape: Remove the tape carefully after the paint has completely dried. Watch that you don’t remove any stripes accidentally.
3.7. Painting Window Trim
- Tracing: After your final backup coat is dry, trace and trim around the inside of the window mask to create a border for the window trim.
- Removing Borders: Remove the borders from all the windows and spray with your desired color, typically black, to create a realistic window trim effect.
By mastering these painting techniques and tips, you can achieve a professional and eye-catching finish on your RC car body. Remember to take your time, be patient, and practice to refine your skills. For additional guidance and service information, check out CARS.EDU.VN.
4. Finishing Touches: Decals, Trimming, And Final Assembly
After painting your RC car body, the finishing touches are what truly bring your vision to life. Applying decals, trimming the body, and final assembly require careful attention to detail to ensure a professional and polished look. Let’s explore these crucial steps.
4.1. Applying Decals For A Professional Look
- Preparation: Ensure the painted surface is clean and dry before applying decals. Use a soft cloth to wipe away any dust or fingerprints.
- Placement: Plan the placement of your decals carefully. Consider the overall design and aesthetics of your RC car body.
- Application: Peel the decal from its backing and carefully position it on the body. Use a squeegee or your finger to smooth out any air bubbles and ensure the decal adheres firmly to the surface.
- Trimming: If necessary, trim excess decal material with a sharp hobby knife to create a clean and seamless look.
4.2. Trimming The Body For Optimal Performance
- Cutting: Use curved scissors for the wheel wells and straight scissors for the lower lines of the body. Trim carefully to achieve a clean and even edge.
- Test Fit: After trimming, test fit the body on your RC chassis to ensure it fits properly and doesn’t rub against the tires or other components.
- Adjustments: Make any necessary adjustments by trimming additional material as needed. Ensure the body is securely mounted and doesn’t interfere with the vehicle’s performance.
4.3. Creating Mounting Holes With Precision
- Reaming: Use a body reamer to create precise mounting holes for the body posts. A body reamer is the recommended tool because it creates clean, round holes without cracking the polycarbonate.
- Drilling: If you don’t have a body reamer, you can use a drill or Dremel tool. Use a small drill bit and drill slowly to avoid damaging the body.
- Hole Size: Ensure the mounting holes are the correct size for the body posts. The holes should be large enough to allow the body to sit securely on the posts without being too loose.
4.4. Adding A Flat Black Bedliner For Realism
- Cutting Film: For a flat black tonneau cover or bedliner effect, cut the overspray film around the bed with a sharp hobby knife and peel it away.
- Applying Paint: Spray the bed on the outside of the body with black paint and let it dry. Follow up with flat clear for a matte finish. The remaining film around the bed protects the rest of the body from overspray.
- Interior Masking: Alternatively, mask and paint the bed on the interior with black paint and the exterior with flat clear for a similar result.
4.5. Final Inspection And Touch-Ups
- Film Removal: Peel back the overspray film and remove the window masks.
- Inspection: Inspect the entire body for any imperfections, such as missed spots or uneven edges.
- Touch-Ups: Touch up any imperfections with a small brush and the appropriate paint color.
- Final Polish: Use a soft cloth to polish the body and remove any smudges or fingerprints.
4.6. Securing The Wing And Installing Hardware
- Wing Attachment: If your body came with a wing or spoiler, attach it securely using the included wing mounting hardware.
- Hardware Installation: Follow the manufacturer’s instructions for installing the wing. Ensure the wing is properly aligned and tightened to prevent it from coming loose during use.
By carefully following these finishing steps, you’ll transform your painted RC car body into a stunning masterpiece. From applying decals to trimming the body and installing hardware, each step contributes to the overall look and performance of your RC vehicle. For more expert tips and service information, visit CARS.EDU.VN.
5. Troubleshooting Common Painting Problems
Even with careful preparation and technique, painting RC car bodies can present challenges. Understanding common issues and how to resolve them is essential for achieving professional results. Let’s explore some common painting problems and their solutions.
5.1. Paint Peeling Or Flaking
- Cause: Paint peeling or flaking typically occurs due to poor adhesion, often caused by inadequate surface preparation or using the wrong type of paint.
- Solution:
- Proper Cleaning: Ensure the body is thoroughly cleaned with dish soap and warm water to remove any mold release agents or contaminants.
- Lexan/Polycarbonate Paint: Use only paints specifically designed for Lexan or polycarbonate RC car bodies.
- Sanding: Lightly sand the surface before painting to create a better bonding surface for the paint.
- Primer: Consider using a primer specifically designed for plastic to improve adhesion.
5.2. Paint Bleeding Under Masks
- Cause: Paint bleeding under masks is a common issue that results in fuzzy or uneven lines. This can be caused by improperly sealed masks or applying too much paint at once.
- Solution:
- Secure Masks: Ensure the masking tape or liquid mask is firmly pressed down to create a tight seal.
- Light Coats: Apply paint in thin, even coats. Avoid applying too much paint at once, which can seep under the masks.
- Masking Tape Quality: Use high-quality masking tape that is designed to create clean lines.
- Liquid Mask Thickness: When using liquid mask, apply multiple thin coats to build up a sufficient barrier.
5.3. Uneven Paint Texture
- Cause: Uneven paint texture can result from inconsistent spraying technique, improper paint viscosity, or environmental factors such as temperature and humidity.
- Solution:
- Consistent Spraying: Maintain a consistent distance and speed when spraying to ensure even coverage.
- Paint Consistency: Ensure the paint is properly mixed and not too thick or thin. Follow the manufacturer’s recommendations for thinning if necessary.
- Environmental Control: Paint in a well-ventilated area with moderate temperature and humidity. Avoid painting in direct sunlight or extreme conditions.
- Nozzle Cleaning: Clean the spray nozzle regularly to prevent clogs and ensure a smooth spray pattern.
5.4. Bubbles In The Paint
- Cause: Bubbles in the paint can occur due to trapped air or moisture during application.
- Solution:
- Surface Preparation: Ensure the surface is clean and dry before painting.
- Application Technique: Apply paint in smooth, even strokes to prevent trapping air.
- Environmental Factors: Avoid painting in high humidity, which can cause moisture to become trapped in the paint.
- Paint Quality: Use high-quality paint that is less prone to bubbling.
5.5. Orange Peel Effect
- Cause: The orange peel effect is a textured surface that resembles the skin of an orange. This is typically caused by the paint drying too quickly or improper spraying technique.
- Solution:
- Thin Coats: Apply paint in thin, even coats to allow it to flow and level properly.
- Spraying Distance: Maintain the correct spraying distance to ensure the paint is atomized properly.
- Reducer: Add a small amount of reducer to the paint to slow down the drying time and allow it to flow more smoothly.
- Environmental Conditions: Paint in a well-ventilated area with moderate temperature and humidity.
5.6. Fisheyes
- Cause: Fisheyes are small, circular craters that appear in the paint surface. This is typically caused by contaminants such as silicone or oil on the surface.
- Solution:
- Thorough Cleaning: Ensure the surface is thoroughly cleaned with a degreaser to remove any contaminants.
- Tack Cloth: Use a tack cloth to wipe the surface before painting and remove any remaining dust or particles.
- Contamination Prevention: Avoid using silicone-based products near the painting area.
- Fisheye Additive: Add a fisheye additive to the paint to help it flow and prevent cratering.
By understanding these common painting problems and their solutions, you can troubleshoot issues as they arise and achieve a professional finish on your RC car body. For more expert tips and service information, visit CARS.EDU.VN.
6. Unleashing Creativity: Custom Paint Job Ideas
Painting an RC car body offers endless opportunities for creativity. Custom paint jobs allow you to express your personal style and make your RC vehicle stand out from the crowd. Let’s explore some inspiring custom paint job ideas that can spark your imagination and elevate your RC car’s appearance.
6.1. Realistic Paint Schemes
- Replicas: Recreate paint schemes from real-world race cars or vehicles. This could include replicating the liveries of famous race teams, classic cars, or even military vehicles.
- Weathering: Add realistic weathering effects such as dirt, rust, and scratches to simulate wear and tear. This can be achieved using techniques like dry brushing, washes, and masking.
- Detailed Graphics: Incorporate intricate graphics such as sponsor logos, racing stripes, and custom artwork to enhance the realism of your paint job.
6.2. Abstract And Artistic Designs
- Geometric Patterns: Create eye-catching designs using geometric shapes such as triangles, squares, and circles. Experiment with different colors, sizes, and arrangements to achieve a unique look.
- Splatter Effects: Achieve a dynamic and energetic look by splattering paint onto the body. Use different colors and consistencies to create a layered and textured effect.
- Airbrush Art: Utilize airbrush techniques to create intricate designs and gradients. This could include creating realistic flames, portraits, or abstract artwork.
6.3. Fluorescent And Glow-In-The-Dark Effects
- Neon Colors: Use fluorescent or neon paints to create a vibrant and attention-grabbing paint job. These colors are particularly effective for nighttime racing or display.
- Glow-In-The-Dark: Incorporate glow-in-the-dark paint or decals to create a unique and eye-catching effect. This can be used to highlight specific areas of the body or create a fully illuminated design.
- UV Reactive: Use UV reactive paints that glow under ultraviolet light. This can be used to create a striking effect in indoor or nighttime environments.
6.4. Two-Tone And Multi-Color Schemes
- Contrasting Colors: Use contrasting colors to create a bold and dynamic look. This could include pairing light and dark colors, warm and cool colors, or complementary colors.
- Gradient Effects: Create smooth transitions between colors using gradient effects. This can be achieved using airbrush techniques or by carefully blending the colors together.
- Panel Designs: Divide the body into panels and paint each panel a different color. This can be used to create a patchwork or mosaic effect.
6.5. Themed Paint Jobs
- Superhero Themes: Create paint jobs inspired by popular superheroes or comic book characters. This could include replicating their costumes, logos, or iconic imagery.
- Movie Themes: Recreate paint schemes from famous movies or TV shows. This could include replicating the vehicles from “Back to the Future,” “Mad Max,” or “Ghostbusters.”
- Fantasy Themes: Create paint jobs inspired by fantasy worlds and mythical creatures. This could include painting dragons, unicorns, or other fantastical designs.
6.6. Simple Yet Effective Designs
- Racing Stripes: Add racing stripes to your RC car body for a classic and sporty look. Experiment with different widths, colors, and placements to achieve a unique design.
- Solid Colors: Opt for a simple and elegant look by painting the body a solid color. This can be particularly effective when paired with contrasting decals or accents.
- Minimalist Designs: Create a minimalist design by using a limited color palette and simple geometric shapes. This can be a sophisticated and understated way to customize your RC car.
By exploring these custom paint job ideas, you can unleash your creativity and create a truly unique and personalized RC car body. Remember to experiment with different techniques, colors, and designs to find what works best for you. For more inspiration and expert tips, visit CARS.EDU.VN.
7. Maintaining Your Painted RC Car Body
Proper maintenance is crucial for preserving the appearance and longevity of your painted RC car body. Regular cleaning, careful handling, and proper storage can help keep your custom paint job looking its best for years to come. Let’s explore the essential maintenance practices for your painted RC car body.
7.1. Cleaning Your Body Regularly
- Gentle Cleaning: Clean your RC car body regularly with a soft cloth and mild soap and water. Avoid using harsh chemicals or abrasive cleaners, which can damage the paint.
- Removing Dirt And Debris: Remove dirt, dust, and debris promptly to prevent them from scratching the paint. Use a soft brush or compressed air to reach tight areas.
- Drying: After cleaning, dry the body thoroughly with a clean, lint-free cloth. Avoid leaving it to air dry, as water spots can form.
7.2. Protecting The Paint From Scratches
- Protective Film: Apply a clear protective film to the outside of the body to shield the paint from scratches and abrasions. This film can be easily replaced when it becomes damaged.
- Careful Handling: Handle the body with care to avoid dropping it or bumping it into hard surfaces. Use a padded carrying case or storage container to protect it during transport and storage.
- Smooth Surfaces: When placing the body on a surface, ensure it is clean and smooth to prevent scratches. Avoid placing it on rough or abrasive surfaces.
7.3. Storing Your RC Car Body Properly
- Cool, Dry Place: Store your RC car body in a cool, dry place away from direct sunlight and extreme temperatures. These conditions can cause the paint to fade, crack, or peel.
- Protective Container: Use a protective container or carrying case to store the body. This will shield it from dust, dirt, and physical damage.
- Avoid Pressure: Avoid placing heavy objects on top of the body, as this can cause it to warp or crack.
7.4. Repairing Minor Damage
- Touch-Ups: Repair minor scratches and chips with touch-up paint that matches the original color. Apply the touch-up paint sparingly and blend it carefully to achieve a seamless repair.
- Decal Replacement: Replace damaged or peeling decals to maintain the overall appearance of the body. Clean the area thoroughly before applying the new decal.
- Crack Repair: Repair cracks in the body with a flexible adhesive designed for plastic. Apply the adhesive to the inside of the body and reinforce the area with fiberglass tape for added strength.
7.5. Using Protective Products
- Waxing: Apply a coat of car wax to the painted surface to protect it from UV rays and environmental damage. Waxing can also enhance the shine and luster of the paint.
- UV Protectant: Use a UV protectant spray to shield the paint from fading and discoloration caused by sunlight. Apply the protectant regularly, especially if you frequently use your RC car outdoors.
- Detailing Sprays: Use detailing sprays to clean and polish the body. These sprays can remove fingerprints, smudges, and minor imperfections, leaving the paint looking fresh and vibrant.
7.6. Regular Inspections
- Check For Damage: Regularly inspect the body for any signs of damage, such as scratches, cracks, or peeling paint.
- Address Issues Promptly: Address any issues promptly to prevent them from worsening. Minor repairs can often be done quickly and easily, preventing the need for more extensive and costly repairs later on.
- Maintain Hardware: Check the mounting hardware regularly to ensure it is secure and properly tightened. Replace any damaged or worn hardware to prevent the body from coming loose during use.
By following these maintenance practices, you can keep your painted RC car body looking its best and extend its lifespan. Regular cleaning, careful handling, and proper storage are essential for preserving your custom paint job and maintaining the overall appearance of your RC vehicle. For more expert tips and service information, visit CARS.EDU.VN.
8. Legal And Safety Considerations For RC Car Enthusiasts
As an RC car enthusiast, it’s crucial to be aware of the legal and safety considerations that apply to your hobby. Understanding and adhering to these guidelines ensures your safety and promotes responsible RC car operation. Let’s delve into the key legal and safety considerations for RC car enthusiasts.
8.1. Understanding Local Regulations
- Operating Restrictions: Research and understand the local regulations regarding RC car operation in your area. Some municipalities may have restrictions on where you can operate RC cars, such as parks, public streets, or private property.
- Noise Ordinances: Be aware of noise ordinances in your area, particularly if you operate electric RC cars. Avoid operating your RC car during quiet hours or in areas where noise levels are restricted.
- Permits: Check if you need any permits or licenses to operate RC cars in specific areas, such as public parks or designated RC car tracks.
8.2. Battery Safety
- Proper Charging: Charge batteries according to the manufacturer’s instructions. Use a charger specifically designed for the type of battery you are using (e.g., LiPo, NiMH).
- Monitoring: Monitor the charging process to prevent overcharging, which can lead to battery damage or fire. Never leave batteries unattended while charging.
- Storage: Store batteries in a cool, dry place away from direct sunlight and extreme temperatures. Use a fireproof storage container for LiPo batteries to contain any potential fires.
8.3. Safe Operating Practices
- Awareness: Always be aware of your surroundings when operating an RC car. Avoid operating in crowded areas or near pedestrian traffic.
- Visibility: Operate your RC car in clear visibility conditions. Avoid operating in fog, rain, or darkness, as this can increase the risk of accidents.
- Control: Maintain control of your RC car at all times. Avoid operating at excessive speeds or performing stunts that could cause loss of control.
8.4. Radio Frequency Interference
- Frequency Channels: Be aware of the frequency channels used by other RC operators in your area. Avoid using the same frequency channel as others, as this can cause interference and loss of control.
- Signal Strength: Ensure your transmitter has a strong and stable signal. Avoid operating in areas with known radio frequency interference, such as near power lines or communication towers.
- Transmitter Maintenance: Maintain your transmitter regularly to ensure it is functioning properly. Check the battery level and antenna condition before each use.
8.5. Environmental Responsibility
- Waste Disposal: Dispose of used batteries and other RC car components responsibly. Recycle batteries whenever possible and avoid disposing of them in landfills.
- Chemical Handling: Handle paints, solvents, and other chemicals used for RC car maintenance and customization responsibly. Follow the manufacturer’s instructions for safe handling and disposal.
- Environmental Protection: Avoid operating your RC car in environmentally sensitive areas, such as wetlands, forests, or wildlife habitats. Respect the natural environment and avoid causing damage or disturbance.
8.6. Insurance Coverage
- Liability Coverage: Consider obtaining liability insurance to protect yourself from potential damages or injuries caused by your RC car. Some homeowner’s or renter’s insurance policies may provide coverage for RC car activities.
- Property Coverage: Check if your insurance policy covers damage to your RC car in case of accidents, theft, or natural disasters. Consider purchasing additional coverage if necessary.
By adhering to these legal and safety considerations, you can enjoy your RC car hobby responsibly and safely. Understanding and following local regulations, practicing safe battery handling, and operating your RC car with awareness and caution are essential for protecting yourself and others. For more expert advice and service information, visit CARS.EDU.VN.
9. Benefits Of Customizing Your RC Car Body
Customizing your RC car body offers numerous benefits, enhancing both the aesthetic appeal and performance of your vehicle. From personal expression to improved visibility, let’s explore the advantages of customizing your RC car body.
9.1. Personal Expression And Style
- Unique Designs: Customizing your RC car body allows you to create unique designs that reflect your personal style and preferences. You can choose colors, patterns, and graphics that set your RC car apart from the crowd.
- Individuality: Express your individuality and creativity through custom paint jobs, decals, and modifications. Your RC car becomes a canvas for your artistic vision.
- Stand Out: Stand out at the track or in your neighborhood with a customized RC car body that showcases your personality and flair.
9.2. Enhanced Visibility
- Bright Colors: Use bright and vibrant colors to improve the visibility of your RC car, especially in low-light conditions or at high speeds.
- Contrasting Patterns: Incorporate contrasting patterns and designs to make your RC car more visible against different backgrounds.
- Safety: Enhance safety by making your RC car more visible to other drivers, pedestrians, and obstacles.
9.3. Improved Performance
- Aerodynamics: Customize the shape and design of your RC car body to improve aerodynamics and handling. Spoilers, wings, and diffusers can enhance downforce and stability.
- Weight Reduction: Reduce the weight of your RC car body by using lightweight materials and trimming unnecessary components. This can improve acceleration, speed, and agility.
- Cooling: Add vents and openings to your RC car body to improve airflow and cooling. This can help prevent overheating and improve the performance of your motor and electronics.
9.4. Durability And Protection
- Reinforcement: Reinforce weak areas of your RC car body with fiberglass tape or carbon fiber to improve durability and prevent cracking.
- Protective Film: Apply a clear protective film to the outside of the body to shield the paint from scratches and abrasions.
- Longevity: Extend the lifespan of your RC car body by protecting it from damage and wear.
9.5. Community And Recognition
- Showcase: Showcase your custom RC car at local events, competitions, and online forums.
- Recognition: Gain recognition and appreciation from fellow RC enthusiasts for your creativity and craftsmanship.
- Community: Connect with other RC car enthusiasts and share your custom designs and ideas.
9.6. Cost-Effectiveness
- DIY Projects: Customizing your RC car body can be a cost-effective alternative to purchasing a new body.
- Material Reuse: Reuse and repurpose existing materials to create custom designs and modifications.
- Value: Increase the value of your RC car by adding custom features and designs.
By customizing your RC car body, you can enjoy a wide range of benefits that enhance its appearance, performance, and value. Personal expression, improved visibility, and enhanced durability are just a few of the advantages of customizing your RC car body. For more expert tips and service information, visit cars.edu.vn.
10. FAQ: Painting RC Car Bodies
10.1. What type of paint should I use on an RC car body?
Use paints