Maintaining the correct tire pressure in your car is crucial for both fuel efficiency and driving safety. According to safety experts, underinflated tires can significantly reduce your gas mileage and negatively impact your vehicle’s handling, braking distances, and stability control systems. To ensure your tires are always properly inflated and to avoid these potential hazards, regular tire pressure checks are essential. Many tire service centers, like Les Schwab, offer complimentary tire air checks to help you maintain optimal tire health.
Understanding Recommended Tire Pressure: Finding Your Car’s Ideal PSI
It’s a common misconception that the PSI (Pounds per Square Inch) value printed on the tire sidewall indicates the recommended pressure for your vehicle. In fact, this number represents the maximum pressure the tire can handle under cold conditions, which is often different from the ideal pressure for your specific car.
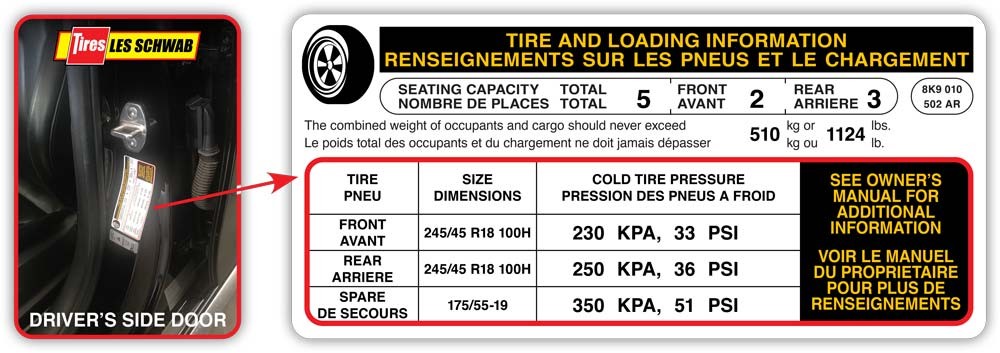
To find the precise recommended tire pressure for your vehicle, consult your owner’s manual or check the sticker typically located on the driver’s side doorjamb. This sticker provides the manufacturer’s recommended PSI for both front and rear tires when they are cold – ideally measured in the morning before driving or after the vehicle has been parked for at least three hours.
Step-by-Step Guide: How to Inflate Your Car Tires at a Gas Station or Home
Adding air to your tires is a straightforward process, whether you’re at a gas station with a public air pump or using your own air compressor at home. You’ll need a tire pressure gauge in either scenario to ensure accurate inflation.
1. Gather Your Tools: Tire Pressure Gauge and Air Compressor
You’ll need a reliable tire pressure gauge to measure the current PSI in your tires and an air source. For home inflation, an air compressor is necessary. Gas stations typically provide public air compressors, often located near the parking area beyond the fuel pumps. Be prepared to pay a small fee (usually with coins or a card) to use a gas station air compressor.
2. Locate the Recommended Tire Pressure (PSI)
Before you begin, find the recommended tire pressure for your car, as detailed above, on the doorjamb sticker or in your owner’s manual. Keep this PSI value in mind as your target inflation level.
3. Check the Initial Tire Pressure (When Tires Are Cold)
For an accurate reading, check your tire pressure when the tires are “cold,” meaning they haven’t been driven on recently. Morning is usually the best time, or after your car has been parked for several hours.
- Remove the valve cap from one tire.
- Press the tire pressure gauge firmly onto the tire valve stem.
- Read the pressure indicated on the gauge. Digital gauges will display a numerical reading, while analog gauges have a bar that extends to show the pressure.
- Note the PSI reading for each tire.
4. Inflate Your Tires to the Recommended PSI
- Park Safely: Position your car so you can easily access all four tires with the air hose, whether at home or a gas station.
- Remove Valve Caps: Take off the valve cap from the tire you’re starting with and keep it in a safe place, like your pocket.
- Attach the Air Compressor Hose: Firmly press the air compressor nozzle onto the tire valve stem. Ensure a tight seal to prevent air leakage.
- Inflate in Short Bursts: Start adding air in short bursts, typically for a few seconds at a time. Air compressors vary in inflation speed, so it’s crucial to check the pressure frequently to avoid overinflation. Listen for air entering the tire. If you hear hissing or feel air escaping, readjust the nozzle connection.
- Check Pressure Frequently: After each short burst of air, remove the compressor nozzle and use your tire pressure gauge to re-check the PSI.
- Add or Release Air as Needed: Continue adding air in short bursts and checking the pressure until you reach the recommended PSI. If you accidentally overinflate, you can release air by briefly pressing the center pin inside the tire valve with the tip of the pressure gauge or another small object. Check the pressure again after releasing air.
5. Final Pressure Check and Valve Cap Replacement
Once you’ve inflated the tire to the correct PSI, double-check the pressure one last time with your gauge to ensure accuracy. Remove the air compressor nozzle and firmly screw the valve cap back onto the valve stem. Repeat this process for each tire.
6. Monthly Tire Pressure Checks: A Key Maintenance Habit
Tires naturally lose air pressure over time – typically around one PSI per month. Consistent monthly tire pressure checks are vital to maintaining optimal tire inflation, even if your tires appear to look normal. Regular checks help ensure safety, extend tire life, and maximize fuel economy.
Driving on Underinflated Tires: Risks and Potential Damage
While occasionally releasing a small amount of air can provide better traction in specific conditions like deep snow, consistently driving with underinflated tires is discouraged and can lead to serious consequences. Underinflation increases tire flex, generating excessive heat, which can cause tire damage, premature wear, and even tire failure (blowouts). It also negatively impacts handling and fuel efficiency.
In the event of a flat tire, it’s essential to promptly change to your spare tire and seek professional tire service as soon as possible. Run-flat tires are designed to allow limited driving distance after pressure loss, providing time to reach a service center like Les Schwab for repair or replacement.
Let Professionals Handle Your Tire Inflation Needs
For convenient and reliable tire care, remember that Les Schwab offers free tire air checks and inflation services at all their locations. Their expert technicians will ensure your tires are inflated to the correct pressure, providing peace of mind and contributing to your vehicle’s safety and performance.