Putting a bike rack on a car can significantly extend your vehicle’s utility, enabling you to transport your bicycle to various destinations for recreation, competition, or commuting. This comprehensive guide, brought to you by CARS.EDU.VN, will provide you with detailed, step-by-step instructions on selecting and installing the appropriate bike rack for your vehicle. We’ll cover different types of racks and essential considerations to ensure a safe and secure transport experience. Bike rack installation and bike transportation don’t have to be a hassle.
1. Understanding the Basics of Bike Racks
Before diving into the installation process, it’s crucial to understand the different types of bike racks available and their suitability for various vehicles and bikes. This section will provide a foundational knowledge base to help you make an informed decision.
1.1. Types of Bike Racks
There are primarily three types of bike racks: hitch-mounted, trunk-mounted, and roof-mounted. Each has its advantages and disadvantages.
1.1.1. Hitch-Mounted Bike Racks
Hitch-mounted bike racks attach to the vehicle’s trailer hitch receiver. These are known for their stability and ease of use.
- Pros: Easy to load and unload bikes, very stable, can carry multiple bikes, minimal contact with the car’s paint.
- Cons: Requires a trailer hitch, can be expensive, adds length to the vehicle, may obstruct the trunk or hatch access.
1.1.2. Trunk-Mounted Bike Racks
Trunk-mounted bike racks, also known as strap-on racks, attach to the trunk or rear hatch of the car using a system of straps and hooks.
- Pros: Affordable, easy to store when not in use, doesn’t require a hitch.
- Cons: Can be less stable than hitch-mounted racks, may scratch the car’s paint if not properly installed, can obstruct trunk access, limited bike capacity.
1.1.3. Roof-Mounted Bike Racks
Roof-mounted bike racks attach to the car’s roof rack system. They come in two main styles: fork-mount and wheel-on.
- Pros: Doesn’t obstruct trunk access, versatile (can also carry other gear), suitable for various car models.
- Cons: Requires lifting bikes onto the roof, can affect fuel efficiency due to added height and wind resistance, may not fit in garages or under low clearances with bikes mounted.
1.2. Key Considerations When Choosing a Bike Rack
Selecting the right bike rack involves several factors, including your vehicle type, the number of bikes you need to carry, and your budget.
1.2.1. Vehicle Compatibility
Not all bike racks fit all vehicles. Check the manufacturer’s compatibility guide to ensure the rack is suitable for your car’s make and model.
- Hitch Type: Ensure your vehicle has the correct hitch receiver size (1 1/4 inch or 2 inch) for hitch-mounted racks.
- Roof Type: Roof racks need to be compatible with your car’s roof type (naked roof, raised rails, flush rails, or fixed points).
- Trunk Design: Trunk-mounted racks may not fit cars with spoilers or other unique trunk designs.
1.2.2. Bike Capacity
Consider how many bikes you typically need to transport. Most racks are designed to carry between one and four bikes.
- Weight Capacity: Be mindful of the rack’s weight capacity. Exceeding the limit can compromise safety and damage the rack or your vehicle.
- Bike Type: Some racks are better suited for certain bike types (e.g., road bikes, mountain bikes, e-bikes). Ensure the rack can accommodate your bike’s frame size and weight.
1.2.3. Ease of Use
Look for a rack that is easy to install, load, and unload. Features like tilt-down mechanisms (for hitch racks) and quick-release levers can make a big difference.
1.2.4. Security Features
Security is paramount to prevent theft. Many racks come with built-in locking mechanisms to secure the bikes to the rack and the rack to the vehicle.
1.2.5. Budget
Bike racks range in price from affordable trunk-mounted options to more expensive hitch-mounted and roof-mounted systems. Set a budget and explore options within that range.
2. Preparing for Bike Rack Installation
Before you start the installation process, there are several steps to take to ensure a smooth and successful experience.
2.1. Gathering Necessary Tools and Equipment
Having the right tools on hand will make the installation process much easier and faster.
- Wrench Set: For tightening bolts and nuts.
- Screwdriver Set: Both Phillips head and flathead screwdrivers.
- Measuring Tape: To ensure proper placement and alignment.
- Torque Wrench: To tighten bolts to the manufacturer’s specified torque.
- Protective Padding: To prevent scratches on your car’s paint.
- Cleaning Supplies: To clean the area where the rack will be installed.
2.2. Reading the Manufacturer’s Instructions
Always read the manufacturer’s instructions thoroughly before beginning the installation. Each rack model is different, and following the instructions is essential for safe and proper installation.
- Step-by-Step Guide: The instructions will provide a detailed, step-by-step guide tailored to your specific rack model.
- Safety Guidelines: Pay close attention to any safety guidelines or warnings provided by the manufacturer.
- Torque Specifications: Ensure you know the correct torque specifications for all bolts and fasteners.
2.3. Cleaning the Installation Area
Clean the area where the bike rack will be installed to remove dirt, grime, and debris. This will help ensure a secure and stable attachment.
- Wash and Dry: Wash the area with soap and water, then dry it thoroughly.
- Waxing: Apply a layer of wax to protect the paint from scratches (especially important for trunk-mounted racks).
3. Step-by-Step Guide to Installing a Hitch-Mounted Bike Rack
Hitch-mounted bike racks are a popular choice due to their stability and ease of use. Here’s how to install one:
3.1. Installing a Trailer Hitch (If Needed)
If your vehicle doesn’t already have a trailer hitch, you’ll need to install one.
- Select the Correct Hitch: Choose a hitch that is compatible with your vehicle’s make, model, and year.
- Gather Tools: You’ll need a wrench set, socket set, torque wrench, and safety glasses.
- Position the Hitch: Align the hitch with the mounting points on your vehicle’s frame.
- Attach the Hitch: Secure the hitch using the provided bolts and hardware.
- Torque the Bolts: Use a torque wrench to tighten the bolts to the manufacturer’s specified torque.
- Test the Hitch: Ensure the hitch is securely attached and can support the weight of the bike rack and bikes.
3.2. Assembling the Bike Rack
Most hitch-mounted bike racks require some assembly. Follow the manufacturer’s instructions to assemble the rack.
- Unpack Components: Lay out all the components and hardware.
- Attach Support Arms: Connect the support arms to the main frame using bolts and nuts.
- Install Wheel Trays: Attach the wheel trays to the support arms.
- Secure Locking Mechanisms: Install any locking mechanisms or security features.
3.3. Attaching the Bike Rack to the Hitch
Once the hitch is installed and the bike rack is assembled, you can attach the rack to the hitch receiver.
- Insert the Rack: Slide the rack’s shank into the hitch receiver.
- Secure with Hitch Pin: Insert the hitch pin through the receiver and shank to secure the rack.
- Tighten Anti-Rattle Device: If your rack has an anti-rattle device, tighten it to eliminate any wobble or movement.
- Test the Rack: Ensure the rack is securely attached and doesn’t move excessively.
3.4. Loading and Securing Bikes
With the rack installed, you can now load and secure your bikes.
- Position the Bikes: Place the bikes onto the wheel trays, ensuring they are evenly distributed.
- Secure with Straps: Use the provided straps or clamps to secure the bikes to the rack.
- Use Additional Straps: For added security, use additional straps to tie the bikes together and to the rack.
- Check Clearance: Ensure the bikes don’t interfere with the vehicle’s lights, license plate, or exhaust.
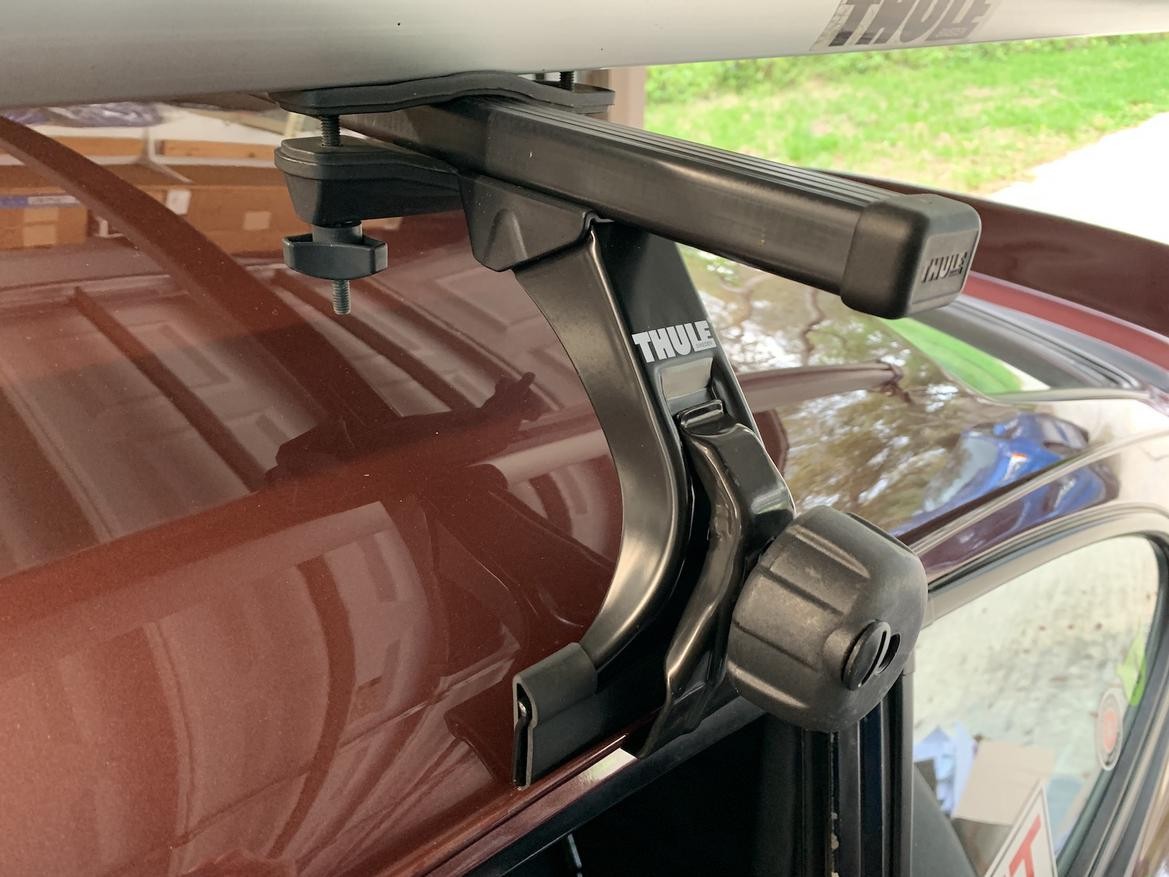
Alt Text: Close-up of a hitch-mounted bike rack securely attached to a car, ready for bike transportation, showcasing its robust design.
4. Step-by-Step Guide to Installing a Trunk-Mounted Bike Rack
Trunk-mounted bike racks are a cost-effective and versatile option for many vehicles. Here’s how to install one properly:
4.1. Preparing the Trunk Area
Before installing a trunk-mounted rack, prepare the trunk area to protect your car’s paint.
- Clean the Trunk: Wash and dry the trunk lid to remove dirt and grime.
- Apply Protective Film: Apply clear protective film to the areas where the rack’s contact points will rest.
4.2. Positioning the Bike Rack
Position the bike rack on the trunk lid, ensuring it is centered and aligned properly.
- Refer to Instructions: Consult the manufacturer’s instructions for the recommended positioning.
- Adjust Support Arms: Adjust the support arms to fit the contours of your trunk lid.
- Check Stability: Ensure the rack sits securely on the trunk lid without wobbling.
4.3. Attaching the Straps and Hooks
Secure the bike rack to the trunk lid using the provided straps and hooks.
- Attach Top Straps: Attach the top straps to the upper edge of the trunk lid.
- Attach Side Straps: Attach the side straps to the sides of the trunk lid.
- Attach Bottom Straps: Attach the bottom straps to the lower edge of the trunk lid.
- Tighten Straps: Tighten the straps evenly, ensuring the rack is securely attached.
- Check for Movement: Ensure the rack doesn’t move excessively when you shake it.
4.4. Loading and Securing Bikes
Load and secure your bikes onto the trunk-mounted rack.
- Position the Bikes: Place the bikes onto the rack, ensuring they are evenly distributed.
- Secure with Straps: Use the provided straps or clamps to secure the bikes to the rack.
- Use Additional Straps: For added security, use additional straps to tie the bikes together and to the rack.
- Check Clearance: Ensure the bikes don’t interfere with the vehicle’s lights, license plate, or exhaust.
5. Step-by-Step Guide to Installing a Roof-Mounted Bike Rack
Roof-mounted bike racks are a great option for cars with existing roof rack systems. Here’s how to install one:
5.1. Ensuring Compatibility with Your Roof Rack
Before installing a roof-mounted bike rack, ensure it is compatible with your car’s roof rack system.
- Check Rack Type: Determine if your roof rack has crossbars, raised rails, flush rails, or fixed points.
- Verify Compatibility: Consult the bike rack manufacturer’s compatibility guide to ensure it fits your roof rack type.
5.2. Assembling the Bike Rack
Most roof-mounted bike racks require some assembly. Follow the manufacturer’s instructions to assemble the rack.
- Unpack Components: Lay out all the components and hardware.
- Attach Mounting Brackets: Connect the mounting brackets to the main frame using bolts and nuts.
- Install Wheel Holders: Attach the wheel holders to the mounting brackets.
- Secure Locking Mechanisms: Install any locking mechanisms or security features.
5.3. Attaching the Bike Rack to the Roof Rack
Attach the bike rack to the roof rack, ensuring it is securely fastened.
- Position the Rack: Place the rack onto the roof rack, ensuring it is centered and aligned properly.
- Attach Mounting Hardware: Use the provided mounting hardware to attach the rack to the roof rack.
- Tighten Bolts: Tighten the bolts evenly, ensuring the rack is securely attached.
- Check for Movement: Ensure the rack doesn’t move excessively when you shake it.
5.4. Loading and Securing Bikes
Load and secure your bikes onto the roof-mounted rack.
- Lift the Bikes: Carefully lift the bikes onto the rack.
- Position the Bikes: Place the bikes onto the wheel holders, ensuring they are evenly distributed.
- Secure with Clamps: Use the provided clamps to secure the bikes to the rack.
- Use Additional Straps: For added security, use additional straps to tie the bikes together and to the rack.
- Check Clearance: Ensure the bikes don’t interfere with the vehicle’s roof or other accessories.
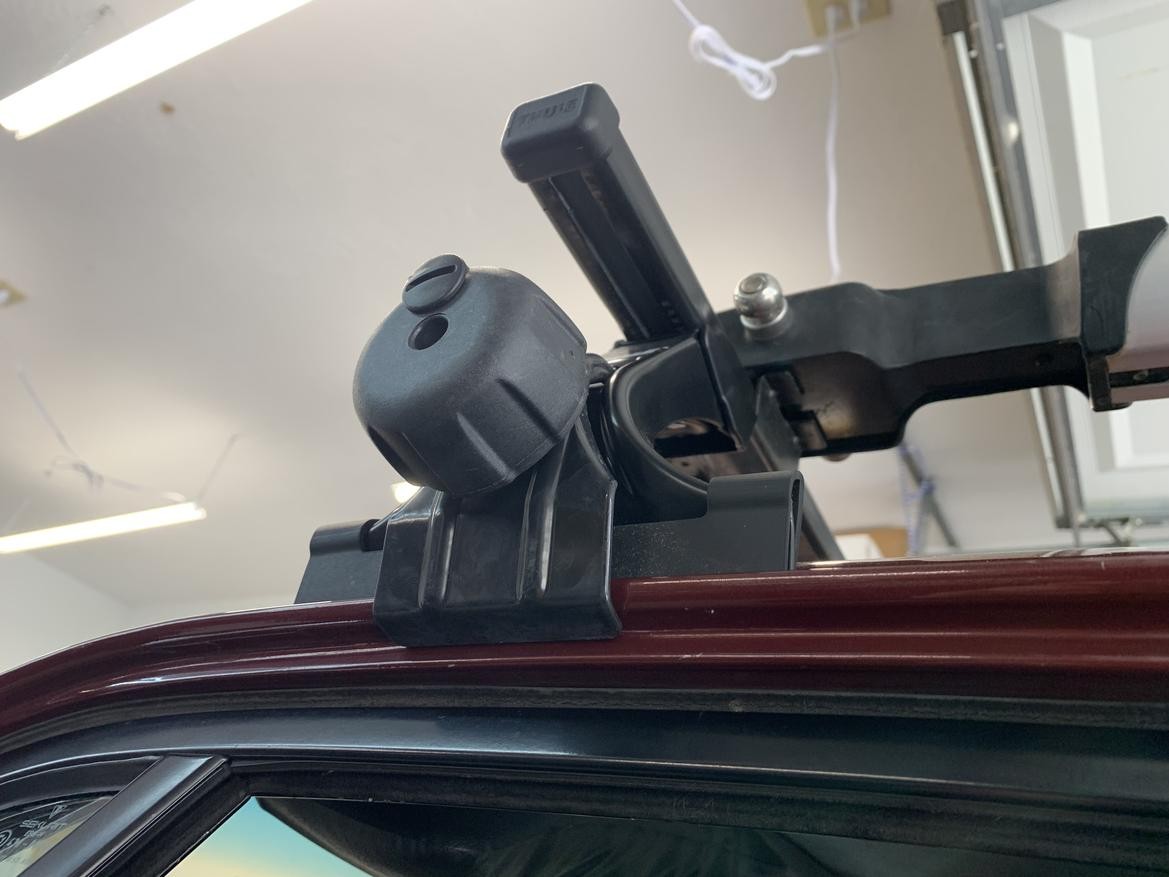
Alt Text: A roof-mounted bike rack on a car, with a bicycle securely attached, demonstrating a safe and practical bike-carrying solution.
6. Safety Tips for Using Bike Racks
Using a bike rack safely is crucial to prevent accidents and damage to your vehicle and bikes.
6.1. Regular Inspections
Regularly inspect the bike rack and its components for wear and tear.
- Check Straps: Ensure straps are not frayed or damaged.
- Inspect Mounting Hardware: Check bolts, nuts, and clamps for looseness or corrosion.
- Examine Rack Structure: Look for cracks, bends, or other signs of damage.
6.2. Secure Bike Attachment
Ensure bikes are securely attached to the rack before each trip.
- Tighten Straps: Double-check that all straps and clamps are tight.
- Use Additional Straps: Use additional straps for added security, especially on long trips.
- Avoid Overloading: Do not exceed the rack’s weight capacity.
6.3. Driving Considerations
Adjust your driving habits when using a bike rack.
- Reduce Speed: Drive slower than usual, especially on rough roads or in windy conditions.
- Increase Following Distance: Increase your following distance to allow for longer braking times.
- Be Aware of Height: Be mindful of the added height when driving under bridges, overpasses, and parking garages (especially with roof-mounted racks).
- Avoid Sharp Turns: Avoid making sharp turns, as this can put extra stress on the rack and bikes.
6.4. Maintenance
Proper maintenance can extend the life of your bike rack and ensure its continued safety.
- Clean Regularly: Clean the rack regularly to remove dirt, grime, and salt.
- Lubricate Moving Parts: Lubricate moving parts, such as hinges and locking mechanisms, to prevent corrosion and ensure smooth operation.
- Store Properly: When not in use, store the rack in a dry, protected location.
7. Troubleshooting Common Bike Rack Issues
Even with proper installation and maintenance, you may encounter some common issues with bike racks. Here’s how to troubleshoot them:
7.1. Rack Wobbling or Shaking
If the rack wobbles or shakes excessively, it could be due to loose mounting hardware or an improperly installed hitch.
- Check Mounting Hardware: Ensure all bolts, nuts, and clamps are tight.
- Tighten Anti-Rattle Device: If your rack has an anti-rattle device, tighten it to eliminate wobble.
- Inspect Hitch Installation: If the hitch is not properly installed, it may need to be reinstalled or adjusted.
7.2. Bikes Shifting During Transit
If bikes shift during transit, it could be due to loose straps or an uneven distribution of weight.
- Tighten Straps: Double-check that all straps and clamps are tight.
- Use Additional Straps: Use additional straps to tie the bikes together and to the rack.
- Redistribute Weight: Ensure the bikes are evenly distributed on the rack.
7.3. Difficulty Loading or Unloading Bikes
If you experience difficulty loading or unloading bikes, it could be due to the rack’s design or the bike’s size and weight.
- Adjust Rack Settings: Adjust the rack settings to accommodate the bike’s size and weight.
- Use a Loading Ramp: Use a loading ramp to make it easier to lift heavy bikes onto the rack.
- Get Assistance: Ask someone to help you load and unload the bikes.
7.4. Rack Noise While Driving
If the rack makes noise while driving, it could be due to wind resistance or loose components.
- Tighten Loose Components: Check for any loose components and tighten them.
- Adjust Rack Position: Adjust the rack position to minimize wind resistance.
- Use Wind Fairing: Use a wind fairing to reduce wind noise and improve fuel efficiency.
8. Maintaining Your Bike Rack for Longevity
Proper maintenance is key to extending the life of your bike rack and ensuring its safety and reliability.
8.1. Regular Cleaning
Regular cleaning helps remove dirt, grime, and salt that can corrode the rack’s components.
- Wash with Soap and Water: Wash the rack with soap and water after each use, especially after driving in wet or salty conditions.
- Rinse Thoroughly: Rinse the rack thoroughly to remove all soap residue.
- Dry Completely: Dry the rack completely to prevent rust and corrosion.
8.2. Lubrication
Lubricating moving parts helps prevent corrosion and ensures smooth operation.
- Apply Lubricant: Apply lubricant to hinges, locking mechanisms, and other moving parts.
- Use a Quality Lubricant: Use a quality lubricant designed for outdoor use.
- Wipe Off Excess: Wipe off any excess lubricant to prevent dirt and grime from accumulating.
8.3. Storage
Proper storage helps protect the rack from the elements and prevents damage.
- Store Indoors: Store the rack indoors when not in use, if possible.
- Cover the Rack: If storing outdoors, cover the rack with a waterproof cover.
- Protect from Sunlight: Protect the rack from direct sunlight, as UV rays can damage the straps and plastic components.
9. Advanced Tips and Tricks for Bike Rack Users
Here are some advanced tips and tricks to enhance your bike rack experience:
9.1. Using Bike Rack Accessories
Various accessories can enhance the functionality and convenience of your bike rack.
- Bike Rack Lights: Use bike rack lights to improve visibility, especially when driving at night.
- License Plate Relocator: Use a license plate relocator to ensure your license plate is visible.
- Cable Locks: Use cable locks to secure your bikes to the rack and prevent theft.
- Wheel Straps: Use wheel straps to prevent the bike wheels from spinning during transit.
- Frame Adapters: Use frame adapters to accommodate bikes with non-standard frame designs.
9.2. Optimizing Fuel Efficiency
Using a bike rack can affect your vehicle’s fuel efficiency. Here’s how to optimize it:
- Remove the Rack When Not in Use: Remove the rack when you’re not using it to reduce wind resistance.
- Use a Wind Fairing: Use a wind fairing to reduce wind noise and improve fuel efficiency.
- Drive at Moderate Speeds: Drive at moderate speeds to minimize wind resistance.
- Inflate Tires Properly: Ensure your tires are properly inflated to reduce rolling resistance.
9.3. Protecting Your Vehicle’s Paint
Protecting your vehicle’s paint is essential, especially when using trunk-mounted racks.
- Use Protective Film: Apply clear protective film to the areas where the rack’s contact points will rest.
- Clean the Rack Regularly: Clean the rack regularly to remove dirt and grime that can scratch the paint.
- Avoid Over-Tightening Straps: Avoid over-tightening straps, as this can damage the paint.
- Use Padding: Use padding between the rack and the vehicle to prevent scratches.
10. Latest Innovations in Bike Rack Technology
Stay updated with the latest innovations in bike rack technology to enhance your biking experience.
10.1. Smart Bike Racks
Smart bike racks come with advanced features such as GPS tracking, theft alerts, and electronic locking mechanisms.
10.2. Lightweight Materials
Manufacturers are using lightweight materials such as aluminum and carbon fiber to reduce the weight of bike racks and improve fuel efficiency.
10.3. Aerodynamic Designs
Aerodynamic designs help reduce wind resistance and improve fuel efficiency.
10.4. Integrated Locking Systems
Integrated locking systems provide enhanced security and convenience.
11. Comparative Analysis of Top Bike Rack Brands
Choosing the right bike rack brand can make a significant difference in terms of quality, reliability, and features. Here’s a comparative analysis of some top bike rack brands:
| Brand | Type | Key Features | Price Range | Pros | Cons |
|---|---|---|---|---|---|
| Thule | Hitch, Roof | Durable, versatile, integrated locking systems, aerodynamic designs | $$$ | High-quality, innovative features, wide range of options | Expensive, some models can be heavy |
| Yakima | Hitch, Roof, Trunk | Affordable, easy to install, wide range of options, user-friendly designs | $$ | Good value for money, easy to use, reliable | May not be as durable as Thule, limited advanced features |
| Kuat | Hitch | Premium design, lightweight materials, integrated locking systems, easy to use | $$$$ | Stylish, high-quality materials, easy to use, innovative features | Very expensive, limited range of options |
| Saris | Trunk, Hitch | Affordable, lightweight, easy to store, versatile | $ | Cost-effective, easy to store, suitable for occasional use | May not be as stable as hitch-mounted racks, limited bike capacity |
| Allen Sports | Trunk, Hitch | Budget-friendly, easy to install, wide range of options | $ | Affordable, easy to install, suitable for beginners | May not be as durable as other brands, limited features |
12. Real-World Examples and Case Studies
To illustrate the practical application of bike rack installation and usage, let’s look at some real-world examples and case studies.
12.1. Case Study 1: Family Road Trip
The Smiths, a family of four, wanted to take their bikes on a road trip. They chose a hitch-mounted bike rack for its stability and ease of use. They installed the rack themselves, following the manufacturer’s instructions carefully. During the trip, they regularly inspected the rack and straps to ensure the bikes remained secure. They also adjusted their driving habits, reducing their speed and increasing their following distance. The road trip was a success, and the Smiths enjoyed biking in various locations along the way.
12.2. Example 2: Commuting to Work
John, a city dweller, commutes to work by bike. He chose a trunk-mounted bike rack for its affordability and ease of storage. He installed the rack himself, taking care to protect his car’s paint with protective film. He regularly cleaned the rack and straps to remove dirt and grime. He also used additional straps to secure his bike to the rack. The trunk-mounted rack made it easy for John to transport his bike to and from work.
12.3. Example 3: Mountain Biking Adventure
Sarah and her friends enjoy mountain biking in remote locations. They chose a roof-mounted bike rack for its versatility and ability to carry multiple bikes. They installed the rack themselves, ensuring it was compatible with their car’s roof rack system. They regularly inspected the rack and mounting hardware to ensure the bikes remained secure. They also used a wind fairing to reduce wind noise and improve fuel efficiency. The roof-mounted rack allowed Sarah and her friends to explore new mountain biking trails.
13. How CARS.EDU.VN Can Help You Choose and Install the Right Bike Rack
At CARS.EDU.VN, we understand the importance of finding the perfect bike rack for your vehicle and lifestyle. We offer a wealth of resources to help you make an informed decision and ensure a safe and successful installation.
13.1. Expert Reviews and Comparisons
Our team of automotive experts provides in-depth reviews and comparisons of various bike racks, helping you assess their pros and cons. We consider factors such as:
- Build Quality: Evaluating the materials and construction of each rack.
- Ease of Installation: Assessing how easy it is to install and remove the rack.
- Bike Capacity: Determining the number of bikes the rack can safely carry.
- Security Features: Analyzing the effectiveness of locking mechanisms.
- Price: Considering the rack’s value for money.
13.2. Step-by-Step Installation Guides
We offer step-by-step installation guides for different types of bike racks, complete with detailed instructions and helpful tips. Our guides cover:
- Hitch-Mounted Racks: Detailed instructions for installing trailer hitches and attaching bike racks.
- Trunk-Mounted Racks: Tips for protecting your car’s paint and ensuring a secure fit.
- Roof-Mounted Racks: Guidance on selecting compatible roof rack systems and attaching bike racks.
13.3. Community Forum
Join our community forum to connect with other bike rack users, share your experiences, and ask questions. Our forum is a valuable resource for:
- Troubleshooting Issues: Getting advice on resolving common bike rack problems.
- Sharing Tips and Tricks: Discovering new ways to enhance your bike rack experience.
- Getting Recommendations: Receiving personalized recommendations based on your needs and preferences.
13.4. Maintenance and Safety Tips
We provide comprehensive maintenance and safety tips to help you keep your bike rack in top condition and ensure safe transportation. Our tips cover:
- Regular Inspections: Guidance on what to look for during routine inspections.
- Secure Bike Attachment: Best practices for securing bikes to the rack.
- Driving Considerations: Tips for adjusting your driving habits when using a bike rack.
- Troubleshooting Common Issues: Solutions to common bike rack problems.
14. Frequently Asked Questions (FAQ) About Bike Racks
Here are some frequently asked questions about bike racks, along with detailed answers:
-
What type of bike rack is best for my car?
The best type of bike rack depends on your vehicle type, budget, and how often you need to transport bikes. Hitch-mounted racks are stable and easy to use but require a trailer hitch. Trunk-mounted racks are affordable and easy to store but may scratch your car’s paint. Roof-mounted racks don’t obstruct trunk access but require lifting bikes onto the roof.
-
How do I know if a bike rack will fit my car?
Check the manufacturer’s compatibility guide to ensure the rack is suitable for your car’s make and model. Pay attention to hitch type, roof type, and trunk design.
-
How many bikes can a bike rack carry?
Most racks are designed to carry between one and four bikes. Be mindful of the rack’s weight capacity and bike type.
-
Are bike racks easy to install?
Some bike racks are easier to install than others. Hitch-mounted racks require a trailer hitch installation, while trunk-mounted and roof-mounted racks are generally easier to install. Always follow the manufacturer’s instructions.
-
How do I prevent my bike from being stolen from a bike rack?
Use a bike rack with integrated locking mechanisms, and supplement with cable locks for added security. Park in well-lit areas and avoid leaving your bike unattended for long periods.
-
How do I protect my car’s paint when using a bike rack?
Apply clear protective film to the areas where the rack’s contact points will rest. Clean the rack regularly to remove dirt and grime, and avoid over-tightening straps.
-
What are the safety considerations when driving with a bike rack?
Reduce speed, increase following distance, be aware of added height, and avoid sharp turns. Regularly inspect the rack and straps to ensure the bikes remain secure.
-
How do I maintain my bike rack?
Clean the rack regularly to remove dirt, grime, and salt. Lubricate moving parts to prevent corrosion, and store the rack in a dry, protected location when not in use.
-
Can I use a bike rack on any type of car?
Not all bike racks fit all types of cars. Check the manufacturer’s compatibility guide to ensure the rack is suitable for your vehicle.
-
Where can I find reliable reviews and comparisons of bike racks?
Visit CARS.EDU.VN for expert reviews and comparisons of various bike racks. Our team of automotive experts provides in-depth assessments of build quality, ease of installation, bike capacity, security features, and price.
15. Conclusion: Enjoying Your Biking Adventures with Confidence
Installing a bike rack on your car opens up a world of biking adventures, allowing you to explore new trails, commute with ease, and enjoy the great outdoors with your favorite two-wheeled companion. By following the guidelines and tips provided in this comprehensive guide, you can confidently select, install, and use a bike rack that meets your needs and ensures a safe and enjoyable biking experience.
Remember to regularly inspect and maintain your bike rack, adjust your driving habits, and protect your vehicle’s paint. And for expert advice, in-depth reviews, and step-by-step installation guides, visit CARS.EDU.VN. Our team of automotive experts is here to help you make the most of your biking adventures.
For any questions or assistance, feel free to contact us at:
Address: 456 Auto Drive, Anytown, CA 90210, United States
WhatsApp: +1 555-123-4567
Website: cars.edu.vn
Happy biking.
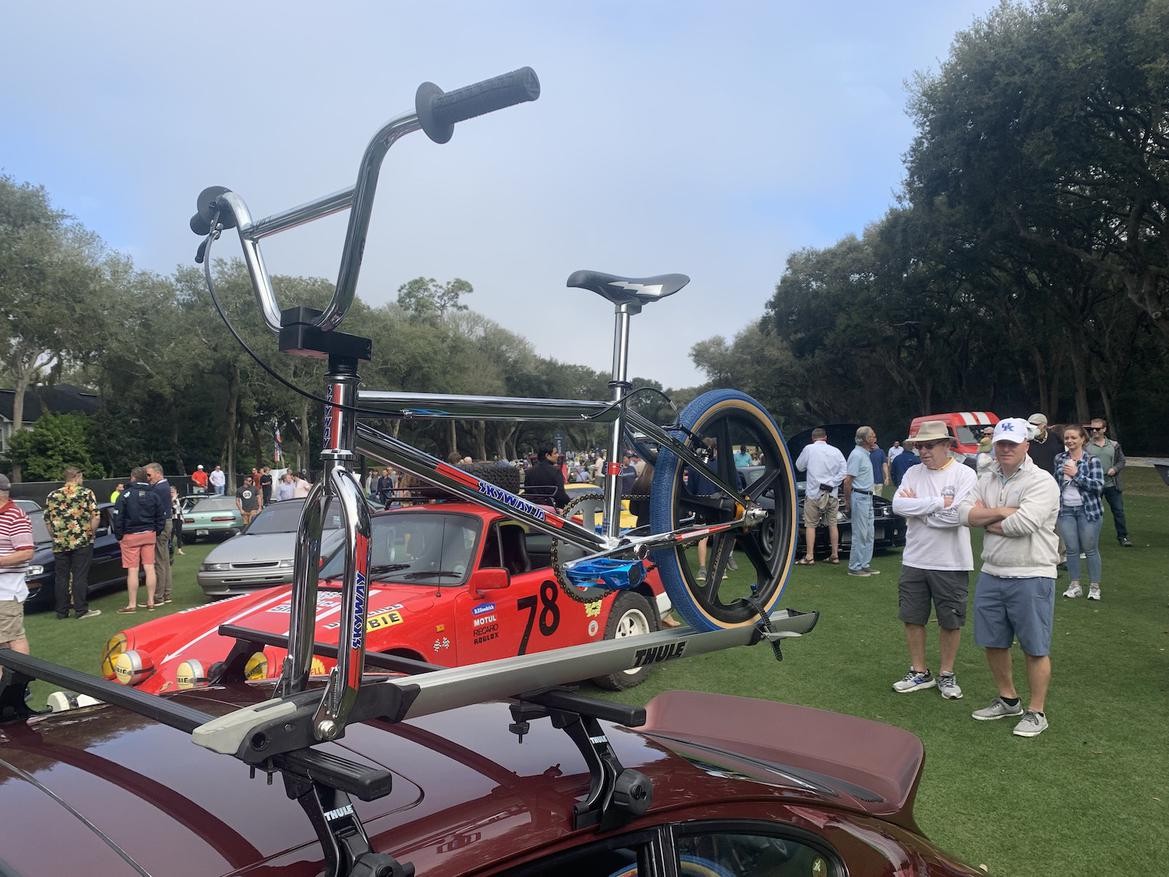
Alt Text: A Porsche 911 equipped with a bike rack, blending automotive elegance with outdoor adventure, offering a unique perspective on car accessories.