Navigating winter roads often means facing challenging conditions, and for many drivers in snowy regions or those planning winter mountain adventures, snow chains are an indispensable tool. If you’re new to using tire chains, or even if you’re looking for a refresher, understanding how to properly install and use them is crucial for your safety and the well-being of your vehicle. Modern “quick-fit” chains are designed to be significantly easier to manage than older models, making the process less daunting. This guide will walk you through each step of installing these user-friendly tire chains, ensuring you’re prepared for icy and snowy roads. We’ll also cover essential safety tips for driving with chains, removing them, and proper storage to extend their lifespan.
Pre-Trip Preparations: Mastering Chain Installation Before You Need It
The side of a snow-covered road, possibly in the dark and amidst falling snow, is the worst place to learn how to install snow chains for the first time. Preparation is key to a smooth and safe experience.
- Practice Makes Perfect: Before heading out, take the time to familiarize yourself with your new snow chains. A dry garage or driveway is an ideal location to practice installing and removing them. This initial practice session will not only confirm that you have the correct size chains for your tires but also build your confidence in handling them. Les Schwab and similar tire centers often offer assistance if you encounter any difficulties during your practice run.
- Assemble a Winter Safety Kit: A well-prepared driver is a safe driver. Create a winter road trip safety kit and always keep it in your vehicle, especially during winter months. Essential items include warm, waterproof gloves, a waterproof outer layer to keep you dry while installing chains, a headlamp or flashlight for visibility in low-light conditions, and potentially a small kneeling pad to protect your knees from the cold, wet ground. Refer to resources like 14 Items for Your Winter Road Trip Safety Kit for a comprehensive list.
Step-by-Step Guide: Installing Quick-Fit Tire Chains
Once you’ve practiced and have your safety kit ready, you’re better equipped to handle chain installation in less-than-ideal conditions. Follow these steps to properly put chains on your car:
-
Safety First: When you determine that tire chains are necessary, prioritize safety. Pull your vehicle as far off the road as possible, ideally onto a level, stable shoulder or a designated pull-out area. Activate your hazard lights to alert other drivers. Now is the time to put on your waterproof gear, gloves, and headlamp from your winter kit.
-
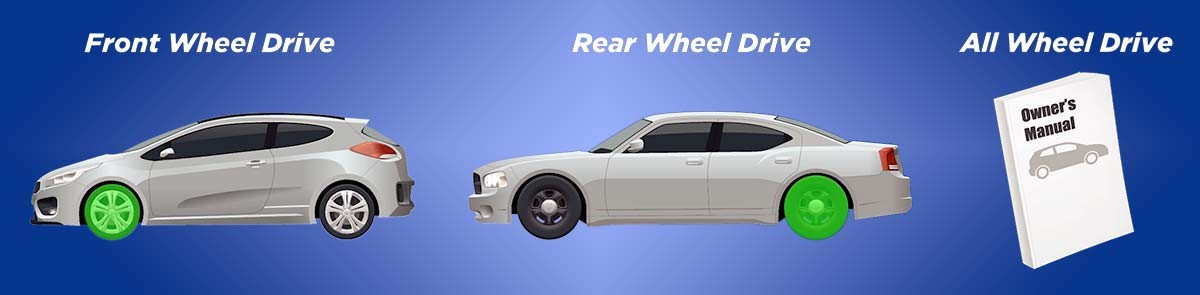
Determine Drive Wheel Configuration: Correct chain placement is crucial and depends on your vehicle’s drive system. For front-wheel-drive vehicles, install chains on the front tires. For rear-wheel-drive vehicles, install them on the rear tires. If you drive an all-wheel-drive (AWD) or four-wheel-drive (4WD) vehicle, consult your owner’s manual for specific instructions, as chain placement can vary. When in doubt, Les Schwab or your local tire experts can provide guidance on the correct tires for chain installation on your specific vehicle.
-
Prepare Chains and Instructions: Open the chain bag and remove the contents. You should find two chains and an instruction sheet. Many quick-fit chains come with a plastic mat, which can be unfolded and used as a clean surface to kneel on during installation, keeping you out of direct contact with the snow and slush.
-
Untangle and Orient Chains: Hold the chains by the plastic-covered cable and carefully untangle them, ensuring no links are twisted or knotted. Orient the chain correctly: typically, quick-fit chains have color-coded ends. Hold the chain so the yellow end is in your left hand and the blue end in your right.
Inspect the chain to ensure the metal hooks or fastening elements are facing away from the tire. This prevents damage to your tires’ sidewalls.
-
Position Chains Behind the Tire: Lay the untangled chain on the ground behind the tire you are working on. Push the chain from the right side to the left, starting with the yellow cable end. Ensure the chain is centered behind the tire.
Grab both ends of the cable and lift them up and over the top of the tire. You should feel the cable settle behind the tire against the vehicle’s axle area.
Connect the color-coded cable ends (yellow to blue) at the top of the tire, ensuring a secure connection.
-
Fasten the Red Hook: Locate the red hook, which is typically positioned opposite the cable connection at the top of the tire. Connect this red hook to the first accessible gold link on the opposite side of the chain. This secures the upper portion of the chain around the tire.
-
Verify Diamond Pattern and Center Rail: Push the connected chain around the tire to check the alignment. The chain should form a diamond pattern across the tire tread. The center rail of the chain should ideally run along the center of your tire tread for optimal traction.
-
Secure the Bottom Chain: The lower section of the chain typically involves a red draw chain with a bungee cord on one side and a chain guide on the other. Pull these components outwards. Thread the red chain through the chain guide and pull it as tightly as possible by hand, avoiding pulling directly on the bungee. As you tighten, a link on the chain will engage with the notch on the red chain guide, locking it in place.
Use the bungee end of the red chain to further secure the chains. Thread the bungee through one or both of the red loops provided, and hook it onto a gold-side chain link opposite the red loops. If threading through both loops is too tight, securing it through one loop is sufficient.
-
Repeat on the Other Tire: Follow steps 1 through 8 to install a chain on the other designated tire.
-
Drive and Settle: Once both chains are installed, drive your vehicle forward a short distance, about 15 feet or one car length. This allows the chains to settle and seat properly on the tires.
-
Re-Tension Chains: After driving forward, stop and check the chains for tightness. If they appear loose, re-tighten them. Unhook the bungee end of the red draw chain, pull the chain tighter, and re-secure the bungee. Ensure the chains are snug against the tire. If they are still loose, adjust the red hook opposite the chain guide to a tighter setting on the gold chain links. Excess chain links can hang loose, but the overall fit should be tight and secure.
It’s crucial to stop immediately if you hear any loud slapping or metallic noises while driving, as this could indicate a broken or improperly installed chain that could damage your vehicle.
Driving Safely with Snow Chains
Driving with tire chains requires adjustments to your driving habits to ensure safety and prevent damage to your vehicle and the chains themselves.
- Speed Restriction: Never exceed 25 miles per hour (40 kilometers per hour) when driving with snow chains. Higher speeds can cause chain failure and vehicle damage.
- Avoid Dry Pavement: Tire chains are designed for snow and ice. Driving on bare pavement can damage both the chains and the road surface, and reduce traction and control. Remove chains as soon as you reach clear roads.
- Gentle Driving Maneuvers: Drive smoothly and avoid sudden starts, stops, and sharp turns. Abrupt maneuvers can cause the wheels to lock or spin, potentially damaging the chains and reducing their effectiveness. Brake and accelerate gently.
Removing Tire Chains
As soon as you reach a stretch of road that is clear of snow and ice, it’s important to remove your tire chains to prevent damage and ensure optimal vehicle handling.
To remove the chains, pull over to a safe location away from traffic. Removal is essentially the reverse of the installation process. Start by unhooking the bungee and chain from the chain guide tensioner. Unfasten the red hook, and then disconnect the blue and yellow cable connection at the top of the tire. Once the chains are loose and lying on the ground, carefully drive forward or backward a few feet to completely free the chains from under the tires, making them easier to pick up and handle.
Storage and Maintenance of Snow Chains
Proper storage and maintenance will prolong the life of your snow chains and ensure they are ready for use whenever you need them.
Before storing your chains, lay them out to dry completely. Storing wet chains can lead to rust and corrosion, degrading their strength and lifespan. Inspect your chains for any signs of wear or damage, especially if you have driven on asphalt. Look for flattened links or sharp edges, which indicate wear and may necessitate chain replacement.
We’re Here to Help
If you’re unsure about selecting the right snow chains or need assistance with installation, remember that professionals at tire centers like Les Schwab are available to help. Many retailers also offer return policies for unused chains at the end of the winter season, providing flexibility for those who may not need them every year.
Equipping your vehicle with snow chains and knowing how to use them is a crucial step in winter driving safety. By following these guidelines and practicing installation beforehand, you can confidently tackle snowy roads and ensure safer winter travels.
For further information on winter driving safety, explore resources like 19 Winter Driving Resources You Can’t Do Without.