Is your car’s air conditioning not blowing as cold as it used to? Over time, even in a sealed system, the refrigerant in your car’s AC can decrease, leading to reduced cooling efficiency. If your car is a few years old and you’ve noticed a decline in AC performance, you might be experiencing a refrigerant issue. Recharging your car’s AC system can restore that refreshing cool air and make your drives comfortable again, especially during hot weather. This guide will walk you through the process of how to recharge your AC system at home, saving you a trip to the mechanic.
Understanding Your Car’s AC System and Refrigerant Loss
Before diving into the recharge process, it’s helpful to understand why your AC might need a boost of refrigerant. Car AC systems are designed to be sealed to prevent refrigerant leaks. However, over years of use, the seals and hoses can naturally degrade, allowing small amounts of refrigerant to escape. This is a gradual process, and you’ll typically notice the cooling becoming less effective over time rather than a sudden loss of cold air.
Signs Your Car AC Might Need a Recharge:
- Weak Airflow: The air coming from your vents isn’t as cold as it used to be, even on the coldest setting.
- Hissing Noises: You might hear a strange hissing sound coming from your vents when the AC is turned on.
- Compressor Issues: The AC compressor may cycle on and off more frequently than normal, or not engage at all.
- Age of Vehicle: If your car is over 6-8 years old and hasn’t had an AC recharge, low refrigerant is a likely culprit.
While a slow refrigerant leak is common, a sudden loss of cooling could indicate a more serious problem, such as a major leak in the system. In such cases, recharging alone won’t solve the issue, and you’ll need to identify and repair the leak first.
Basic Components of Your Car’s AC System:
To better understand the recharge process, here are the key components of your car’s air conditioning system:
- Compressor: The heart of the system, the compressor circulates refrigerant and pressurizes it.
- Condenser: Located in front of the radiator, the condenser dissipates heat from the refrigerant.
- Evaporator: Situated inside the dashboard, the evaporator is where the refrigerant expands and cools the air blown into the cabin.
- Expansion Valve: This valve controls the flow of refrigerant into the evaporator.
- Refrigerant: The substance that cycles through the system, absorbing and releasing heat to cool the air. R-134a is a common type, but newer vehicles may use R-1234yf.
Tools and Materials You’ll Need to Recharge Your AC
Recharging your car’s AC system yourself is a straightforward process with the right tools. Here’s what you’ll need:
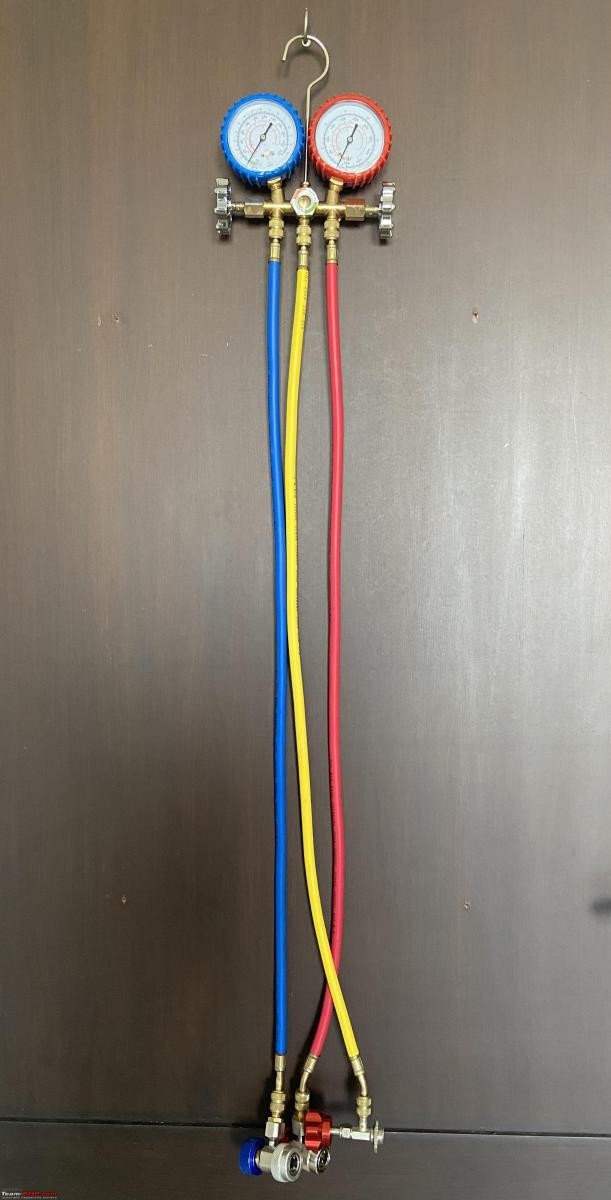
- AC Manifold Gauge Set: This is the most crucial tool. It allows you to connect to your car’s AC system, read the pressure, and safely add refrigerant.
-
Refrigerant Can with R-134a: Ensure you use the correct type of refrigerant specified for your vehicle. This information is usually found on a sticker under the hood. A standard 450g can is typically sufficient for most cars.
-
Can Tap Valve: This valve attaches to the refrigerant can and connects to the yellow hose of the manifold gauge set.
-
Probe Thermometer: A thermometer to measure the air temperature from your vents before and after recharging, helping you gauge the improvement. A digital multimeter with a temperature probe works well.
-
Safety Goggles and Nitrile Gloves: Protect your eyes and skin from refrigerant, which can cause frostbite.
-
Vehicle Service Manual (Optional but Recommended): Consult your car’s service manual for the exact location of the low-pressure (LP) and high-pressure (HP) ports and the recommended refrigerant capacity.
Step-by-Step Guide to Recharging Your Car AC System
Now, let’s proceed with the recharge process. Follow these steps carefully:
1. Preparation and Safety First:
-
Park your car in a well-ventilated area.
-
Turn off the engine.
-
Put on safety goggles and nitrile gloves.
-
Locate the Low-Pressure (LP) and High-Pressure (HP) service ports in your engine bay. Typically, the LP port is on a larger diameter pipe and the HP port is on a smaller diameter pipe. They are usually capped with dust covers labeled “L” and “H” respectively.
-
Remove the dust caps from both ports and keep them in a safe place.
2. Connect the Manifold Gauge Set:
-
Ensure both valves on the manifold gauge set are closed. (The knobs should be turned clockwise as far as they go).
-
Connect the blue hose (low-pressure) to the LP service port and the red hose (high-pressure) to the HP service port using the quick couplers. The couplers are designed to fit only the correct ports to prevent accidental connection to the wrong port.
-
Attach the yellow hose to the can tap valve, but do not connect the valve to the refrigerant can yet.
3. Read Initial Pressure:
-
Start your car’s engine.
-
Turn the AC to its maximum cooling setting and the blower fan to high.
-
Observe the pressure readings on the manifold gauges. Note both the low-pressure (blue gauge) and high-pressure (red gauge) readings.
-
Compare these readings to the pressure-temperature chart for R-134a refrigerant (you can find these charts online or often included with the manifold gauge set). The ideal pressure readings depend on the ambient temperature. For example, at 28°C (82°F), the low-pressure side should ideally read between 45-50 psi, and the high-pressure side between 190-230 psi. Low readings on the high-pressure side suggest a refrigerant deficiency.
4. Prepare the Refrigerant Can and Purge the Yellow Hose:
- Attach the can tap valve to the refrigerant can. Ensure the valve is closed (needle retracted) before screwing it onto the can to avoid accidental piercing.
- Slightly loosen the yellow hose connection at the manifold gauge to purge air from the hose.
- Carefully pierce the refrigerant can by turning the handle on the can tap valve clockwise until you feel resistance. Then, turn it counter-clockwise to open the valve and allow refrigerant to flow.
- Let a small amount of refrigerant bleed out of the loose connection to purge air and moisture from the yellow hose.
- Tighten the yellow hose connection securely.
5. Charge the System with Refrigerant:
- Slowly open the low-pressure (blue) valve on the manifold gauge set by turning the knob counter-clockwise. This will allow refrigerant to flow into the system.
- Observe the refrigerant flow through the sight glass on the manifold, if equipped.
- Watch the pressure readings on both gauges. The high-pressure reading should gradually increase as you add refrigerant.
- Charge in short bursts, opening and closing the low-pressure valve intermittently. Avoid opening the valve fully for extended periods to prevent overcharging.
6. Monitor Pressure and Temperature:
-
Continuously monitor the high-pressure gauge and compare it to the pressure-temperature chart for R-134a based on the ambient temperature. Aim to reach the optimal range indicated on the chart.
-
Check the vent temperature inside the car with your probe thermometer. You should notice a decrease in temperature as you add refrigerant.
-
Stop charging when the high-pressure reading is within the recommended range for the ambient temperature and the vent temperature is significantly cooler than before. Do not overcharge the system, as this can damage components.
7. Final Checks and Testing:
- Close the low-pressure valve on the manifold gauge set completely.
- Turn off your car’s engine and AC system.
- Carefully disconnect the quick couplers from the LP and HP service ports. Some refrigerant may escape during disconnection, which is normal, but avoid prolonged release.
- Replace the dust caps on the service ports.
- Run your car’s AC again to verify the improved cooling performance. Measure the vent temperature to confirm the improvement.
Important Considerations and Tips for AC Recharge
- Safety Precautions: Refrigerant can cause frostbite. Always wear safety goggles and gloves when working with the AC system. Work in a well-ventilated area.
- Don’t Overcharge: Overcharging the system is as bad as undercharging. It can lead to poor cooling and damage to the compressor and other components. Always monitor the pressure gauges and refer to the pressure-temperature chart.
- Listen for the Compressor: Ensure your AC compressor is engaging and cycling properly throughout the process. If the compressor is not working, recharging won’t solve the problem.
- Check for Leaks: If you find yourself needing to recharge frequently, suspect a leak in the system. Professional AC service centers can perform leak detection tests.
- Environmental Responsibility: Handle refrigerant responsibly. Do not vent large amounts of refrigerant into the atmosphere. Dispose of empty refrigerant cans properly according to local regulations.
- When to Seek Professional Help: If you are uncomfortable performing this procedure yourself, or if you suspect a more complex issue than low refrigerant, it’s always best to consult a qualified car AC technician. They have specialized equipment and expertise to diagnose and repair all AC system problems.
Recharging your car’s AC system can be a cost-effective DIY solution to restore cooling performance. By following these steps carefully and prioritizing safety, you can keep your car cool and comfortable for your drives.