Is your car’s air conditioning not as cold as it used to be? Especially in vehicles older than 6-8 years, a common culprit for diminished cooling performance is a simple lack of refrigerant. If you’ve noticed a decrease in your AC’s effectiveness and perhaps even a strange hissing sound from the vents, you might be experiencing refrigerant loss. The good news is, if there are no underlying issues within your car’s AC system, recharging the refrigerant can be a straightforward DIY task that restores that refreshing cold air. This guide will walk you through the process of how to recharge your car AC system at home, enhancing the original guide with more detail and clarity for the English-speaking market.
Disclaimer
Please note, I am not a certified HVAC technician. This guide is based on personal experience and is intended for informational and educational purposes only. Proceed with caution and prioritize safety throughout the process.
Understanding Car AC Refrigerant and Why It Needs Recharging
Your car’s air conditioning system relies on refrigerant to produce cold air. This refrigerant circulates through a sealed system, absorbing heat from inside your vehicle and releasing it outside. Over time, even in a sealed system, refrigerant levels can naturally decrease. This is often due to minor permeation through rubber seals and hoses within the AC lines. Think of it like a slow leak in a tire – gradual but impactful over years. While the system is designed to be closed, these minute losses are normal, particularly in older vehicles. Significant leaks can also occur from damage to components like hoses or the condenser, often from road debris. If your car is getting older and the AC isn’t as cold as it once was, low refrigerant is a prime suspect.
Before you jump to recharging, it’s wise to rule out other potential issues. A basic check of the AC system components can save you time and effort:
- Compressor: You should hear a distinct “click” when you engage the AC, indicating the compressor is activating. Visually inspect the drive belt connected to the compressor to ensure it’s in good condition and properly turning the compressor pulley.
- Evaporator: Usually, evaporator issues manifest as water leaks inside the car (footwell) or a musty odor. If you don’t see these signs, the evaporator is likely functioning.
- Condenser: Located at the front of your car, the condenser can get clogged with debris. Check for obstructions and clean any visible dirt, but avoid harsh chemicals that could damage the delicate fins.
- Expansion Valve: This component is harder to diagnose without specialized equipment. If other components seem fine, the expansion valve is less likely to be the issue in a simple refrigerant loss scenario.
- Blower Motor: Ensure your blower fan operates at different speeds. If it’s only working on high, the blower resistor might be faulty, but this is unrelated to refrigerant levels.
- Cabin Air Filter: A clogged cabin air filter restricts airflow and reduces AC efficiency. While not directly related to refrigerant, a clean filter ensures optimal cooling after recharging.
If these basic checks seem normal, then refrigerant recharge is a logical next step.
Is DIY AC Recharge Right for You?
Recharging your car AC yourself can be a cost-effective and empowering DIY project, especially if you suspect a simple refrigerant loss in an older vehicle. It’s particularly suitable if:
- Your car is over 6-8 years old and the AC cooling has gradually weakened.
- You hear a slight hissing sound from the vents when the AC is on.
- Basic component checks (compressor, blower, etc.) are normal.
However, DIY recharge might not be the right approach if:
- Your AC stopped cooling suddenly or completely. This could indicate a significant leak or compressor issue.
- You suspect a major leak or component failure.
- You are uncomfortable working on your car or handling refrigerants.
Safety First: Working with refrigerants and automotive systems requires caution. Refrigerant can cause frostbite upon skin contact, and improper procedures can damage your AC system. If you are at all unsure, it’s always best to consult a qualified automotive AC technician.
Tools and Materials You’ll Need
To recharge your car’s AC system at home, you’ll need the following tools and materials:
-
AC Manifold Gauge Set: This is the core tool for AC work. It consists of:
- Two gauges: a low-pressure gauge (blue) and a high-pressure gauge (red).
- Color-coded hoses: blue (low pressure), red (high pressure), and yellow (charging/vacuum).
- A manifold with valves to control refrigerant flow.
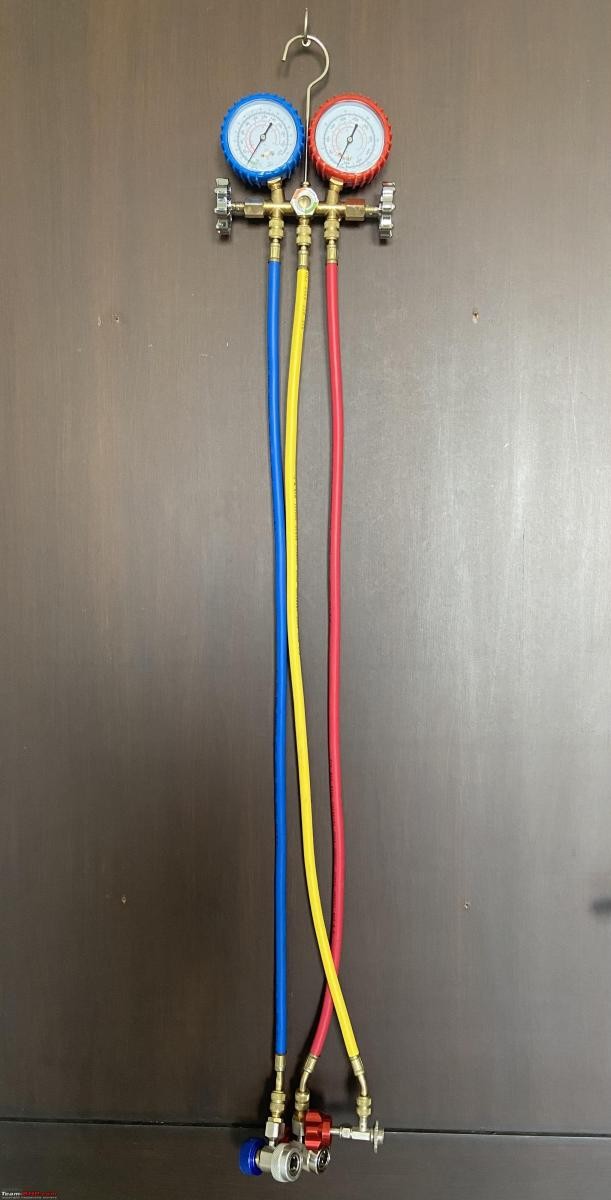 AC Manifold Setup
 -
R-134a Refrigerant Can with Can Tap Valve: R-134a is a common type of refrigerant used in many vehicles. Always check your car’s AC system sticker (usually under the hood) to confirm the correct refrigerant type. The can tap valve screws onto the refrigerant can and allows you to connect it to the manifold gauge set.
Alt text: Can of R-134a refrigerant, a common type used in car air conditioning systems, for recharging car AC.
-
Probe Thermometer (or Multimeter with Thermocouple): Used to measure the temperature of the air coming from your AC vents before and after recharging to assess the improvement.
Alt text: Digital probe thermometer for measuring air vent temperature, used to check car AC cooling performance.
-
Safety Goggles: Essential eye protection when working with refrigerants under pressure.
-
Nitrile Gloves: Protect your hands from potential frostbite from refrigerant contact.
Step-by-Step Guide to Recharging Your Car AC
Follow these steps carefully to recharge your car’s AC refrigerant.
Preparation
-
Start Your Engine and AC: Turn on your car’s engine. Set the AC to the coldest setting and the blower fan to maximum speed. Let it run for a few minutes.
-
Measure Vent Temperature (Initial): Use your probe thermometer to measure the temperature of the air coming from the center AC vents. Note this reading as your “before” temperature for comparison.
Alt text: Using a probe thermometer to measure the temperature of air from a car’s AC vent, assessing cooling efficiency.
Alt text: Close-up of a digital thermometer displaying a warm temperature reading from a car AC vent, indicating poor cooling.
-
Locate Service Ports: Open your car’s hood and locate the AC service ports. There are two ports:
- Low-Pressure (LP) Port: Has a larger diameter pipe and a smaller port fitting.
- High-Pressure (HP) Port: Has a smaller diameter pipe and a larger port fitting.
The port sizes are intentionally different to prevent accidental connection to the wrong port.
Alt text: Location of low-pressure (LP) and high-pressure (HP) service ports in a car AC system, showing different port sizes.
-
Identify Refrigerant Type: Check the sticker under your hood or in the engine bay for the refrigerant type and system capacity. This guide assumes R-134a refrigerant.
Alt text: Sticker indicating the type and quantity of refrigerant for a car’s air conditioning system, usually found under the hood.
-
Remove Dust Caps: Remove the dust caps from both the LP and HP service ports. Keep them in a safe place as you’ll need to replace them later.
Alt text: Removing the protective dust caps from car AC service ports to prepare for connecting manifold gauges.
-
Prepare PPE: Put on your safety goggles and nitrile gloves.
Alt text: Wearing safety goggles and nitrile gloves, essential personal protective equipment for handling car AC refrigerant.
Connecting the Manifold Gauges
-
Hang the Manifold Set: Hang the AC manifold gauge set under the hood, ensuring it is secure and you can easily see the gauges. Make sure both manifold valves (blue and red knobs) are fully closed (turned clockwise).
Alt text: Hanging the AC manifold gauge set in the engine bay of a car, preparing to connect to service ports for AC recharge.
-
Connect Hoses to Manifold: Connect the blue hose to the blue (low-pressure) gauge, the red hose to the red (high-pressure) gauge, and the yellow hose to the center port of the manifold.
Alt text: Diagram of an AC manifold gauge set showing gauges, valves, and ports for connecting hoses in car AC service.
Alt text: Close-up of AC manifold gauges showing pressure readings, valves, and the sight glass for observing refrigerant flow.
-
Connect Yellow Hose to Refrigerant Can: Attach the can tap valve to the refrigerant can. Ensure the valve handle is fully open (counter-clockwise) before screwing the valve assembly onto the refrigerant can. Then, screw the valve assembly onto the yellow hose.
Alt text: Can tap valve used to connect a refrigerant can to the yellow hose of an AC manifold gauge set for car AC recharge.
Alt text: Valve on a refrigerant can being screwed down to pierce the top and release refrigerant for car AC charging.
-
Purge Air from Yellow Hose: Slightly loosen the yellow hose connection at the manifold. Carefully and briefly puncture the refrigerant can by turning the can tap valve handle clockwise until you hear a hiss. Allow a small amount of refrigerant to purge out of the loose connection, pushing out any air in the yellow hose. Then, tighten the connection firmly. This step is crucial to prevent air and moisture from entering your AC system.
Alt text: Animation showing purging air from the yellow hose of an AC manifold set by releasing a small amount of refrigerant.
-
Connect Quick Couplers to Service Ports: Connect the blue quick coupler (on the blue hose) to the LP service port and the red quick coupler (on the red hose) to the HP service port. Ensure the quick couplers are in the closed position (lever up) before attaching them. Push down on the couplers to snap them onto the ports, then flip the levers down to lock them in place.
Alt text: Color-coded blue, red, and yellow hoses of an AC manifold gauge set, used for low-pressure, high-pressure, and charging connections.
Alt text: Schrader valve fitting on the end of an AC manifold hose, similar to a tire valve, preventing refrigerant leaks.
Alt text: Quick coupler fittings in blue and red for low-pressure and high-pressure car AC service ports, designed for secure and leak-free connections.
Alt text: Close-up showing the different sizes of low-pressure (LP) and high-pressure (HP) car AC service ports, preventing incorrect connections.
Alt text: Quick couplers from an AC manifold set snapping onto the service ports of a car’s air conditioning system for pressure measurement and refrigerant charging.
-
Open Quick Coupler Valves: Open the valves on the quick couplers by turning the knobs clockwise. This allows pressure readings to register on the gauges. You don’t need to open them fully, just enough to get a reading.
Alt text: Animation showing pressure readings appearing on AC manifold gauges after connecting to car AC service ports, indicating system pressures.
Charging the Refrigerant
-
Start Engine and Increase RPM: Have a helper start the engine and gently rev it to around 1500 RPM. This engages the AC compressor and provides accurate pressure readings.
-
Read Pressure Gauges and Compare to P-T Chart: Observe the readings on both the low-pressure (blue) and high-pressure (red) gauges. Note the ambient temperature. Refer to an R-134a pressure-temperature (P-T) chart to determine the ideal pressure ranges for your ambient temperature.
Alt text: AC manifold gauges showing pressure readings while the car engine is running, used to diagnose refrigerant levels.
Alt text: R134a refrigerant pressure-temperature chart, used to determine correct operating pressures based on ambient temperature for car AC systems.
Alt text: Display showing ambient temperature reading, needed to interpret car AC pressure readings using a pressure-temperature chart.
For example, at 28°C (approximately 82°F) ambient temperature, the low-pressure reading should be around 45-50 psi, and the high-pressure reading should be between 190-230 psi according to the chart. Your readings will likely be lower if your system is low on refrigerant.
-
Slowly Charge Refrigerant: Very slowly and gradually open the low-pressure side valve (blue knob) on the manifold by turning it counter-clockwise. Refrigerant will begin to flow from the can into the system.
Alt text: Opening the low-pressure valve on an AC manifold gauge set to start charging refrigerant into a car AC system.
Alt text: Animation showing refrigerant flow through the sight glass of an AC manifold gauge during the charging process.
-
Monitor High-Pressure Gauge: Watch the high-pressure gauge (red) closely as you slowly add refrigerant. Charge in short bursts, closing the low-pressure valve intermittently to check the pressure readings. The high-pressure reading should gradually increase and move towards the target range from the P-T chart for your ambient temperature.
Alt text: AC manifold high-pressure gauge showing needle rising as refrigerant is charged into the car AC system, indicating increasing system pressure.
Alt text: AC manifold high-pressure gauge needle reaching the target pressure range during car AC recharge, indicating sufficient refrigerant level.
Important: Avoid Overcharging. Overcharging is as bad as undercharging and can damage your AC system. Do not exceed the recommended high-pressure reading for your ambient temperature. Charge slowly and in small increments.
-
Close Valves and Monitor Vent Temperature (Final): Once the high-pressure gauge reading is within the target range, close the low-pressure manifold valve (blue knob) completely and turn the can tap valve handle counter-clockwise to close it. Detach the refrigerant can. Let the AC run for a few minutes, then measure the air temperature at the vents again with your probe thermometer.
Alt text: Digital thermometer displaying a cold temperature reading from a car AC vent after refrigerant recharge, showing improved cooling performance.
If the vent temperature is now significantly lower than your initial reading, you have successfully recharged your car’s AC system!
Post-Recharge Checks and Important Considerations
- Verify Cooling Improvement: Confirm that the air from your AC vents is noticeably colder than before the recharge.
- Monitor AC Performance: Keep an eye on your AC’s cooling performance over the next few days and weeks. If the cooling degrades quickly again, it could indicate a leak in the system that needs professional attention.
- Check for Leaks: If you suspect a leak, you can use leak detection tools or have a professional AC service shop inspect your system.
- When to Seek Professional Help: If you are uncomfortable with any part of this DIY process, or if you suspect a more serious issue than low refrigerant, it’s always best to consult a qualified automotive AC technician. They have specialized equipment and expertise to diagnose and repair complex AC problems.
Conclusion
Recharging your car’s AC refrigerant can be a straightforward DIY task to restore cooling performance, especially in older vehicles experiencing gradual cooling loss. By carefully following these steps and prioritizing safety, you can potentially save money and learn more about your car’s AC system. However, remember that this guide is for basic refrigerant recharge. If you encounter persistent AC problems or suspect major issues, seeking professional help from a qualified AC technician is always recommended to ensure proper diagnosis and repair.
(Note: Original article included links to a training manual and BHPian comments. These could be added as references or further reading if desired, but as per instructions, I’m omitting external links in this rewritten article for now unless specifically asked.)