Maintaining your car’s pristine appearance is a point of pride for many owners. The clear coat, that glossy, transparent layer applied over your car’s colored paint, plays a vital role in this. It acts as a shield, protecting the base coat from scratches, UV rays, road debris, and environmental contaminants, thus preserving the vibrancy and shine of your vehicle’s paintwork.
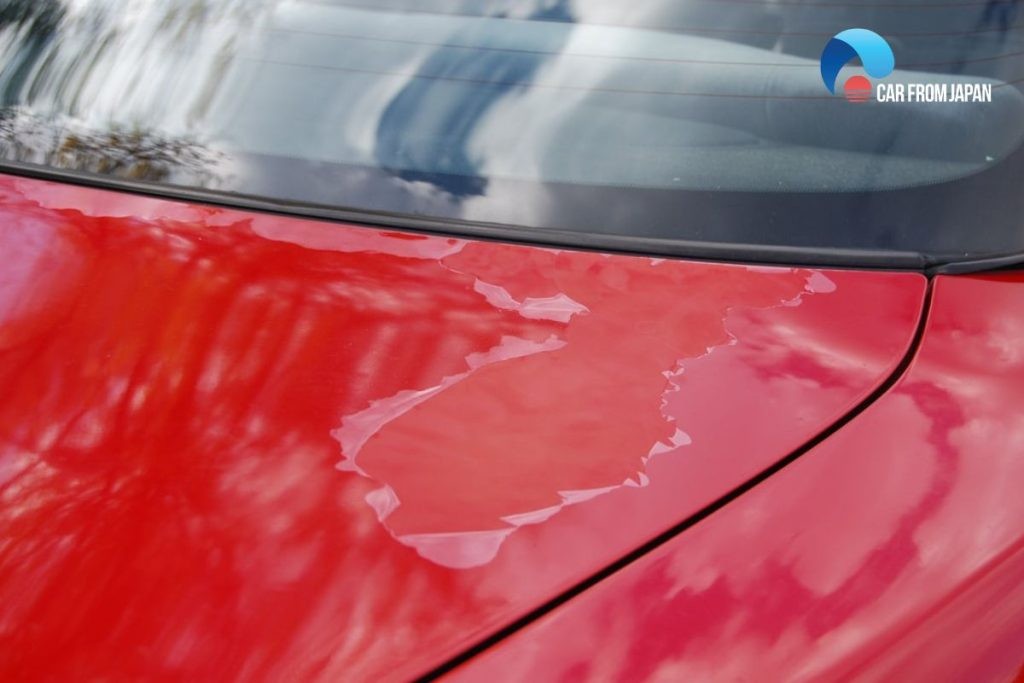
However, the clear coat isn’t invincible. Over time, exposure to the elements, improper washing techniques, and everyday wear and tear can lead to its degradation. Scratches, swirl marks, oxidation, and peeling can mar the once-flawless finish. When the clear coat begins to fail, removing and replacing it becomes necessary to restore your car’s showroom gleam and prevent further damage.
Attempting to remove clear coat can be daunting for DIY enthusiasts. A common pitfall is inadvertently damaging the underlying color coat in the process. But fear not! With the right approach and meticulous execution, you can successfully remove the clear coat yourself without compromising the integrity of your car’s paint. This comprehensive guide will walk you through each step, ensuring a professional-quality result in your own garage.
Addressing Minor Clear Coat Imperfections
Before diving into complete clear coat removal, it’s worth assessing the extent of the damage. If you’re dealing with minor scratches or superficial blemishes, a full removal might be overkill. In many cases, these less severe imperfections can be rectified with targeted repair techniques.
Begin by thoroughly cleaning the affected area with a degreaser to eliminate any wax or sealant that could interfere with the repair process. Next, carefully mask off the area surrounding the damage with painter’s tape, extending about an inch beyond the clear coat’s edge.
Using 800-grit sandpaper, gently begin to sand down the damaged clear coat. As you move away from the most heavily scratched areas, lighten your sanding pressure. The goal here is to feather the edges of the damaged clear coat, creating a smooth transition into the undamaged sections. This blending process is crucial to avoid a noticeable line where the old and new clear coats meet.
Once you’ve achieved a smooth, even surface, you can apply a spray-on clear coat to the sanded area. Multiple thin coats are better than one thick coat. Allow each coat to dry completely according to the manufacturer’s instructions before applying the next. Continue layering until the repaired area is level with the surrounding original clear coat and the finish is uniform and glossy.
Can You Apply New Clear Coat Over Existing Clear Coat?
A frequently asked question among car owners is whether it’s possible to simply apply a fresh layer of clear coat over the existing one. The answer hinges on the condition of the original clear coat.
If the existing clear coat is in generally good condition, free from peeling, significant scratches, or oxidation, then applying an additional layer can indeed enhance the gloss and depth of your car’s paint. This is a common practice to revitalize a slightly faded or dull clear coat.
However, if the clear coat exhibits signs of damage such as peeling, cracking, or deep scratches that cannot be addressed by a simple top coat, then these issues must be resolved first. Attempting to apply a new clear coat over damaged areas will only trap the imperfections underneath, and the problems will likely reappear or worsen over time. In such cases, localized repair or complete removal, as outlined in this guide, is necessary before applying any new clear coat.
Understanding the Nuances of Clear Coat Removal
Important Considerations Before You Start
Removing the clear coat from an entire vehicle is a substantial undertaking. It demands patience, a degree of skill, specialized tools, and a significant investment of time. It’s not a task to be rushed, and meticulousness is key to achieving a satisfactory outcome.
Furthermore, inexperienced DIYers can easily cause unintended damage during the removal process. Scratches to the base coat, damage to trim or adjacent panels, and inconsistent results are all potential pitfalls.
If you are unfamiliar with automotive paint care or lack confidence in your abilities, it is prudent to entrust this task to a professional auto body shop or a qualified detailer. The cost of repairing mistakes can quickly outweigh any initial savings from attempting a DIY clear coat removal. However, for those who are detail-oriented and enjoy hands-on car care, this guide provides the necessary steps to tackle the job effectively.
Why Paint Thinner is a No-Go
A common misconception is that paint thinner can be used to strip clear coat. While paint thinner will indeed remove clear coat, it’s far too aggressive for controlled removal and is highly likely to damage the underlying base coat paint. Paint thinner is designed to dissolve all layers of paint, making it unsuitable for selectively removing only the clear coat.
Using paint thinner will likely require multiple applications, increasing the risk of reaching and damaging the colored paint layer beneath. Paint thinner should only be considered if you intend to completely strip all paint layers down to bare metal, which is not the objective when aiming to refresh the clear coat.
Some online sources may suggest mineral spirits as a milder alternative, or even recommend simply sanding away blemishes. However, professional results and the preservation of your base coat necessitate a more controlled and systematic approach using specialized tools and techniques, as detailed in the step-by-step guide below.
Essential Tools and Materials for Clear Coat Removal
Before commencing the clear coat removal process, gather all the necessary tools and materials. Having everything readily available will streamline the job and ensure efficiency.
Cleaning Supplies:
- Car Wash Soap and Water: Essential for pre-cleaning the vehicle.
- Washing Hose and Spray Nozzle: For rinsing the vehicle thoroughly.
- Microfiber Wash Mitts or Sponges: Gentle on the paint surface.
- Detailing Clay Bar (Optional): For removing embedded contaminants before sanding.
- Degreaser: To remove wax and grease before starting work on the clear coat.
- Painter’s Tape: For masking off delicate areas.
- Clean Microfiber Drying Towels: For drying the vehicle without scratching.
Sanding and Buffing Tools:
- Assortment of Wet/Dry Sandpaper: 400 grit, 800 grit, 1000 grit, 1200 grit, 2000 grit, 3000 grit. (Higher grits for refining and blending).
- Spray Bottle with Water: For wet sanding.
- Sanding Block (Optional): For ensuring even sanding on flat surfaces.
- Electric Polisher (Rotary or Dual-Action): Significantly reduces effort and improves consistency in buffing.
- 100% Wool Buffing Pads: Aggressive cutting pads for compound application.
- Foam Polishing Pads (Various Grades): For polishing and finishing.
Compounds and Polishes:
- Specialized Buffing Compound for Clear Coat Removal: Formulated to safely remove clear coat without excessive aggression.
- Paint Polish: For refining the surface after compounding and enhancing gloss.
- Spray Detailer: For final cleaning and gloss enhancement after polishing.
- Car Wax or Sealant: To protect the newly exposed paint after clear coat removal and polishing.
Safety and Miscellaneous:
- Safety Glasses: To protect eyes from sanding dust and polishing splatter.
- Respirator or Dust Mask: To avoid inhaling sanding dust and compound particles.
- Gloves: To protect hands from chemicals and friction during sanding and buffing.
- Work Light: To illuminate the work area and reveal imperfections.
Step-by-Step Guide: Removing Clear Coat From Your Car
Step 1: Thoroughly Wash the Vehicle
Starting with a clean surface is paramount for any paint correction or clear coat removal process. Washing removes loose dirt, grime, and contaminants that could scratch the paint during sanding.
Begin by rinsing the entire vehicle with a hose to remove loose debris. Then, using car wash soap and a microfiber wash mitt, wash the car panel by panel, working from top to bottom. Rinse thoroughly with clean water and dry with microfiber drying towels. For optimal results, consider using a detailing clay bar after washing to remove any embedded contaminants that washing alone might miss. This ensures a perfectly clean surface for sanding.
Step 2: Wet Sanding the Clear Coat (Initial Cut)
Wet sanding is the primary method for removing clear coat. The water acts as a lubricant, reducing friction and heat buildup, which minimizes the risk of damaging the base coat. Soak your 400-grit sandpaper in water for several minutes before starting.
Working in manageable sections, lightly sand the clear coat using consistent, even strokes. Avoid applying excessive pressure. The goal at this stage is to uniformly abrade the clear coat, weakening it for removal. Focus on sanding approximately one inch beyond any visible damage or peeling areas. Keep the surface wet throughout the sanding process by using a spray bottle to periodically re-wet the area. The water will turn milky as you sand away the clear coat.
Step 3: Progressing to Finer Grit Sandpaper (Refinement)
After sanding the entire area with 400-grit sandpaper, move to the next finer grit – 800 grit. Repeat the wet sanding process, extending your sanding area slightly beyond the area sanded with 400 grit, perhaps by half an inch.
Continue this progression through 1000-grit and then 1200-grit sandpaper. With each step, the scratches from the previous, coarser grit will be refined and minimized. Wet sanding with progressively finer grits is crucial for achieving a smooth, even surface ready for polishing. Regularly feel the surface with your hand as you sand. You should aim for a surface that feels increasingly smooth to the touch, with a uniform, crosshatch pattern visible. If the surface still feels rough, continue sanding with the current grit until smoothness is achieved.
Step 4: Protect Delicate Vehicle Parts
Once you are satisfied with the wet sanding stages, it’s time to protect any delicate parts of your vehicle that you don’t want to be affected by the subsequent dry sanding and buffing stages. Use painter’s tape to carefully mask off headlights, taillights, trim, emblems, door handles, mirrors, windshield wipers, and any other sensitive areas. Proper masking ensures that these parts remain undamaged and free from compound or polish residue.
Step 5: Dry Sanding for Enhanced Smoothness
Allow the vehicle to dry completely before proceeding to dry sanding. Dry sanding further refines the surface, preparing it for buffing. Use a finer grit sandpaper for this stage, such as 600 or 800 grit.
The objective of dry sanding is to achieve an even smoother finish and eliminate any remaining imperfections from the wet sanding process. Pay attention to your sanding pattern. When addressing scratches, sanding at a 45-degree angle to the scratch can be effective. For general sanding, follow the natural lines of the vehicle’s body panels for optimal results. Use light to medium pressure and avoid concentrating on one spot for too long to prevent uneven sanding.
Step 6: Rinse and Dry After Sanding
After dry sanding, thoroughly rinse the vehicle again with a hose to remove all sanding residue and particles. Observe the wastewater. If it appears milky, this indicates that you have effectively removed the clear coat and are now sanding the base coat. At this stage, stop sanding to avoid damaging the color coat.
Once rinsed, dry the vehicle completely with clean microfiber towels. Ensure no water remains in crevices or trim areas before moving to the next step.
Step 7: Final Sanding with Ultra-Fine Grit (Touch-Up)
For the ultimate smooth finish before buffing, perform a final light sanding with ultra-fine grit sandpaper, such as 2000 or 3000 grit. This step is a touch-up to remove any remaining minor imperfections or coarseness. Use very light pressure and ensure you are sanding evenly across the entire area. This step is critical for achieving a swirl-free, mirror-like finish after polishing.
Step 8: Buffing the Sanded Surface (Polishing Stage)
Now, the sanded surface is ready for buffing to restore its gloss. Apply a paint polish to a foam polishing pad and attach it to your electric polisher. Set the polisher to a low to medium speed, around 1200-1400 RPM initially.
Work in overlapping passes, using a consistent, circular motion to evenly polish the entire sanded area. The polishing process will remove the fine sanding scratches and begin to restore the shine. If you don’t have an electric polisher, you can buff by hand using a clean 100% wool pad, but this will require significantly more effort and time.
During the polishing stage, you will notice the surface becoming increasingly glossy and the sanding marks disappearing. However, polishing alone might leave behind微細 swirls.
Step 9: Buffing with Compound (Cutting Stage)
For the second buffing stage, switch to a 100% wool buffing pad and apply a specialized buffing compound formulated for clear coat removal. Increase the polisher speed slightly. Buff the entire area again, using overlapping passes and consistent pressure.
The buffing compound is more abrasive than polish and will effectively remove any remaining swirl marks and oxidation, bringing out a deep shine. Be cautious when using buffing compound, as it can generate heat and potentially burn the paint if used aggressively or in one spot for too long. If you are unsure about using buffing compound, test it in an inconspicuous area first to ensure compatibility and technique.
Step 10: Final Polish and Finish
After compounding, switch back to a clean foam polishing pad and apply a finishing polish. This final polishing step refines the surface to its maximum gloss and removes any micro-marring left by the buffing compound. You can increase the polisher speed slightly for this stage to enhance the shine further.
Once polishing is complete, clean the area with a spray detailer to remove any remaining polish residue and reveal the final finish. For long-lasting protection and an even deeper gloss, apply a high-quality car wax or sealant to the freshly polished paint. Waxing is a crucial final step to protect the newly exposed base coat and maintain its shine.
Pro Tips for Successful Clear Coat Removal
- Work in a Shaded Area: Perform clear coat removal in a garage or shaded area, especially in warm weather. Direct sunlight can cause clear coat removers and compounds to dry too quickly, making them less effective and harder to work with.
- Avoid High Humidity: High humidity can hinder the drying process of your car after washing and rinsing steps. It’s best to work on a dry day with moderate humidity for optimal results.
- Apply Clear Coat Remover Carefully: If using a chemical clear coat remover (though sanding is generally safer for DIYers), apply it sparingly and precisely to the areas where you want to remove the clear coat. Avoid overspray or drips onto surrounding surfaces.
- Test Buffing Compound: If you are unsure about the aggressiveness of your buffing compound, test it on a spare part or an inconspicuous area of the vehicle before applying it to the main panels. This will help you gauge its cutting power and ensure it’s safe for your paint.
- Keep the Polisher Moving: When buffing with both polish and compound, never hold the polisher in one spot for too long. Keep it moving continuously to distribute heat and avoid burning or damaging the paint. Overlapping passes are key to even buffing.
- Consider Removing Parts: For localized clear coat removal on smaller parts like bumpers or trim pieces, consider removing the part from the vehicle. This allows for easier access and prevents accidental damage to surrounding panels.
FAQs About Clear Coat Removal
Can vinegar safely remove clear coat?
No, vinegar is not effective for removing clear coat. While vinegar is a mild acid and can help with removing light oxidation or water spots, it is far too weak to break down and remove a durable automotive clear coat. Attempting to use vinegar will likely be ineffective and waste your time.
Is it possible to remove only a section of clear coat?
Yes, it is possible to perform spot clear coat removal, but it requires precision and careful blending. Using fine abrasive polishes or wet sanding with very high grit sandpaper (2000-3000 grit) in a controlled manner can help you remove clear coat from a localized area and blend it seamlessly with the surrounding original clear coat. This technique is often used for repairing isolated clear coat damage.
What is the safest DIY method for removing clear coat?
The safest DIY method for removing clear coat is wet sanding, as described in this guide. Wet sanding, when done correctly with progressively finer grits of sandpaper and plenty of water lubrication, offers a controlled and relatively safe way to remove clear coat without aggressively attacking the base coat. Always start with coarser grits and gradually refine with finer grits, and avoid excessive pressure.
Can toothpaste be used to remove clear coat?
No, toothpaste is not capable of removing clear coat. Toothpaste is a very mild abrasive and may have a slight polishing effect on very minor surface scratches. However, it lacks the cutting power to remove a durable automotive clear coat. Toothpaste is ineffective for clear coat removal and should not be used for this purpose.
For a visual guide to the clear coat removal process, consider watching video tutorials from reputable automotive detailing channels online. Understanding the techniques visually can supplement this written guide and enhance your success.