Renewing leather car seats is a worthwhile endeavor that can enhance your driving experience. At CARS.EDU.VN, we know how important it is to keep your car’s interior looking and feeling its best. This guide gives a thorough rundown on how to revitalize leather car seats, making sure they stay comfortable and stylish for years to come. Discover how to maintain your car’s value through proper leather care and upholstery protection.
1. Understanding Leather Car Seat Wear and Tear
Leather car seats are subjected to constant use, making them vulnerable to a wide range of wear and tear. Understanding the common causes of this deterioration is the first step in effectively restoring and maintaining your leather.
1.1 Common Causes of Leather Damage
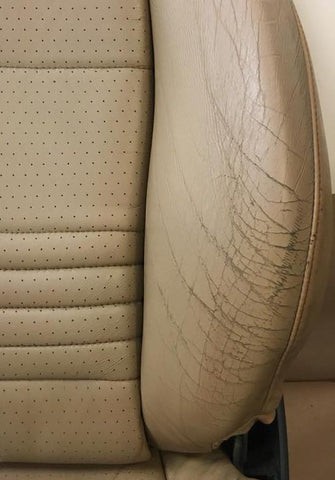
- Friction: Getting in and out of your car causes friction, which gradually wears away the leather’s surface, particularly on the side bolsters of the driver’s seat.
- UV Exposure: Sunlight can fade and dry out leather, causing it to crack and lose its flexibility.
- Spills and Stains: Drinks, food, and other substances can stain and damage leather if not cleaned immediately.
- Lack of Maintenance: Neglecting regular cleaning and conditioning can lead to the leather drying out and cracking over time.
- Temperature Fluctuations: Extreme temperatures can cause the leather to expand and contract, leading to cracking and weakening.
1.2 Types of Leather Used in Car Seats
Most car leather is coated leather, also known as pigmented leather. This type of leather has a protective coating that makes it more resistant to stains and wear, but it still requires proper care. Here’s a list of common types:
| Leather Type | Description | Pros | Cons |
|---|---|---|---|
| Pigmented Leather | Coated with a layer of pigment and a protective topcoat. | Durable, easy to clean, and resistant to stains and fading. | Less natural feel, can look artificial if the coating is too thick. |
| Aniline Leather | Dyed with transparent dyes that do not conceal the natural surface. | Soft, natural look and feel, retains the leather’s unique characteristics. | More susceptible to stains, scratches, and fading, requires more maintenance. |
| Semi-Aniline Leather | Aniline leather with a light surface coating for added protection. | Balances natural appearance with increased durability and stain resistance. | More expensive than pigmented leather, still requires careful maintenance. |
| Nappa Leather | A full-grain, unsplit leather from sheep or lamb, known for its softness. | Exceptionally soft and supple, luxurious feel. | Very delicate, prone to scratches and stains, requires specialized cleaning and conditioning. |
| Bonded Leather | Made from shredded leather fibers bonded together with adhesives and coated with a polyurethane layer. | Affordable, uniform appearance. | Not as durable or breathable as genuine leather, can crack and peel over time. |
| Synthetic Leather | Artificial material made to mimic the look and feel of genuine leather (e.g., vinyl, polyurethane). | Cost-effective, water-resistant, easy to clean, available in various textures and colors. | Not as breathable or durable as genuine leather, lacks the natural feel and aging characteristics. |
| Alcantara Leather | A synthetic suede-like material made from polyester and polyurethane. | Soft, durable, and resistant to stains and fading, provides excellent grip. | Can be more expensive than some genuine leathers, requires specialized cleaning products. |
| Perforated Leather | Leather with small holes to enhance breathability and comfort. | Increased airflow, helps keep occupants cool. | Requires more careful cleaning to prevent dirt and debris from accumulating in the perforations. |
| Vegetable-Tanned | Leather that’s processed using natural tannins found in bark and other plant tissues. | Environmentally friendly, develops a unique patina, distinct earthy tone. | Sensitive to staining and water damage, requires protective finish to prevent stains. |
| Chrome-Tanned | Leather that’s tanned using chromium sulfate and other chemical agents. | Supple and resistant to water and heat, vibrant color. | Can contain residual chromium, less eco-friendly. |
1.3 Identifying Damage Severity
Assessing the extent of the damage will help you determine the appropriate restoration method. Minor wear may only require cleaning and conditioning, while more severe damage might need professional repair. Here are some key signs and steps to evaluate:
| Severity Level | Signs | Recommended Action |
|---|---|---|
| Minor | Slight discoloration, minor scuffs, and surface dirt. | Regular cleaning and conditioning to maintain leather’s health. |
| Moderate | Visible scratches, fading, and minor cracking. | Color restoration and crack filling to prevent further damage. |
| Severe | Deep cracks, rips, and significant color loss. | Professional repair or re-upholstery, as DIY methods may not suffice for extensive damage. |
| Stains | Surface stains from spills like coffee, ink, or dyes. | Use specialized leather stain removers and conditioners to lift stains and restore leather’s appearance. |
| Fading | Color loss due to prolonged exposure to sunlight. | Apply leather dyes or color restorers to rejuvenate faded areas, followed by a UV protective conditioner. |
| Cracking | Small to large cracks in the leather surface, often caused by dryness. | Fill cracks with leather filler, sand smooth, and apply color restorer to blend with the surrounding area. |
| Rips | Tears in the leather, ranging from small punctures to large tears. | Repair rips with leather patches or professional stitching, followed by color matching and conditioning. |
| Scuffs | Surface abrasions or grazes, usually from friction. | Clean scuffs, apply leather balm or conditioner, and gently buff to minimize appearance. |
| Drying | Leather feels stiff and brittle due to loss of natural oils. | Condition regularly with a high-quality leather conditioner to restore moisture and flexibility. |
| Mold/Mildew | Growth of mold or mildew due to moisture exposure, indicated by a musty odor and visible spots. | Clean with a specialized mold remover, disinfect, and thoroughly dry the leather to prevent recurrence. |
| Transfer | Color transfer from clothing or other materials onto the leather surface. | Use a gentle leather cleaner to lift transferred dyes, followed by a protective sealant to prevent future transfer. |
By understanding these factors, you can take proactive steps to protect and maintain your leather car seats, ensuring they remain in excellent condition for years to come. For more detailed advice and specific product recommendations, visit CARS.EDU.VN.
2. Essential Tools and Products for Leather Renewal
Having the right tools and products is essential for successfully renewing your leather car seats. High-quality supplies not only make the job easier but also ensure the best possible results.
2.1 Cleaning Supplies
- Leather Cleaner: Choose a pH-balanced cleaner specifically designed for automotive leather. Avoid harsh chemicals that can damage the leather. Brands like Lexol, Meguiar’s, and Chemical Guys are popular among car enthusiasts.
- Soft Brushes: Use a soft-bristled brush to gently scrub the leather and remove dirt from the pores. A horsehair brush is ideal.
- Microfiber Cloths: These are perfect for wiping down surfaces and applying cleaning and conditioning products.
2.2 Repair Materials
- Leather Filler: For repairing cracks and small tears, a flexible leather filler is essential. Look for products like Coconix Leather and Vinyl Repair Kit.
- Sanding Pads: Fine-grit sandpaper or sanding pads (2000-3000 grit) are used to smooth out rough areas after applying filler.
- Leather Glue: For re-gluing loose leather pieces, a specialized leather glue is necessary.
- Leather Patches: For larger repairs, leather patches can be glued or stitched onto the damaged area.
2.3 Conditioning and Protection
- Leather Conditioner: A good leather conditioner will keep the leather soft and supple, preventing it from drying out and cracking. Products like Leather Honey and Griot’s Garage Leather Care are highly recommended.
- Leather Protectant: A protectant helps to guard the leather against UV rays, spills, and friction.
- Dye and Friction Blocker: This product is designed to provide extra durability to repaired areas, ensuring long-lasting results.
2.4 Color Restoration
- Leather Dye or Color Restorer: If the leather has faded or the color has worn off, a leather dye or color restorer can bring back its original appearance. Products like the Geist. Easy Colour Restorer are designed for easy application and excellent color matching.
- Sponges: Use high-density sponges for applying color restorers.
- Heat Gun or Hair Dryer: For drying layers of color restorer, a heat gun or hair dryer can be helpful.
2.5 Optional Tools
- Detailing Brushes: Smaller brushes can be used to clean hard-to-reach areas and crevices.
- Vacuum Cleaner: To remove loose dirt and debris before cleaning.
- Steamer: A handheld steamer can help to lift stubborn stains and dirt from the leather.
2.6 Product Recommendations Table
| Product Type | Brand Recommendation | Description | Purpose |
|---|---|---|---|
| Leather Cleaner | Lexol Leather Cleaner | pH-balanced formula, safe for automotive leather. | To remove dirt, grime, and surface stains without drying out the leather. |
| Leather Conditioner | Leather Honey | Non-toxic, penetrates deeply to moisturize and protect leather. | To keep leather soft, supple, and prevent cracking. |
| Leather Filler | Coconix Leather and Vinyl Repair Kit | Flexible filler, suitable for repairing cracks and small tears. | To fill in cracks, scratches, and minor damages, restoring a smooth surface. |
| Leather Dye | Fiebing’s Leather Dye | High-quality dye for restoring or changing the color of leather. | To restore faded color or change the color of the leather. |
| Microfiber Cloths | Chemical Guys Professional Grade | Soft, lint-free cloths for cleaning and applying products. | To wipe surfaces, apply cleaners, conditioners, and dyes evenly. |
| Soft Brush | Horsehair Leather Cleaning Brush | Soft bristles for gentle yet effective cleaning. | To agitate cleaner and remove dirt from the pores of the leather without causing damage. |
| Leather Glue | Barge All-Purpose Cement Glue | Strong adhesive for bonding leather pieces together. | To re-glue loose leather pieces or attach leather patches. |
| Sanding Pads | 3M Sanding Sponges (Fine Grit) | Fine-grit pads for smoothing out rough areas after applying filler. | To smooth surfaces after applying leather filler, ensuring a seamless repair. |
| UV Protectant | 303 Aerospace Protectant | Protects against UV rays, preventing fading and cracking. | To shield leather from sun damage and prolong its life. |
| Dye & Friction Blocker | Geist. Dye & Friction Blocker | Provides extra durability to repaired areas. | Protects repaired areas, ensuring long-lasting results. |
| Detailing Brushes | Mothers Detailing Brush Set | Smaller brushes for cleaning hard-to-reach areas. | To clean crevices and detailed areas effectively. |
By assembling these essential tools and products, you’ll be well-prepared to tackle any leather renewal project, ensuring your car seats look and feel their best. Remember to always test products in an inconspicuous area first to ensure compatibility and desired results. For more in-depth guidance and product recommendations, visit CARS.EDU.VN.
3. Step-by-Step Guide to Cleaning Leather Car Seats
Cleaning leather car seats is a fundamental part of maintaining their condition and preventing long-term damage. Here’s a detailed guide on how to properly clean your leather car seats:
3.1 Preparation
- Vacuum the Seats: Use a vacuum cleaner with a soft brush attachment to remove loose dirt, crumbs, and debris from the surface of the seats. Pay special attention to seams and crevices.
- Gather Your Supplies: Assemble your leather cleaner, soft brushes, microfiber cloths, and a bucket of warm water.
3.2 Cleaning Process
- Apply Leather Cleaner: Spray the leather cleaner onto a microfiber cloth or directly onto the soft brush. Avoid spraying directly onto the leather seat, as this can cause the cleaner to pool in certain areas.
- Gentle Scrubbing: Gently scrub the leather in a circular motion, paying attention to areas with visible dirt or stains. Use the soft brush to work the cleaner into the pores of the leather.
- Wipe Away Residue: Use a clean, damp microfiber cloth to wipe away the cleaner and any dislodged dirt. Rinse the cloth frequently to avoid spreading the dirt around.
- Dry the Seats: Use a dry microfiber cloth to thoroughly dry the leather seats. Ensure no moisture remains, as this can lead to mold or mildew growth.
3.3 Addressing Specific Stains
- Ink Stains: Use a specialized ink remover for leather, following the product instructions carefully.
- Grease Stains: Apply a small amount of dish soap to a damp cloth and gently blot the stain. Wipe away with a clean, damp cloth.
- Food and Drink Stains: Clean these immediately with a leather cleaner to prevent them from setting.
3.4 Tips for Effective Cleaning
- Work in Sections: Clean one section of the seat at a time to ensure thorough cleaning and prevent the cleaner from drying on the surface.
- Avoid Over-Saturation: Do not over-saturate the leather with cleaner, as this can damage it. Use just enough cleaner to effectively clean the surface.
- Test in an Inconspicuous Area: Before applying any cleaner, test it in a small, hidden area to ensure it doesn’t discolor or damage the leather.
3.5 Detailed Cleaning Steps
| Step | Description | Tools/Products Needed |
|---|---|---|
| Vacuuming | Remove loose dirt and debris from the seats. | Vacuum cleaner with soft brush attachment |
| Applying Cleaner | Spray leather cleaner onto a microfiber cloth or soft brush. | Leather cleaner, microfiber cloth, soft brush |
| Scrubbing | Gently scrub the leather in a circular motion. | Soft brush |
| Wiping Residue | Wipe away the cleaner and dirt with a clean, damp microfiber cloth. | Clean, damp microfiber cloth |
| Drying | Thoroughly dry the leather seats with a dry microfiber cloth. | Dry microfiber cloth |
| Stain Removal | Use specialized stain removers for specific stains like ink or grease. | Ink remover, dish soap, clean cloth |
| Final Check | Ensure all areas are clean and dry. Repeat if necessary. |
3.6 Product Spotlight: Geist. Rapid Cleaner
Geist. Rapid Cleaner is an excellent option for cleaning leather car seats. It is a plant and algae-based cleaner that effectively lifts dirt and grime without damaging the leather. It is safe for use on non-absorbent leather and vinyl surfaces. For best results, use it with a Geist. Leather Cleaning Brush to remove dirt stuck in the pores and grain of the leather.
By following these steps, you can effectively clean your leather car seats, keeping them looking fresh and well-maintained. Regular cleaning not only improves the appearance of your car’s interior but also helps to prolong the life of the leather. For more expert tips and product recommendations, visit CARS.EDU.VN.
4. Repairing Cracks, Scuffs, and Tears in Leather Seats
Repairing damage to leather car seats can restore their appearance and prevent further deterioration. Here’s a detailed guide on how to repair cracks, scuffs, and tears:
4.1 Assessing the Damage
Before starting any repairs, assess the extent of the damage. Minor scuffs and scratches can often be addressed with simple cleaning and conditioning, while deeper cracks and tears may require more extensive repair.
4.2 Repairing Minor Scuffs and Scratches
- Clean the Area: Use a leather cleaner to thoroughly clean the affected area.
- Apply Leather Conditioner: Apply a small amount of leather conditioner to a microfiber cloth and gently rub it into the scuffed or scratched area.
- Buff the Area: Use a clean, dry microfiber cloth to buff the area in a circular motion. This will help to blend the scuff or scratch into the surrounding leather.
4.3 Repairing Cracks and Small Tears
- Clean the Area: Clean the damaged area with a leather cleaner and allow it to dry completely.
- Apply Leather Filler: Use a spatula or applicator to apply a thin layer of leather filler into the crack or tear. Smooth the filler so it is level with the surrounding leather.
- Allow to Dry: Allow the filler to dry completely, which may take several hours. Follow the manufacturer’s instructions for drying times.
- Sand the Area: Use fine-grit sandpaper (2000-3000 grit) to gently sand the filled area until it is smooth and flush with the surrounding leather.
- Apply Color Restorer: If necessary, apply a leather color restorer to match the color of the surrounding leather. Use a sponge or applicator to apply thin layers, allowing each layer to dry before applying the next.
- Apply Leather Conditioner: Once the color restorer is dry, apply a leather conditioner to protect and moisturize the repaired area.
4.4 Repairing Larger Tears
- Clean the Area: Clean the damaged area thoroughly with a leather cleaner.
- Prepare a Leather Patch: Cut a leather patch slightly larger than the tear. If possible, use a patch of similar leather to the original seat.
- Apply Leather Glue: Apply leather glue to the back of the patch and carefully position it over the tear.
- Secure the Patch: Press the patch firmly onto the leather seat and hold it in place with clamps or weights until the glue is completely dry.
- Stitch the Patch (Optional): For added security, you can stitch the patch onto the leather seat using a leather sewing needle and thread.
- Apply Leather Filler: Apply leather filler to the edges of the patch to blend it into the surrounding leather.
- Sand and Color Restore: Sand the filled areas and apply a color restorer as needed to match the surrounding leather.
- Condition the Area: Apply a leather conditioner to protect and moisturize the repaired area.
4.5 Geist. Easy Filler for Leather & Vinyl
For repairing deeper scratches, dry cracks, and rips, Geist. Easy Filler is an excellent choice. This filler can also be color-matched to your interior. Apply the filler using a spatula and spread it evenly on the damaged area or cracks. Allow the filler to dry for about 20-30 minutes, then remove any excess using Geist. Dissolve and gently sand the surface down.
4.6 Detailed Repair Steps
| Step | Description | Tools/Products Needed |
|---|---|---|
| Cleaning | Clean the damaged area with leather cleaner and degreaser to remove dirt and oils. | Leather cleaner, degreaser, microfiber cloth |
| Applying Filler | Apply a thin layer of leather filler to cracks or tears, smoothing it to match the surrounding surface. | Leather filler, spatula or applicator |
| Drying | Allow the filler to dry completely, following manufacturer’s instructions. | |
| Sanding | Gently sand the filled area with fine-grit sandpaper for a smooth finish. | Fine-grit sandpaper (2000-3000 grit) |
| Color Restoration | Apply leather color restorer in thin layers to match the original color, allowing each layer to dry. | Leather color restorer, sponge or applicator, heat gun or hair dryer (optional) |
| Conditioning | Apply leather conditioner to protect and moisturize the repaired area. | Leather conditioner, microfiber cloth |
| Patching (for tears) | Cut and glue a leather patch over the tear, stitching for added security. | Leather patch, leather glue, clamps or weights, leather sewing needle and thread |
By following these steps, you can effectively repair cracks, scuffs, and tears in your leather car seats, restoring their appearance and preventing further damage. Regular maintenance and prompt repairs will help to keep your car’s interior looking its best. For more detailed guidance and product recommendations, visit CARS.EDU.VN.
5. Conditioning and Protecting Leather Car Seats
Conditioning and protecting leather car seats are crucial steps in maintaining their longevity and appearance. Regular conditioning keeps the leather soft and supple, preventing it from drying out and cracking, while protection helps to guard against UV rays, spills, and friction.
5.1 Why Conditioning is Important
Leather is a natural material that requires moisture to stay flexible. Over time, the natural oils in leather can evaporate, causing it to become dry and brittle. Conditioning replenishes these oils, keeping the leather soft and preventing it from cracking.
5.2 Choosing the Right Conditioner
- Water-Based Conditioners: These are generally safe for all types of leather and won’t leave a greasy residue.
- Oil-Based Conditioners: These can provide deeper conditioning but may darken the leather and leave a greasy feel.
- Cream Conditioners: These offer a good balance of moisturizing and protection without being too heavy.
5.3 How to Condition Leather Seats
- Clean the Seats: Before conditioning, clean the leather seats to remove any dirt or grime.
- Apply Conditioner: Apply a small amount of conditioner to a microfiber cloth.
- Massage into Leather: Gently massage the conditioner into the leather in a circular motion.
- Allow to Absorb: Allow the conditioner to absorb into the leather for about 10-20 minutes.
- Wipe Away Excess: Use a clean, dry microfiber cloth to wipe away any excess conditioner.
5.4 Protecting Leather from UV Rays
UV rays can cause leather to fade and dry out over time. To protect your leather seats from UV damage:
- Use a Leather Protectant: Apply a leather protectant that contains UV inhibitors.
- Park in the Shade: When possible, park your car in the shade to minimize exposure to direct sunlight.
- Use Window Tint: Consider installing window tint to block out harmful UV rays.
5.5 Preventing Spills and Stains
- Act Quickly: Clean up spills immediately to prevent staining.
- Use a Leather Cleaner: Use a leather cleaner specifically designed for automotive leather to clean spills.
- Avoid Harsh Chemicals: Do not use harsh chemicals or abrasive cleaners, as these can damage the leather.
5.6 Geist. Dye & Friction Blocker
A day after carrying out any repairs or color restoration, it is highly recommended to apply Geist. Dye & Friction Blocker. This product is sprayed onto a soft cloth or microfiber and gently applied to the leather without buffing. Working on one panel at a time will provide the repair with extra durability and ensure a long-lasting result.
5.7 Detailed Conditioning and Protection Steps
| Step | Description | Tools/Products Needed |
|---|---|---|
| Cleaning | Clean the leather seats with a pH-balanced leather cleaner to remove dirt and grime. | Leather cleaner, microfiber cloth |
| Applying Conditioner | Apply a small amount of leather conditioner to a microfiber cloth. | Leather conditioner, microfiber cloth |
| Massaging | Gently massage the conditioner into the leather in a circular motion. | |
| Absorption | Allow the conditioner to absorb into the leather for 10-20 minutes. | |
| Wiping Excess | Wipe away any excess conditioner with a clean, dry microfiber cloth. | Clean, dry microfiber cloth |
| UV Protection | Apply a leather protectant with UV inhibitors. | Leather protectant with UV inhibitors, microfiber cloth |
| Friction Blocking | Apply Geist. Dye & Friction Blocker after repairs to ensure durability. | Geist. Dye & Friction Blocker, soft cloth or microfiber |
By following these steps, you can effectively condition and protect your leather car seats, ensuring they remain in excellent condition for years to come. Regular maintenance will not only improve the appearance of your car’s interior but also help to prolong the life of the leather. For more expert tips and product recommendations, visit CARS.EDU.VN.
6. Color Restoration Techniques for Faded Leather
Over time, leather car seats can fade due to exposure to sunlight, wear, and improper care. Restoring the color can significantly improve the appearance of your car’s interior. Here are effective color restoration techniques:
6.1 Identifying the Original Color
Before starting the color restoration process, it’s essential to identify the original color of the leather. You can find the color code on the car’s VIN plate or consult with a leather specialist.
6.2 Preparing the Leather
- Clean the Seats: Thoroughly clean the leather seats with a leather cleaner to remove any dirt, grime, and previous conditioning products.
- Degrease the Leather: Use a leather degreaser to remove any oils or silicones that may prevent the new color from adhering properly.
6.3 Applying Leather Dye or Color Restorer
- Choose the Right Product: Select a high-quality leather dye or color restorer that matches the original color of your seats. Products like Geist. Easy Colour Restorer are specifically designed for this purpose.
- Test the Color: Before applying the dye to the entire seat, test it in a small, inconspicuous area to ensure it matches the original color.
- Apply Thin Layers: Use a sponge or applicator to apply thin, even layers of dye to the leather. Allow each layer to dry completely before applying the next.
- Use a Heat Gun (Optional): A heat gun or hair dryer can be used to speed up the drying process. Be careful not to overheat the leather.
- Build Coverage: Continue applying layers of dye until you achieve the desired color coverage.
6.4 Sealing and Protecting the Color
- Apply a Leather Sealer: After the dye has dried completely, apply a leather sealer to protect the new color and prevent it from fading.
- Condition the Leather: Finally, apply a leather conditioner to keep the leather soft and supple.
6.5 Custom Color Matching
If you can’t find a pre-mixed dye that matches your car’s interior, you may need to have a custom color mixed. Many leather supply companies offer custom color matching services. You will typically need to provide a sample of the original leather for them to match.
6.6 Geist. Easy Colour Restorer
Geist. Easy Colour Restorer is a one-step coloring product that includes binders and a clear coat. First, test the color match in a hidden area. If satisfied, wipe the product onto the surface using the provided sponge and dab over it. For best results, apply multiple thin layers and dry each layer using a heat gun or hair dryer.
6.7 Detailed Color Restoration Steps
| Step | Description | Tools/Products Needed |
|---|---|---|
| Cleaning | Clean the leather seats with a pH-balanced leather cleaner. | Leather cleaner, microfiber cloth |
| Degreasing | Degrease the leather with a leather degreaser to ensure proper dye adhesion. | Leather degreaser, microfiber cloth |
| Color Testing | Test the dye or color restorer in an inconspicuous area. | Leather dye or color restorer, sponge or applicator |
| Applying Dye | Apply thin, even layers of dye to the leather, allowing each layer to dry completely. | Leather dye or color restorer, sponge or applicator, heat gun or hair dryer (optional) |
| Sealing | Apply a leather sealer to protect the new color. | Leather sealer, microfiber cloth |
| Conditioning | Apply a leather conditioner to keep the leather soft and supple. | Leather conditioner, microfiber cloth |
| Custom Matching | If necessary, obtain a custom-mixed color to match your car’s interior. | Sample of original leather, custom color mixing service |
By following these techniques, you can effectively restore the color of your faded leather car seats, bringing new life to your car’s interior. Regular maintenance and prompt attention to fading will help to keep your seats looking their best. For more expert tips and product recommendations, visit CARS.EDU.VN.
7. Preventing Future Damage to Leather Car Seats
Preventing damage to leather car seats is essential for maintaining their appearance and prolonging their lifespan. Here are several strategies to help you protect your leather:
7.1 Regular Cleaning and Conditioning
- Clean Regularly: Clean your leather seats every 1-3 months to remove dirt, grime, and spills.
- Condition Regularly: Condition your leather seats every 3-6 months to keep them soft and supple.
7.2 Protect from Sunlight
- Park in the Shade: Whenever possible, park your car in the shade to minimize exposure to direct sunlight.
- Use Window Tint: Install window tint to block out harmful UV rays.
- Use a Sunshade: Use a sunshade to protect your dashboard and seats when parking in direct sunlight.
7.3 Avoid Sharp Objects
- Be Careful with Keys and Belts: Be mindful of sharp objects that can scratch or tear the leather.
- Avoid Wearing Rough Clothing: Rough clothing can cause friction and wear down the leather over time.
7.4 Protect from Spills
- Act Quickly: Clean up spills immediately to prevent staining.
- Use a Leather Cleaner: Use a leather cleaner specifically designed for automotive leather to clean spills.
- Avoid Eating and Drinking in the Car: If possible, avoid eating and drinking in the car to minimize the risk of spills.
7.5 Use Seat Covers
- Consider Seat Covers: If you frequently transport passengers or carry items that could damage the leather, consider using seat covers.
- Choose Breathable Materials: Choose seat covers made from breathable materials to prevent moisture buildup.
7.6 Professional Detailing
- Regular Detailing: Consider having your car professionally detailed every year or two to keep the leather in top condition.
- Leather Specialists: Look for detailers who specialize in leather care.
7.7 Routine Inspections
- Check Regularly: Regularly inspect your leather seats for signs of wear, cracks, or damage.
- Address Issues Promptly: Address any issues promptly to prevent them from becoming worse.
7.8 Detailed Prevention Steps
| Step | Description | Frequency |
|---|---|---|
| Cleaning | Clean the leather seats with a pH-balanced leather cleaner to remove dirt and grime. | Every 1-3 months |
| Conditioning | Condition the leather seats with a leather conditioner to keep them soft and supple. | Every 3-6 months |
| Sun Protection | Park in the shade, use window tint, and use a sunshade to protect from UV rays. | Daily |
| Sharp Object Avoidance | Be careful with keys and belts, and avoid wearing rough clothing. | Daily |
| Spill Protection | Clean up spills immediately with a leather cleaner, and avoid eating and drinking in the car. | As needed |
| Seat Covers | Consider using seat covers to protect the leather from wear and damage. | As needed |
| Professional Detailing | Have your car professionally detailed every year or two. | Every 1-2 years |
| Routine Inspections | Regularly inspect your leather seats for signs of wear, cracks, or damage. | Monthly |
By implementing these preventive measures, you can significantly reduce the risk of damage to your leather car seats and keep them looking their best for years to come. For more expert tips and product recommendations, visit cars.edu.vn.
8. Professional Leather Restoration Services
While many minor leather repairs can be handled with DIY methods, severe damage often requires the expertise of professional leather restoration services. Knowing when to seek professional help can save you time and ensure the best possible results.
8.1 When to Seek Professional Help
- Extensive Damage: