Sourdough, with its distinctive tangy flavor and satisfyingly chewy texture, has captivated bakers for centuries. At the heart of every sourdough creation lies the starter – a living culture that requires care and attention. Many perceive sourdough starter maintenance as a daunting task, but in reality, it’s a simple and rewarding process that integrates seamlessly into your baking routine.
Whether you’re a novice baker just embarking on your sourdough journey or an experienced enthusiast looking to refine your starter care techniques, this guide is for you. We’ll demystify the process of feeding and maintaining a sourdough starter, ensuring yours thrives and becomes the foundation for countless delicious loaves, pancakes, pizzas, and more.
Feeding Your Sourdough Starter: The Basics
Feeding a sourdough starter is essentially providing it with fresh food – flour and water – to nourish the yeast and bacteria that make it alive and active. This process is crucial for maintaining a healthy and vigorous starter capable of leavening your baked goods.
The fundamental principle of feeding is straightforward: replenish what the starter has consumed. While some bakers adhere to strict measurements, a more intuitive approach, especially for home bakers, is to eyeball the proportions.
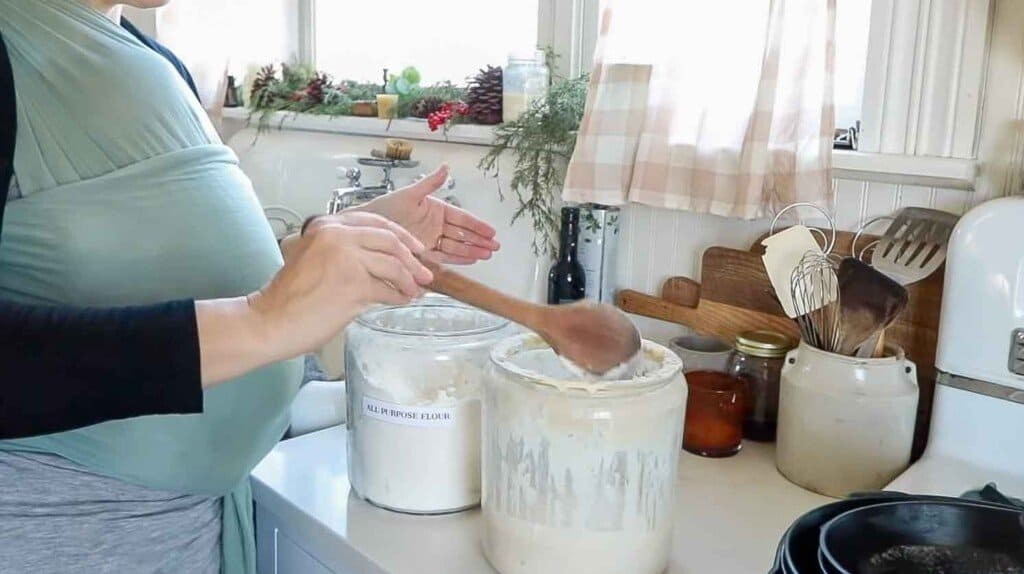
Here’s a simple method to feed your sourdough starter:
- Assess your starter: Begin by visually estimating the amount of starter you have in your jar.
- Add equal parts flour and water: A good rule of thumb is to feed your starter with at least an equal volume of flour and water to the amount of starter you have. For instance, if you have one cup of starter, add approximately ½ cup of water and ½ cup of flour. If you want to increase your starter volume, you can add slightly more flour and water.
- Mix thoroughly: Stir the flour and water into the starter until well combined. The consistency should resemble thick pancake batter – pourable but not too runny.
- Cover loosely: Cover the jar with a breathable lid, such as a tea towel, cheesecloth, or a loosely fitted lid. A glass lid, slightly ajar, also works well and allows you to monitor activity. Avoid airtight seals for this stage.
- Observe and wait: Let the starter sit at room temperature for 4 to 12 hours. During this time, it should double in volume and become bubbly, indicating it’s active and ready for baking. The exact time will depend on room temperature; warmer environments speed up the process.
Maintaining Your Sourdough Starter: Counter vs. Fridge
The frequency of feeding depends on where you store your starter: at room temperature on the counter or in the refrigerator.
Countertop Maintenance:
- Frequent feeding: If you keep your starter at room temperature, it will need to be fed more frequently, typically every 12 to 24 hours. This is because the warmer environment encourages faster yeast and bacteria activity, leading to quicker consumption of food.
- Feeding schedule adjustments: In warmer homes or if you bake frequently, you’ll need to feed your starter closer to every 12 hours. In colder environments or during less active baking periods, feeding every 24 hours might suffice.
- Ideal for regular bakers: Countertop maintenance is suitable for those who bake with sourdough several times a week and prefer a consistently active starter.
Refrigerator Maintenance:
- Less frequent feeding: Storing your sourdough starter in the refrigerator significantly slows down yeast and bacteria activity. In the fridge, you only need to feed your starter about once a week.
- Dormant state: Think of refrigeration as putting your starter in a dormant state, similar to hibernation. The cold temperature reduces their metabolic rate, requiring less frequent nourishment.
- Long-term storage: A sourdough starter can be stored in the refrigerator for up to two months without feeding, although weekly feeding is recommended for optimal health.
- Reviving from refrigeration: If your starter has been in the fridge for an extended period, reviving it is simple. Feed it equal parts flour and water, let it sit at room temperature for 12 hours, and then feed it again. It might require 2-3 feedings with 12-hour intervals to regain full activity, especially for recipes like sourdough bread. No-wait recipes might work sooner.
- Dealing with hooch: Before feeding a refrigerated starter, you might notice a layer of dark liquid on top, called “hooch.” This is a byproduct of fermentation and indicates your starter is hungry. You can either pour it off or stir it back in before feeding – both are perfectly acceptable.
Switching Between Counter and Fridge:
You can easily transition your starter between countertop and refrigerator storage depending on your baking schedule. If you bake daily or every other day, keep it on the counter. If your baking is more sporadic, the fridge is your best friend.
How Much to Feed: Flour and Water Ratios
Sourdough starters are remarkably resilient and forgiving. Precise measurements of flour and water aren’t always necessary, especially once your starter is well-established. The key is to achieve the right consistency.
- Pancake batter consistency: Aim for a consistency similar to thick pancake batter after feeding. This is a good visual cue and works well with various flour types.
- Flour type variations: The type of flour you use can influence the water absorption. All-purpose flour generally requires less water, while whole wheat and other whole grain flours tend to absorb more liquid.
- Adjusting as needed: If your starter appears too thick, add a little more water. If it seems too runny, add a bit more flour. Don’t be afraid to experiment and adjust until you achieve the desired pancake batter consistency.
- Experience over precision: After some time, you’ll develop an intuitive feel for the right consistency and amounts, making feeding a quick and effortless task.
Common Sourdough Starter Questions Answered
Let’s address some frequently asked questions to further clarify sourdough starter care:
Q: Once established, how often should I feed my countertop starter?
A: Feed your countertop starter every 12-24 hours, depending on room temperature and baking frequency. Warmer temperatures and frequent use necessitate more frequent feedings (around 12 hours).
Q: How long before baking should I take my starter out of the fridge?
A: Typically, taking it out 4 hours before baking is sufficient. However, this can vary based on the recipe. Sourdough recipes often provide specific instructions regarding starter preparation. For no-wait discard recipes, you can often use starter directly from the fridge.
Q: Can I bake sourdough bread straight from the fridge?
A: For many no-wait discard recipes, using starter straight from the fridge is perfectly fine. However, for recipes like sourdough bread where rise and texture are crucial, it’s best to take it out, feed it, and allow it to become active (bubbly and doubled in volume) before using. This usually takes 4-12 hours.
Q: My starter is very thick. Is that normal?
A: No, a healthy starter should not be excessively thick. If your starter is pasty, gradually add small amounts of water until it reaches the consistency of thick pancake batter. The 1:1 flour-to-water ratio is a starting guideline, but adjustments might be needed based on flour type and environmental factors.
Q: Why discard starter during initial stages? Can I avoid discarding?
A: During the initial days (Days 2-7) of creating a starter, discarding is essential. You’re cultivating wild yeasts and bacteria, and discarding helps maintain a balanced environment and prevents excessive acidity buildup. While you might consider using the discard, it’s essentially immature starter and not ideal for baking at this stage, especially if you are aiming for the health benefits of fully fermented sourdough. Discarded starter can be composted or given to animals.
Q: How should I store my sourdough starter?
A: When feeding and allowing it to activate, cover it loosely with a tea towel or cloth. For refrigerator storage, use an airtight container to prevent drying out and contamination. Glass bowls or jars with silicone or airtight lids work well. Periodically clean the storage container to remove any dried starter buildup.
Q: How much starter should I keep on hand?
A: Maintain a reasonable amount of starter, ideally at least a cup, so you always have enough for both baking and future feedings. Having a good quantity allows for spontaneous baking of no-wait recipes. Always ensure you retain enough starter in the jar (around a cup) to continue feeding and maintaining your culture.
Q: What does “fed” sourdough starter mean in recipes?
A: “Fed” starter refers to starter that has been recently given flour and water and allowed to sit at room temperature for a few hours to become active. Even if you’re not baking immediately, always feed your starter before refrigerating it. Let it sit at room temperature for a short period after feeding before placing it back in the fridge.
Q: Is it okay to put starter away unfed sometimes?
A: While it’s best practice to feed your starter before refrigerating it, an occasional lapse is not detrimental. Sourdough starters are resilient. However, for optimal health and consistent performance, make feeding before refrigeration a regular habit.
Q: My starter tastes very sour. How to reduce sourness?
A: A more sour taste indicates a longer fermentation period or less frequent feedings. To reduce sourness, feed your starter more often and reduce the fermentation time at room temperature. However, a longer fermentation is crucial for those seeking the digestive benefits of sourdough.
Q: If I receive starter from a friend, how soon can I use it?
A: Feed the starter once and let it become bubbly and active before using it in a recipe. This ensures it’s vigorous and ready to leaven your bake.
Q: How to make sourdough starter from scratch?
A: Creating a starter from scratch is a rewarding process. It involves mixing flour and water and allowing wild yeasts to cultivate over several days with regular feedings and discards. Numerous online resources and tutorials, like “How to Make for Sourdough Starter,” can guide you through the process.
Q: How to make gluten-free sourdough starter?
A: Yes, gluten-free sourdough starters are achievable using gluten-free flours like rice flour, buckwheat flour, or a blend. “Gluten Free Sourdough Starter” guides are available to assist you.
Q: Do I need a strict feeding schedule?
A: A rigid schedule isn’t necessary. Adapt your feeding routine to your baking frequency and lifestyle. Observe your starter’s activity and adjust feedings accordingly.
Q: Is a hard crust on top of starter normal?
A: Yes, a dry crust can form if the starter is left uncovered or loosely covered on the counter. You can either scrape it off or mix it back in – it’s harmless.
Q: What is the black liquid on top of my starter (hooch)?
A: This dark liquid, called “hooch,” is a sign of a hungry starter. It’s a byproduct of fermentation. Pour it off or stir it in and feed your starter promptly.
Q: After Day 7, do I still discard starter?
A: No, once your starter is established (around Day 8), you no longer need to discard with each feeding. Simply feed it with fresh flour and water.
Q: How do I know if my starter has gone bad or molded?
A: Mold is usually visually apparent – look for fuzzy or discolored patches (other than the hooch liquid). A foul, off-putting smell (distinct from its typical sour aroma) can also indicate spoilage. If in doubt, it’s best to discard and start a new one.
Q: How do I know if my starter is active and working?
A: An active starter will rise noticeably after feeding (ideally doubling in volume) and exhibit bubbles throughout. In baking, a working starter will effectively leaven dough, causing it to rise. If your dough doesn’t rise, your starter might need more time to establish or may not be sufficiently active.
Q: Why is sourdough healthier than regular flour-based bread?
A: Sourdough’s health benefits stem from fermentation. Grains contain phytic acid, which can hinder nutrient absorption. Fermentation breaks down phytic acid, making nutrients more bioavailable. It essentially pre-digests the grains, making sourdough easier to digest for many, even those with some grain sensitivities (though not for celiac). Fermentation also unlocks vitamins and beneficial compounds within the grains.
Q: Can I tolerate sourdough if I’m grain intolerant?
A: Many people with grain sensitivities find they can tolerate sourdough, especially if fermented for 18-24 hours. Experimentation is key, and consulting a doctor is recommended, especially for those with celiac disease, who should avoid gluten grains entirely.
Q: How long can a sourdough starter last?
A: With proper care, a sourdough starter can last indefinitely, even for generations, becoming a treasured culinary heirloom.
Q: Does starter need to be in an airtight container?
A: For refrigeration, yes, an airtight container is recommended. For countertop activation after feeding, a loose cover is preferable to allow for gas exchange.
Q: Sourdough discard vs. starter – what’s the difference?
A: Technically, they are the same culture. “Discard” refers to the portion removed before feeding or unfed starter. “Active starter” is starter that has been freshly fed and is bubbly and ready for baking. Many recipes utilize discard for flavor and texture in items like pancakes and crackers.
Q: Can sourdough dough rise overnight at room temperature?
A: Yes, sourdough dough can rise overnight at room temperature (8-12 hours is common, and sometimes up to 24 hours depending on recipe and temperature). Always cover the dough during room temperature fermentation.
Q: Can I let sourdough dough rise in the fridge?
A: Yes, refrigeration slows down fermentation significantly, allowing for longer rises (up to 36 hours or more). This is beneficial for flavor development and managing baking schedules.
Q: What flour is best for feeding starter?
A: Unbleached all-purpose flour, whole wheat flour (freshly ground is excellent), and even einkorn flour work well for feeding sourdough starters. Starters are adaptable to various flour types.
Conclusion: Embrace the Simplicity of Sourdough Starter Care
Taking care of a sourdough starter is not a complex or time-consuming endeavor. It’s a simple rhythm of feeding and observation that becomes second nature with practice. By understanding the basic principles of feeding, maintenance, and troubleshooting, you can confidently nurture a thriving sourdough starter and unlock a world of flavorful and wholesome baked goods. Embrace the journey, experiment with recipes, and enjoy the rewarding experience of sourdough baking!