At CARS.EDU.VN, we understand the need for window tint removal, whether due to bubbling, fading, or legal requirements. This comprehensive guide provides step-by-step instructions on how to remove window tint from your car, explores professional options, and discusses the benefits of high-quality replacement films. We’ll cover everything from necessary tools to cost considerations, including professional tint removal services. Discover resources for car window defogging and expert auto detailing tips at CARS.EDU.VN.
1. DIY vs. Professional Window Tint Removal: Which Is Right for You?
Deciding whether to tackle window tint removal yourself or hire a professional is a crucial first step. While DIY methods can save money, professional removal ensures a pristine finish and minimizes the risk of damaging your vehicle. Let’s examine the pros and cons of each approach.
1.1. The Allure of DIY Window Tint Removal
For the hands-on car enthusiast, DIY window tint removal can be a satisfying project. The potential cost savings are a significant draw, and the sense of accomplishment after completing the task can be rewarding. However, it’s important to be realistic about the time, effort, and potential risks involved.
1.2. The Benefits of Professional Window Tint Removal Services
Opting for professional window tint removal offers numerous advantages. Experienced technicians possess the skills, tools, and knowledge to remove tint efficiently and safely, preventing damage to your car’s windows or rear defogger. Professional services also save you valuable time and effort, ensuring a flawless result.
Key Considerations:
| Factor | DIY Window Tint Removal | Professional Window Tint Removal |
|---|---|---|
| Cost | Lower upfront cost; potential expenses for specialized tools or chemicals | Higher upfront cost; includes labor and expertise |
| Time | Significant time investment; can take several hours depending on the number of windows and tint condition | Faster turnaround time; professionals can complete the job in a fraction of the time |
| Risk | Higher risk of damaging windows, scratching surfaces, or causing personal injury; potential for adhesive residue and uneven removal | Minimal risk of damage due to expertise and specialized tools; ensures clean and even removal |
| Expertise | Requires research, patience, and attention to detail; learning curve involved | Professional expertise ensures proper techniques and safe handling of materials |
| Tools | Requires gathering necessary tools and materials; heat gun, razor blades, cleaning solutions, etc. | Professionals have all the necessary tools and equipment readily available |
| Results | Results may vary; potential for imperfections, adhesive residue, or damage to the window | Consistent and high-quality results; ensures a clean and professional finish |
| Warranty | No warranty; any damage incurred is the responsibility of the DIYer | Many professionals offer warranties on their work, providing peace of mind |

Ultimately, the choice between DIY and professional window tint removal depends on your comfort level, budget, and available time. If you’re unsure about your abilities or concerned about damaging your vehicle, hiring a professional is the wisest course of action. At CARS.EDU.VN, we recommend weighing the pros and cons carefully to make an informed decision.
2. Essential Tools and Equipment for DIY Window Tint Removal
If you decide to remove window tint yourself, gathering the right tools and equipment is paramount for a successful outcome. Using the appropriate tools not only makes the process easier but also minimizes the risk of damage to your vehicle. Here’s a comprehensive list of essentials:
- Heat Gun: A heat gun is crucial for softening the adhesive that bonds the tint to the window. It allows for easier peeling and reduces the likelihood of leaving behind stubborn residue.
- Razor Blade or Scraper: A sharp razor blade or plastic scraper is needed to gently lift the edges of the tint and peel it away from the glass. Choose a high-quality blade to prevent scratching the window.
- Spray Bottle: A spray bottle filled with a cleaning solution helps to loosen the adhesive and keep the window surface wet during the removal process.
- Cleaning Solution: Various cleaning solutions can be used, including soapy water, ammonia solution, or specialized adhesive removers. Choose a solution that is safe for your car’s windows and won’t damage the glass or surrounding materials.
- Microfiber Towels: Soft microfiber towels are essential for wiping away cleaning solutions and adhesive residue without scratching the window surface.
- Safety Glasses: Safety glasses protect your eyes from debris, chemicals, and sharp objects during the removal process.
- Gloves: Gloves protect your hands from chemicals and provide a better grip on tools, preventing accidental cuts or injuries.
- Face Mask: A face mask prevents you from inhaling dust, debris, and chemical fumes during the removal process.
- Plastic Drop Cloths: Placing plastic drop cloths around the work area protects your car’s interior and exterior from spills, scratches, and debris.
2.1. Gathering Your Supplies
Before starting your DIY window tint removal project, take the time to gather all the necessary tools and equipment. Ensure that your tools are in good working condition and that you have an ample supply of cleaning solutions and microfiber towels. A well-prepared workspace will streamline the removal process and minimize potential mishaps.
2.2. Tool Alternatives and Considerations
While certain tools are essential for effective window tint removal, alternatives can be used depending on availability and budget. For example, a hairdryer can be used in place of a heat gun, although it may take longer to achieve the same results. Similarly, a plastic putty knife can be used instead of a razor blade for those concerned about scratching the glass. However, it’s important to remember that using alternatives may impact the efficiency and effectiveness of the removal process.
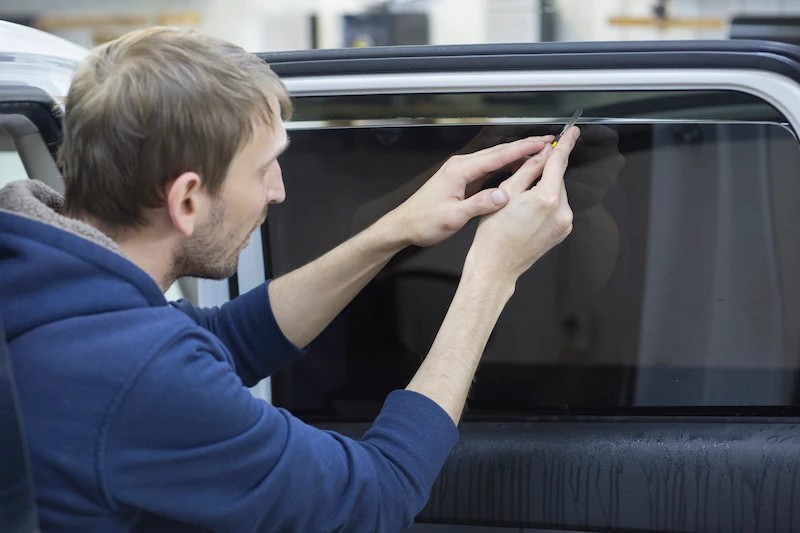
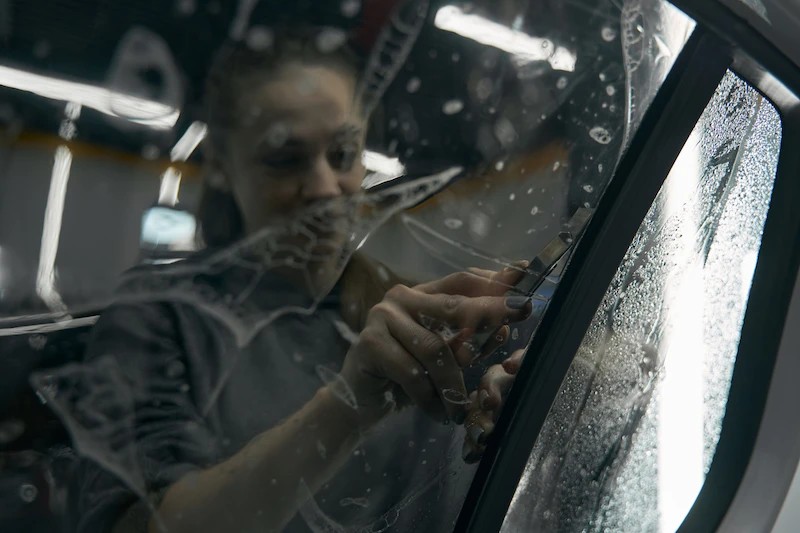
3. Step-by-Step Guide to Removing Window Tint Yourself
Removing window tint yourself requires patience, attention to detail, and adherence to proper techniques. Follow these step-by-step instructions to safely and effectively remove window tint from your car:
3.1. Preparing the Area for Window Tint Removal
Choose a well-ventilated area, such as an outdoor space or a garage with the door open, to minimize exposure to fumes and debris. Cover the surrounding area with plastic drop cloths to protect your car’s interior and exterior from spills and scratches.
3.2. Softening the Adhesive with Heat
Use a heat gun or hairdryer to gently heat the window tint, softening the adhesive that bonds it to the glass. Hold the heat source a few inches away from the window and move it in a sweeping motion to evenly distribute the heat. Avoid overheating the glass, which can cause it to crack or shatter.
3.3. Peeling Away the Window Tint Film
Once the adhesive has softened, use a razor blade or plastic scraper to carefully lift the edge of the tint film. Gently peel the film away from the window, working slowly and steadily to avoid tearing it. If the film becomes difficult to remove, apply more heat to soften the adhesive further.
3.4. Removing Adhesive Residue from Windows
After removing the tint film, adhesive residue will likely remain on the window. Use a cleaning solution, such as soapy water or adhesive remover, to saturate the residue and let it sit for a few minutes. Then, use a microfiber towel to scrub away the residue, applying gentle pressure as needed. Repeat the process until the window is clean and free of adhesive.
3.5. Final Cleaning and Inspection
Once the adhesive residue has been removed, clean the window with a glass cleaner to remove any remaining streaks or smudges. Inspect the window carefully to ensure that all traces of tint and adhesive have been removed. If necessary, repeat the cleaning process to achieve a pristine finish.
Tips for Success:
- Work in a well-lit area to better see the progress of the removal process.
- Use a new, sharp razor blade to avoid scratching the glass.
- Apply heat evenly to prevent overheating the window.
- Be patient and avoid rushing the removal process.
- Wear safety glasses, gloves, and a face mask to protect yourself from injury and exposure to chemicals.
4. How Much Does Professional Window Tint Removal Cost?
If you’re considering professional window tint removal, understanding the associated costs is essential for budgeting purposes. The cost of professional removal varies depending on several factors, including the type of vehicle, the number of windows, and the complexity of the job.
4.1. Factors Affecting Window Tint Removal Prices
Several factors can influence the price of professional window tint removal:
- Vehicle Type: Larger vehicles with more windows typically cost more to remove tint from than smaller cars.
- Number of Windows: The more windows that need to be treated, the higher the overall cost.
- Tint Condition: Older or poorly installed tint may be more difficult to remove, increasing labor costs.
- Location: Prices may vary depending on geographic location and local market rates.
- Service Provider: Different service providers may have varying pricing structures and expertise levels.
4.2. Average Cost Ranges for Different Vehicles
On average, professional window tint removal can range from $50 to $150 per window. However, this range can vary depending on the factors mentioned above. It’s always best to obtain quotes from multiple service providers to compare prices and services.
General Price Ranges:
| Vehicle Type | Average Cost Per Window |
|---|---|
| Sedan | $50 – $100 |
| SUV | $75 – $125 |
| Truck | $75 – $150 |
| Windshield/Rear Window | $85 – $175 |
Note: These are estimated price ranges and may vary depending on location and service provider.
At CARS.EDU.VN, we advise researching local service providers, reading online reviews, and obtaining multiple quotes to ensure you receive the best value for your money.
5. Replacing Your Old Film with a High-Quality Tint
Once you’ve removed the old window tint, consider upgrading to a high-quality replacement film. Quality window tint offers numerous benefits, including enhanced privacy, UV protection, and improved aesthetics.
5.1. Benefits of Upgrading to Quality Window Tint
- UV Protection: High-quality window tint blocks up to 99% of harmful UV rays, protecting your skin and preventing fading of your car’s interior.
- Heat Reduction: Window tint reduces heat buildup inside your car, keeping you cooler and more comfortable during hot weather.
- Glare Reduction: Tinted windows minimize glare from sunlight and headlights, improving visibility and reducing eye strain.
- Privacy: Window tint provides added privacy for you and your passengers, deterring theft and unwanted attention.
- Aesthetics: Tinted windows enhance the appearance of your car, giving it a sleek and stylish look.
5.2. Choosing the Right Type of Window Tint Film
With so many options available, choosing the right type of window tint film can be overwhelming. Consider the following factors when making your selection:
- Tint Darkness: Choose a tint darkness that complies with local laws and regulations.
- Film Material: Opt for high-quality materials, such as ceramic or metallic films, for superior performance and longevity.
- Brand Reputation: Research reputable brands known for producing reliable and long-lasting window tint films.
- Professional Installation: Consider professional installation to ensure proper application and avoid bubbles or wrinkles.
Popular Window Tint Film Types:
| Film Type | Benefits | Drawbacks |
|---|---|---|
| Dyed Film | Affordable, basic heat and glare reduction | Fades over time, lower heat rejection |
| Metallic Film | Reflects heat, durable | Can interfere with electronic signals (GPS, cell phones) |
| Carbon Film | Excellent heat rejection, non-reflective, doesn’t interfere with electronic signals | More expensive than dyed film |
| Ceramic Film | Superior heat rejection, UV protection, non-reflective, doesn’t interfere with electronic signals, long-lasting | Most expensive option |
At CARS.EDU.VN, we recommend consulting with a professional window tint installer to determine the best type of film for your specific needs and preferences.
6. Maintaining Your Car Windows After Tint Removal
Proper maintenance is essential to keep your car windows looking their best after tint removal. Here are some tips to ensure long-lasting clarity and protection:
6.1. Cleaning Tips for Tint-Free Car Windows
- Use a Mild Cleaning Solution: Avoid harsh chemicals or abrasive cleaners that can damage the glass. Opt for a mild soap and water solution or a specialized glass cleaner.
- Use a Microfiber Cloth: Microfiber cloths are gentle and won’t scratch the glass surface. Avoid using paper towels or rough cloths, which can leave behind lint and streaks.
- Wipe in a Circular Motion: Use a circular motion to evenly distribute the cleaning solution and remove dirt and grime.
- Dry the Windows Thoroughly: After cleaning, dry the windows with a clean, dry microfiber cloth to prevent water spots and streaks.
6.2. Products to Avoid When Cleaning Car Windows
Avoid using the following products when cleaning your car windows:
- Ammonia-Based Cleaners: Ammonia can damage window tint and other surfaces.
- Abrasive Cleaners: Abrasive cleaners can scratch the glass surface.
- Paper Towels: Paper towels can leave behind lint and streaks.
- Harsh Chemicals: Harsh chemicals can damage the glass and surrounding materials.
Recommended Cleaning Schedule:
| Frequency | Task |
|---|---|
| Weekly | Wipe down windows with a damp microfiber cloth |
| Monthly | Clean windows with a mild cleaning solution |
| As Needed | Remove bug splatter or tree sap immediately |
Regular cleaning and maintenance will help keep your car windows looking clear and pristine for years to come.
7. Legal Aspects of Window Tint Removal and Replacement
Before removing or replacing window tint, it’s crucial to understand the legal regulations in your area. Window tint laws vary by state and may specify the allowable darkness levels and reflectivity of window tint films.
7.1. Understanding Local Window Tint Laws
- Tint Darkness: Most states have laws regarding the percentage of light that can pass through window tint film, known as Visible Light Transmission (VLT).
- Reflectivity: Some states also regulate the reflectivity of window tint film, prohibiting films that are too reflective.
- Windshield Tinting: Laws regarding windshield tinting may differ from those for side and rear windows.
- Medical Exemptions: Some states offer medical exemptions for individuals who require darker window tint due to medical conditions.
7.2. Consequences of Non-Compliance
Failure to comply with local window tint laws can result in fines, tickets, or even the requirement to remove the illegal tint. It’s essential to research and understand the regulations in your area before making any changes to your car’s window tint.
Resources for Finding Local Window Tint Laws:
- State Department of Motor Vehicles (DMV) Website: Most state DMVs provide information on window tint laws and regulations.
- Local Law Enforcement Agencies: Local police departments or sheriff’s offices can provide guidance on window tint laws in your area.
- Professional Window Tint Installers: Reputable window tint installers are knowledgeable about local laws and can help you choose a legal tint option.
At CARS.EDU.VN, we advise consulting with local authorities or a professional window tint installer to ensure compliance with all applicable laws and regulations.
8. Troubleshooting Common Window Tint Removal Problems
Even with careful preparation and execution, DIY window tint removal can present challenges. Here are some common problems and how to address them:
8.1. Stubborn Adhesive Residue
If adhesive residue remains after peeling off the tint film, try the following:
- Apply More Cleaning Solution: Saturate the residue with a cleaning solution and let it sit for a longer period.
- Use a Stronger Adhesive Remover: Try a specialized adhesive remover designed for automotive applications.
- Use a Plastic Scraper: Gently scrape away the residue with a plastic scraper, being careful not to scratch the glass.
- Apply Heat: Use a heat gun or hairdryer to soften the residue before scrubbing.
8.2. Tearing or Cracking of the Tint Film
If the tint film tears or cracks during removal, try the following:
- Apply More Heat: Use a heat gun or hairdryer to soften the adhesive further.
- Work in Smaller Sections: Peel the film away in smaller sections to prevent tearing.
- Use a Razor Blade: Use a razor blade to carefully cut the film along the tear line and peel it away in separate pieces.
8.3. Scratched or Damaged Windows
If you accidentally scratch or damage the window during removal, try the following:
- Use a Glass Polishing Compound: Apply a glass polishing compound to the scratched area and buff it with a soft cloth.
- Consult a Professional: If the damage is severe, consult a professional glass repair service for assistance.
Preventative Measures:
- Use a Sharp Razor Blade: A dull blade is more likely to scratch the glass.
- Apply Even Pressure: Avoid applying excessive pressure when scraping or peeling the film.
- Work Slowly and Carefully: Rushing the removal process increases the risk of damage.
At CARS.EDU.VN, we emphasize the importance of patience and caution when tackling DIY window tint removal to minimize the risk of complications.
9. The Environmental Impact of Window Tint Removal
Window tint removal can have environmental implications, particularly regarding the disposal of old tint film and cleaning solutions.
9.1. Responsible Disposal of Old Tint Film
- Check Local Regulations: Research local regulations regarding the disposal of window tint film. Some areas may have specific guidelines or restrictions.
- Recycling Options: Explore recycling options for window tint film. Some recycling centers may accept certain types of film.
- Proper Disposal: If recycling is not available, dispose of the film properly in a designated waste container.
9.2. Eco-Friendly Cleaning Solutions
- Choose Non-Toxic Cleaners: Opt for non-toxic and biodegradable cleaning solutions to minimize environmental impact.
- Avoid Harsh Chemicals: Avoid using harsh chemicals that can contaminate water sources and harm wildlife.
- Use Minimal Amounts: Use cleaning solutions sparingly to reduce waste and minimize environmental impact.
Sustainable Practices:
- Consider Professional Removal: Professional window tint removal services often have established waste disposal protocols and use eco-friendly products.
- Proper Ventilation: Ensure proper ventilation when working with cleaning solutions to minimize exposure to fumes.
- Educate Others: Share information about responsible window tint removal practices with friends, family, and fellow car enthusiasts.
At CARS.EDU.VN, we encourage responsible and sustainable practices in all aspects of car care, including window tint removal.
10. Finding Reliable Window Tint Removal Services
If you prefer professional window tint removal, finding a reliable service provider is crucial for a satisfactory outcome.
10.1. Researching Local Service Providers
- Online Reviews: Read online reviews and testimonials to gauge the reputation and quality of local service providers.
- Ask for Recommendations: Seek recommendations from friends, family, or fellow car enthusiasts who have used window tint removal services in the past.
- Check Credentials: Verify that the service provider is licensed and insured to perform window tint removal services in your area.
10.2. Questions to Ask Before Hiring
Before hiring a window tint removal service, ask the following questions:
- Experience: How many years of experience do you have in window tint removal?
- Techniques: What techniques and tools do you use for window tint removal?
- Pricing: What is the estimated cost of the service, and what factors may affect the price?
- Warranty: Do you offer a warranty on your work?
- Insurance: Are you insured against damage to my vehicle during the removal process?
Red Flags to Watch Out For:
- Unwillingness to Provide References: Be wary of service providers who are unwilling to provide references or testimonials.
- Unclear Pricing: Avoid service providers who offer vague or unclear pricing structures.
- Lack of Insurance: Ensure that the service provider is adequately insured to cover any potential damage to your vehicle.
At CARS.EDU.VN, we advise thorough research and due diligence when selecting a window tint removal service to ensure a positive and hassle-free experience.
Removing window tint from your car can seem daunting, but with the right knowledge and tools, it’s a manageable task. Whether you choose the DIY route or opt for professional assistance, understanding the process, potential costs, and legal considerations is key to achieving a clean, compliant result. Remember, CARS.EDU.VN is your trusted resource for all things automotive, offering expert advice and guidance to keep your vehicle in top condition.
Are you struggling to find reliable information on car maintenance or repair services? At CARS.EDU.VN, we understand the challenges car owners face. That’s why we provide comprehensive guides, expert reviews, and helpful resources to empower you to make informed decisions about your vehicle. From finding reputable repair shops to learning DIY maintenance tips, CARS.EDU.VN is your go-to source for all things automotive. Visit cars.edu.vn today to explore our wealth of information and discover how we can help you navigate the world of car ownership with confidence. Contact us at 456 Auto Drive, Anytown, CA 90210, United States. Whatsapp: +1 555-123-4567.
Frequently Asked Questions (FAQ) About Window Tint Removal
-
Is it legal to remove window tint myself?
Yes, it is generally legal to remove window tint yourself, as long as you comply with local regulations regarding the disposal of old tint film.
-
Will removing window tint damage my car windows?
If done incorrectly, removing window tint can potentially damage your car windows. Using the wrong tools or techniques can scratch the glass or damage the rear defogger.
-
How long does it take to remove window tint?
The time it takes to remove window tint depends on several factors, including the number of windows, the age and condition of the tint, and the method used. DIY removal can take several hours, while professional removal may take as little as one to two hours.
-
What is the best way to remove adhesive residue from car windows?
The best way to remove adhesive residue is to use a specialized adhesive remover designed for automotive applications. Apply the remover to the residue, let it sit for a few minutes, and then scrub it away with a microfiber towel.
-
Can I use a heat gun to remove window tint?
Yes, a heat gun can be used to soften the adhesive that bonds the tint to the window. However, it’s essential to use caution and avoid overheating the glass, which can cause it to crack or shatter.
-
Is it better to remove window tint in hot or cold weather?
It is generally easier to remove window tint in warm weather, as the heat helps to soften the adhesive. However, you can still remove tint in cold weather by using a heat gun or hairdryer to warm the window.
-
What are the benefits of professional window tint removal?
Professional window tint removal offers several benefits, including reduced risk of damage to your vehicle, faster turnaround time, and a clean, professional finish.
-
How much does professional window tint removal cost?
The cost of professional window tint removal varies depending on several factors, including the type of vehicle, the number of windows, and the complexity of the job. On average, professional removal can range from $50 to $150 per window.
-
What should I do with the old window tint film after removing it?
Check local regulations regarding the disposal of window tint film. Some areas may have specific guidelines or restrictions. Explore recycling options if available, or dispose of the film properly in a designated waste container.
-
How can I prevent problems when removing window tint myself?
To prevent problems when removing window tint yourself, gather the right tools and equipment, follow proper techniques, work in a well-ventilated area, and exercise patience and caution throughout the process.