Taking window tint off car windows can be a tricky process, but CARS.EDU.VN is here to guide you through it. Whether you’re dealing with bubbling, fading, or simply want an upgrade, we’ll explore both DIY methods and the benefits of professional removal. Discover the best ways to achieve a clean, fresh look for your vehicle while avoiding costly mistakes. Learn about automotive window film removal, car window defogging, and auto glass care for a complete solution.
1. DIY vs Professional Window Tint Removal: Which is Right for You?
Removing window tint can seem like a straightforward task, but the reality often involves more than meets the eye. Choosing between DIY and professional removal depends on your comfort level, available time, and concern for potential damage. Let’s delve into the pros and cons of each approach.
1.1. The Allure of DIY Window Tint Removal
For many car owners, the DIY route is appealing due to its potential cost savings. The idea of tackling the project yourself, armed with readily available tools, can be quite attractive. However, it’s essential to understand the full scope of what’s involved.
Pros of DIY Window Tint Removal:
- Cost Savings: The most obvious benefit is the potential to save money on labor costs. You only pay for the necessary tools and materials.
- Flexibility: You can work at your own pace and schedule, fitting the project into your free time.
- Learning Experience: DIY projects can be a great way to learn new skills and gain a better understanding of your vehicle.
Cons of DIY Window Tint Removal:
- Time-Consuming: Removing window tint can be a lengthy process, especially if you’re dealing with stubborn adhesive.
- Potential for Damage: Without the proper technique, you risk scratching or damaging your car’s windows.
- Safety Concerns: Working with sharp tools and chemicals requires caution and protective gear.
1.2. The Expertise of Professional Window Tint Removal
Opting for professional window tint removal offers peace of mind and a higher likelihood of a flawless result. Professionals have the experience, tools, and expertise to handle the job efficiently and safely.
Pros of Professional Window Tint Removal:
- Efficiency: Professionals can remove window tint much faster than the average DIYer.
- Reduced Risk of Damage: Experienced technicians know how to remove tint without damaging the glass.
- Convenience: You can drop off your car and let the professionals handle everything, saving you time and effort.
Cons of Professional Window Tint Removal:
- Higher Cost: Professional services come with labor costs, which can be higher than DIY.
- Scheduling: You may need to schedule an appointment and work around the shop’s availability.
1.3. Making the Right Choice for Your Needs
Ultimately, the decision between DIY and professional window tint removal depends on your individual circumstances. If you’re on a tight budget and enjoy hands-on projects, DIY might be a viable option. However, if you value convenience, safety, and a guaranteed outcome, professional removal is the way to go.
According to a survey by the International Window Film Association (IWFA), approximately 60% of car owners prefer professional window tint removal due to concerns about potential damage and the complexity of the process.
1.4. CARS.EDU.VN Recommendation
At CARS.EDU.VN, we understand the challenges car owners face when maintaining their vehicles. We recommend carefully weighing the pros and cons of DIY versus professional removal. If you’re unsure about your ability to handle the project safely and effectively, it’s best to consult with a professional.
Ready to explore more car care tips and expert advice? Visit CARS.EDU.VN today for comprehensive guides and resources to help you keep your vehicle in top condition!
2. Essential Tools and Equipment for DIY Window Tint Removal
Before embarking on the DIY journey of removing window tint, gathering the right tools and equipment is crucial. Having the necessary items on hand will not only make the process smoother but also minimize the risk of damaging your vehicle.
2.1. The Must-Have Toolkit
A well-equipped toolkit is the foundation of any successful DIY project. Here’s a list of essential tools you’ll need for removing window tint:
| Tool | Description | Purpose |
|---|---|---|
| Heat Gun | A device that emits a concentrated stream of hot air. | Softens the adhesive holding the tint to the window, making it easier to peel off. |
| Razor Blade | A sharp blade, typically single-edged. | Gently lifts the edge of the tint film and helps peel it away from the window. |
| Scraper | A tool with a flat, rigid edge. | Removes stubborn adhesive residue from the window surface. |
| Spray Bottle | A container used to dispense liquids in a fine mist. | Applies cleaning solutions and adhesive removers to the window. |
| Cleaning Solution | A liquid formulated to clean glass surfaces. | Removes dirt, grime, and remaining adhesive residue from the window. |
| Adhesive Remover | A specialized solution designed to dissolve adhesive residue. | Breaks down the adhesive bond, making it easier to scrape away. |
| Microfiber Cloths | Soft, absorbent cloths that won’t scratch surfaces. | Wipes away cleaning solutions and adhesive removers, leaving the window clean and streak-free. |
| Safety Glasses | Protective eyewear that shields your eyes from debris and chemicals. | Prevents eye irritation and injury during the removal process. |
| Safety Gloves | Gloves that protect your hands from cuts and chemical exposure. | Provides a barrier against sharp tools and potentially harmful substances. |
| Face Mask or Respirator | A mask that filters out dust and particles. | Prevents inhalation of debris and chemical fumes. |
| Plastic Drop Cloths | Protective sheets that cover surfaces. | Shields your car’s interior from debris, cleaning solutions, and adhesive removers. |
2.2. Choosing the Right Products
Selecting high-quality products is just as important as having the right tools. Here are some considerations when choosing your supplies:
- Heat Gun: Opt for a heat gun with adjustable temperature settings to avoid overheating the glass.
- Adhesive Remover: Choose a product specifically designed for automotive use to prevent damage to the window.
- Cleaning Solution: Use a non-ammonia based glass cleaner to avoid damaging any interior surfaces.
2.3. Safety First: Protective Gear
Prioritizing safety is paramount when working with tools and chemicals. Always wear safety glasses, gloves, and a face mask to protect yourself from potential hazards.
2.4. CARS.EDU.VN Recommendation
At CARS.EDU.VN, we emphasize the importance of preparation and safety. Ensure you have all the necessary tools and protective gear before starting your window tint removal project.
Looking for reliable car care advice and product recommendations? Visit CARS.EDU.VN for expert insights and tips to help you maintain your vehicle!
3. Step-by-Step Guide: Safely Removing Window Tint from Your Car
Removing window tint requires patience, precision, and a systematic approach. Following these steps will help you achieve a clean and professional-looking result.
3.1. Preparing the Area
Before you begin, prepare the area to protect your car and yourself:
- Choose a well-ventilated space: Work outdoors or in a garage with the door open to minimize exposure to fumes and debris.
- Cover your car’s interior: Use plastic drop cloths to protect seats, dashboards, and other surfaces from adhesive residue and cleaning solutions.
- Wear protective gear: Put on safety glasses, gloves, and a face mask to safeguard your eyes, hands, and respiratory system.
3.2. Softening the Adhesive
The key to successful tint removal is softening the adhesive that bonds the film to the glass:
- Use a heat gun: Hold the heat gun a few inches away from the window, moving it slowly and evenly over the surface.
- Focus on the edges: Pay special attention to the edges of the tint film, as this is where you’ll begin peeling.
- Watch for curling: As the adhesive softens, you’ll notice the edges of the film starting to curl away from the glass.
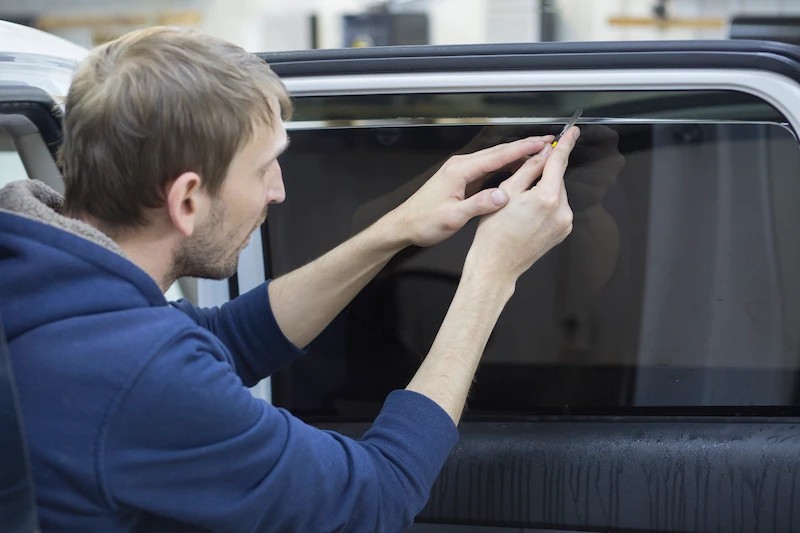
3.3. Peeling Off the Tint Film
Once the adhesive is softened, carefully peel off the tint film:
- Use a razor blade or scraper: Gently lift the edge of the film with a razor blade or scraper.
- Peel slowly and steadily: Pull the film away from the window at a consistent pace, using the heat gun as needed to keep the adhesive soft.
- Avoid tearing: If the film tears, use the razor blade to lift the edge and continue peeling.
3.4. Removing Adhesive Residue
After removing the tint film, you’ll likely be left with stubborn adhesive residue:
- Apply adhesive remover: Spray the residue with an automotive-specific adhesive remover.
- Let it soak: Allow the remover to sit for a few minutes to break down the adhesive.
- Scrape away the residue: Use a plastic scraper to gently remove the softened adhesive.
- Wipe clean: Wipe the window with a microfiber cloth to remove any remaining residue.
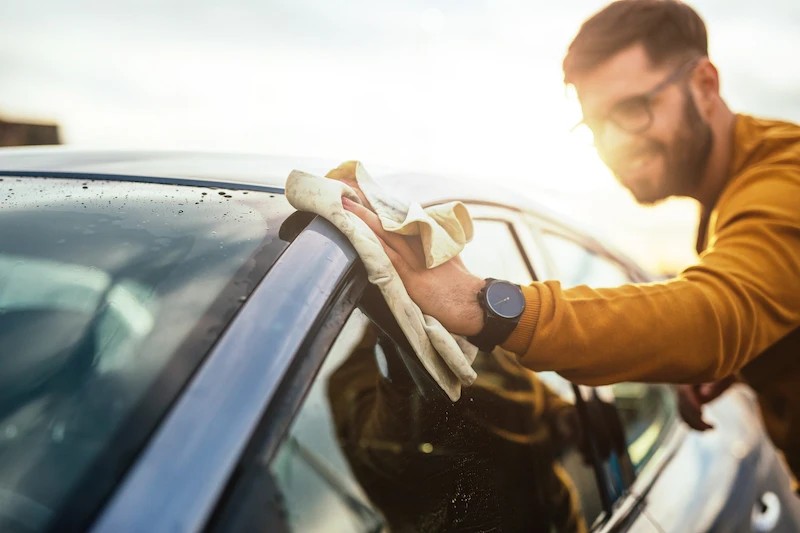
3.5. Cleaning the Window
The final step is to clean the window to remove any lingering residue and streaks:
- Apply glass cleaner: Spray the window with a non-ammonia based glass cleaner.
- Wipe with a microfiber cloth: Use a clean microfiber cloth to wipe the window thoroughly.
- Inspect for streaks: Check the window for streaks or residue and wipe again as needed.
3.6. CARS.EDU.VN Recommendation
At CARS.EDU.VN, we believe in providing clear, actionable advice. Follow these steps carefully to safely and effectively remove window tint from your car.
Need more detailed instructions or troubleshooting tips? Visit CARS.EDU.VN for comprehensive car care guides and expert assistance!
4. Choosing the Right Adhesive Remover: A Comprehensive Guide
Selecting the appropriate adhesive remover is essential for efficiently and safely eliminating residue after removing window tint. Not all adhesive removers are created equal, and using the wrong product can damage your car’s windows or leave behind a sticky mess.
4.1. Types of Adhesive Removers
There are several types of adhesive removers available, each with its own set of pros and cons:
| Type of Remover | Description | Pros | Cons |
|---|---|---|---|
| Automotive-Specific | Formulated specifically for use on vehicles. | Safe for use on glass, paint, and other automotive surfaces; effective at removing adhesive residue. | Can be more expensive than other options. |
| Isopropyl Alcohol | A common household solvent. | Readily available, relatively inexpensive. | May not be as effective on stubborn residue; can dry out rubber and plastic. |
| Acetone (Nail Polish Remover) | A strong solvent often used for removing nail polish. | Highly effective at dissolving adhesive. | Can damage paint and plastic; should be used with caution on glass. |
| Citrus-Based | Made from natural citrus extracts. | Environmentally friendly, pleasant scent. | May not be as strong as other solvents; can leave behind an oily residue. |
| Soapy Water | A mixture of mild soap and water. | Gentle, safe for all surfaces. | Not very effective on strong adhesives; requires a lot of scrubbing. |
4.2. Factors to Consider
When choosing an adhesive remover, consider the following factors:
- Safety: Ensure the product is safe for use on glass and won’t damage your car’s paint or interior.
- Effectiveness: Choose a remover that is known for its ability to dissolve adhesive residue quickly and efficiently.
- Ease of Use: Opt for a product that is easy to apply and remove, with clear instructions.
- Odor: Some adhesive removers have strong odors, so choose one with a pleasant or mild scent.
- Environmental Impact: Consider using an environmentally friendly, citrus-based remover to minimize your impact.
4.3. How to Use Adhesive Remover
Follow these steps to safely and effectively use adhesive remover:
- Test in an inconspicuous area: Before applying the remover to the entire window, test it in a small, hidden area to ensure it doesn’t damage the surface.
- Apply liberally: Spray the adhesive residue with a generous amount of remover.
- Allow to soak: Let the remover sit for several minutes to allow it to penetrate and dissolve the adhesive.
- Scrape gently: Use a plastic scraper to gently remove the softened residue.
- Wipe clean: Wipe the window with a clean microfiber cloth to remove any remaining residue.
- Repeat if necessary: If the residue is stubborn, repeat the process until it is completely removed.
4.4. CARS.EDU.VN Recommendation
At CARS.EDU.VN, we prioritize safety and effectiveness. We recommend using an automotive-specific adhesive remover for removing window tint residue. These products are formulated to be safe for your vehicle’s surfaces and highly effective at dissolving adhesive.
Looking for expert product recommendations and car care tips? Visit CARS.EDU.VN for comprehensive guides and resources to help you maintain your vehicle!
5. Preventing Window Damage During Tint Removal: Expert Tips
Removing window tint can be a delicate process, and preventing damage to your car’s windows is crucial. Scratches, cracks, and other damage can be costly to repair, so taking precautions is essential.
5.1. Using the Right Tools
Using the correct tools is the first step in preventing window damage:
- Plastic Scrapers: Opt for plastic scrapers instead of metal ones to minimize the risk of scratching the glass.
- Razor Blades: Use high-quality razor blades designed for automotive use, and replace them frequently to ensure a sharp, clean edge.
- Microfiber Cloths: Use soft, clean microfiber cloths to wipe away residue and cleaning solutions without scratching the window.
5.2. Applying Heat Properly
Applying heat is essential for softening the adhesive, but it’s important to do it correctly:
- Maintain Distance: Hold the heat gun a few inches away from the window to avoid overheating the glass.
- Move Constantly: Keep the heat gun moving in a consistent, sweeping motion to distribute the heat evenly.
- Avoid Overheating: Don’t focus the heat on one spot for too long, as this can cause the glass to crack.
5.3. Peeling with Care
Peeling the tint film requires patience and a gentle touch:
- Lift the Edge: Use a razor blade or scraper to gently lift the edge of the tint film without gouging the glass.
- Peel Slowly: Pull the film away from the window slowly and steadily, using the heat gun as needed to keep the adhesive soft.
- Avoid Tearing: If the film tears, use the razor blade to lift the edge and continue peeling from the tear point.
5.4. Removing Stubborn Residue
Removing adhesive residue can be challenging, but it’s important to avoid using excessive force:
- Apply Adhesive Remover: Use a generous amount of automotive-specific adhesive remover to soften the residue.
- Allow to Soak: Let the remover sit for several minutes to allow it to penetrate and dissolve the adhesive.
- Scrape Gently: Use a plastic scraper to gently remove the softened residue, avoiding excessive pressure.
- Repeat if Necessary: If the residue is stubborn, repeat the process until it is completely removed.
5.5. Inspecting for Damage
After removing the tint and residue, inspect the window for any signs of damage:
- Check for Scratches: Look closely for any scratches or abrasions on the glass surface.
- Inspect for Cracks: Examine the window for any cracks, especially around the edges.
- Feel the Surface: Run your hand over the window to feel for any rough spots or imperfections.
5.6. CARS.EDU.VN Recommendation
At CARS.EDU.VN, we prioritize safety and quality. Follow these expert tips to prevent window damage during tint removal and ensure a flawless result.
Looking for professional car care advice and troubleshooting tips? Visit CARS.EDU.VN for comprehensive guides and resources to help you maintain your vehicle!
6. Cost Breakdown: DIY vs Professional Tint Removal Services
Understanding the cost implications of DIY versus professional window tint removal is crucial for making an informed decision. Let’s break down the expenses associated with each approach.
6.1. DIY Tint Removal Costs
The cost of DIY tint removal primarily involves the purchase of necessary tools and materials. Here’s a breakdown of potential expenses:
| Item | Estimated Cost | Notes |
|---|---|---|
| Heat Gun | $20 – $50 | A basic heat gun is sufficient for this task. |
| Razor Blades | $5 – $10 | Purchase a pack of high-quality razor blades designed for automotive use. |
| Plastic Scraper | $5 – $10 | A plastic scraper is essential for removing adhesive residue without scratching the glass. |
| Adhesive Remover | $10 – $20 | Choose an automotive-specific adhesive remover for safety and effectiveness. |
| Cleaning Solution | $5 – $10 | A non-ammonia based glass cleaner is recommended. |
| Microfiber Cloths | $5 – $10 | Purchase a pack of soft, clean microfiber cloths. |
| Safety Glasses | $5 – $15 | Safety glasses are essential for protecting your eyes from debris and chemicals. |
| Safety Gloves | $5 – $10 | Gloves protect your hands from cuts and chemical exposure. |
| Face Mask or Respirator | $10 – $20 | A face mask or respirator prevents inhalation of dust and fumes. |
| Plastic Drop Cloths | $10 – $20 | Plastic drop cloths protect your car’s interior from residue and cleaning solutions. |
| Total Estimated Cost | $80 – $185 | This is an approximate range, and the actual cost may vary depending on the specific products you choose. |
6.2. Professional Tint Removal Costs
Professional tint removal services typically charge based on the number of windows and the size of the vehicle. Here’s a general cost range:
| Service | Estimated Cost | Notes |
|---|---|---|
| Removal of Tint from All Side Windows | $60 – $120 | This is a typical price range for removing tint from all four side windows. |
| Removal of Tint from Windshield or Rear Window | $85 – $150 | Windshield and rear window removal may cost more due to their size and complexity. |
| Total Estimated Cost | $145 – $270 | This is an approximate range, and the actual cost may vary depending on the shop and the vehicle. |
6.3. Hidden Costs and Considerations
In addition to the direct costs, consider these potential hidden costs and factors:
- Time Investment: DIY tint removal can be time-consuming, especially if you’re not experienced. Factor in the value of your time when comparing costs.
- Risk of Damage: DIY removal carries a risk of damaging your car’s windows, which could result in costly repairs.
- Quality of Result: Professional tint removal typically yields a cleaner, more flawless result than DIY.
6.4. CARS.EDU.VN Recommendation
At CARS.EDU.VN, we encourage you to weigh the costs and benefits of each approach carefully. While DIY tint removal can save money, professional services offer convenience, expertise, and a reduced risk of damage.
Need help finding a reputable tint removal service in your area? Visit CARS.EDU.VN for expert recommendations and car care resources!
7. What to Do After Removing Window Tint: Next Steps
After successfully removing window tint from your car, it’s essential to take the necessary steps to ensure your windows are clean, protected, and ready for whatever comes next.
7.1. Thorough Cleaning
Even after removing the adhesive residue, it’s crucial to thoroughly clean your windows:
- Apply Glass Cleaner: Spray your windows with a high-quality, non-ammonia based glass cleaner.
- Wipe with Microfiber Cloth: Use a clean, lint-free microfiber cloth to wipe the windows thoroughly, removing any remaining residue or streaks.
- Inspect for Streaks: Check the windows for streaks or smudges and wipe again as needed until they are crystal clear.
7.2. Consider Re-Tinting
If you removed the old tint due to damage or fading, you might want to consider re-tinting your windows:
- Benefits of Window Tint: Window tint offers several benefits, including reducing glare, blocking UV rays, and enhancing privacy.
- Choosing the Right Tint: Select a high-quality tint film that meets your needs and local regulations.
- Professional Installation: Consider professional installation for a flawless and long-lasting result.
7.3. Applying a Glass Protectant
To protect your windows from scratches, chips, and other damage, consider applying a glass protectant:
- Types of Protectants: There are several types of glass protectants available, including coatings and films.
- Benefits of Protectants: Glass protectants can help repel water, reduce glare, and make your windows easier to clean.
- Application: Follow the manufacturer’s instructions carefully when applying a glass protectant.
7.4. Inspecting for Damage
After cleaning and protecting your windows, inspect them for any signs of damage:
- Check for Scratches: Look closely for any scratches or abrasions on the glass surface.
- Inspect for Chips: Examine the windows for any chips, especially around the edges.
- Address Damage: If you find any damage, consult with a glass repair professional to determine the best course of action.
7.5. CARS.EDU.VN Recommendation
At CARS.EDU.VN, we provide comprehensive car care advice to help you maintain your vehicle in top condition. After removing window tint, follow these steps to ensure your windows are clean, protected, and ready for whatever comes next.
Looking for expert car care tips and product recommendations? Visit CARS.EDU.VN for comprehensive guides and resources to help you maintain your vehicle!
8. Common Mistakes to Avoid When Removing Car Window Tint
Removing car window tint can be a straightforward process, but it’s easy to make mistakes that can damage your windows or result in a less-than-perfect outcome. Here are some common mistakes to avoid:
8.1. Using the Wrong Tools
Using the wrong tools can damage your windows or make the removal process more difficult:
- Metal Scrapers: Avoid using metal scrapers, as they can scratch the glass.
- Household Cleaners: Don’t use harsh household cleaners, as they can damage the tint film and the window.
- Dull Razor Blades: Use sharp, high-quality razor blades designed for automotive use, and replace them frequently.
8.2. Applying Too Much Heat
Applying too much heat can cause the glass to crack or shatter:
- Maintain Distance: Hold the heat gun a few inches away from the window.
- Move Constantly: Keep the heat gun moving in a consistent, sweeping motion.
- Avoid Overheating: Don’t focus the heat on one spot for too long.
8.3. Rushing the Process
Rushing the removal process can result in torn tint film and stubborn adhesive residue:
- Take Your Time: Allow ample time for the adhesive to soften and the film to peel away.
- Peel Slowly: Pull the film away from the window slowly and steadily.
- Be Patient: Be patient and persistent, especially when dealing with stubborn areas.
8.4. Neglecting Safety Precautions
Neglecting safety precautions can result in injuries and chemical exposure:
- Wear Safety Glasses: Always wear safety glasses to protect your eyes from debris and chemicals.
- Wear Gloves: Wear gloves to protect your hands from cuts and chemical exposure.
- Use a Face Mask: Use a face mask or respirator to prevent inhalation of dust and fumes.
8.5. Using Abrasive Cleaners
Using abrasive cleaners can scratch the glass and damage any remaining tint film:
- Non-Abrasive Cleaners: Use non-abrasive cleaners specifically designed for automotive use.
- Microfiber Cloths: Use soft, clean microfiber cloths to wipe away residue and cleaning solutions.
- Avoid Harsh Chemicals: Avoid using harsh chemicals like bleach or ammonia.
8.6. CARS.EDU.VN Recommendation
At CARS.EDU.VN, we provide expert advice to help you avoid common mistakes and achieve the best possible results. When removing car window tint, be sure to use the right tools, apply heat properly, take your time, follow safety precautions, and use non-abrasive cleaners.
Looking for professional car care tips and troubleshooting advice? Visit CARS.EDU.VN for comprehensive guides and resources to help you maintain your vehicle!
9. Maintaining Your Car Windows After Tint Removal
Once you’ve successfully removed the window tint, maintaining your car windows is essential to keep them clean, clear, and protected. Proper maintenance will not only enhance the appearance of your vehicle but also prolong the life of your windows.
9.1. Regular Cleaning
Regular cleaning is the key to maintaining your car windows:
- Use a Quality Glass Cleaner: Use a non-ammonia based glass cleaner specifically designed for automotive use.
- Microfiber Cloths: Use soft, clean microfiber cloths to wipe the windows.
- Clean Regularly: Clean your windows at least once a month, or more often if they become dirty.
- Clean Inside and Out: Don’t forget to clean both the inside and outside of your windows.
9.2. Protecting from Scratches
Protecting your windows from scratches is essential to maintain their clarity:
- Avoid Abrasive Materials: Avoid using abrasive materials like steel wool or scouring pads.
- Use a Soft Sponge: Use a soft sponge or cloth when washing your car.
- Avoid Parking Under Trees: Avoid parking under trees, as falling branches and debris can scratch the windows.
9.3. Preventing Water Spots
Preventing water spots can help keep your windows looking their best:
- Dry After Washing: Dry your windows immediately after washing your car.
- Use a Water Repellent: Apply a water repellent to your windows to help prevent water spots.
- Park in a Garage: Park your car in a garage to protect it from rain and other elements.
9.4. Addressing Chips and Cracks
Addressing chips and cracks promptly can prevent them from spreading:
- Inspect Regularly: Inspect your windows regularly for chips and cracks.
- Repair Small Chips: Repair small chips as soon as possible to prevent them from spreading.
- Replace Cracked Windows: Replace cracked windows to ensure your safety and visibility.
9.5. CARS.EDU.VN Recommendation
At CARS.EDU.VN, we provide comprehensive car care advice to help you maintain your vehicle in top condition. After removing window tint, follow these steps to maintain your car windows and keep them clean, clear, and protected.
Looking for expert car care tips and product recommendations? Visit CARS.EDU.VN for comprehensive guides and resources to help you maintain your vehicle!
10. Frequently Asked Questions (FAQs) About Removing Car Window Tint
Here are some frequently asked questions about removing car window tint, along with detailed answers to help you navigate the process:
10.1. Is it legal to remove window tint from my car?
Yes, it is generally legal to remove window tint from your car. However, it is essential to be aware of local regulations regarding window tinting. If you plan to re-tint your windows, make sure to comply with the legal tint darkness and reflectivity requirements in your area.
10.2. How long does it take to remove window tint?
The time it takes to remove window tint depends on several factors, including the size of the windows, the type of tint film, and your experience level. DIY removal can take anywhere from 2 to 6 hours, while professional removal typically takes 1 to 2 hours.
10.3. Can I use a household steamer to remove window tint?
Yes, a household steamer can be used to remove window tint. The steam helps to soften the adhesive, making it easier to peel off the film. However, a heat gun is generally more effective and efficient for this task.
10.4. What is the best adhesive remover for window tint residue?
The best adhesive remover for window tint residue is an automotive-specific product designed to dissolve adhesive without damaging the glass or paint. Isopropyl alcohol and citrus-based cleaners can also be effective, but test them in an inconspicuous area first.
10.5. How can I prevent scratches when removing window tint?
To prevent scratches when removing window tint, use plastic scrapers instead of metal ones, use sharp razor blades designed for automotive use, and avoid applying too much pressure. Also, keep the window surface clean and lubricated with adhesive remover.
10.6. Can I remove window tint in cold weather?
Removing window tint in cold weather can be more challenging because the adhesive becomes brittle and difficult to soften. If you must remove tint in cold weather, use a heat gun to warm the window and adhesive before peeling.
10.7. How do I dispose of old window tint film?
Dispose of old window tint film responsibly by checking with your local waste management company for recycling options. If recycling is not available, wrap the film in plastic and dispose of it in your regular trash.
10.8. Is it worth hiring a professional to remove window tint?
Hiring a professional to remove window tint can be worth it if you value convenience, safety, and a guaranteed outcome. Professionals have the experience, tools, and expertise to remove tint quickly and efficiently without damaging your car’s windows.
10.9. Can I remove window tint from the inside of my car?
Yes, you can remove window tint from the inside of your car. This is often the easiest approach, as it allows you to work in a controlled environment. However, be careful not to damage your car’s interior when using tools and chemicals.
10.10. Where can I find more car care tips and advice?
You can find more car care tips and advice at CARS.EDU.VN, your trusted source for comprehensive automotive information. Visit our website for expert guides, product recommendations, and troubleshooting advice.
Have more questions about car care? Visit CARS.EDU.VN for expert answers and resources to help you maintain your vehicle in top condition!
At CARS.EDU.VN, we understand the challenges car owners face when maintaining their vehicles. Whether you choose the DIY route or opt for professional service, our goal is to empower you with the knowledge and resources you need to make informed decisions. Remember, a well-maintained car is not just a mode of transportation; it’s an investment in your safety and peace of mind.
Ready to take your car care knowledge to the next level? Explore CARS.EDU.VN today for in-depth guides, expert tips, and personalized recommendations to help you keep your vehicle running smoothly and looking its best!
For professional assistance, contact us at: 456 Auto Drive, Anytown, CA 90210, United States. Whatsapp: +1 555-123-4567. Visit our website: cars.edu.vn