Tinting your car windows is a fantastic way to enhance your vehicle’s aesthetics, increase driving comfort, and boost privacy. Beyond just adding a touch of cool style, window tinting offers practical benefits like reducing heat inside your car, protecting the interior from sun damage, and improving safety. If you’re looking to take on this project yourself, this comprehensive guide will walk you through each step of how to tint your car windows effectively.
Why You Should Tint Your Car Windows
Car window tinting provides a range of advantages that go beyond just looks. Here are some key reasons why tinting your car windows is a worthwhile upgrade:
- UV Ray Protection: Window tint acts as a shield against harmful ultraviolet (UV) rays from the sun. This protection helps to reduce the risk of skin damage and also prevents the car’s interior – particularly the seats and dashboard – from fading and cracking over time.
- Heat Reduction: By blocking solar heat, window tint can significantly lower the temperature inside your vehicle, especially during hot summer months. This makes your car more comfortable and reduces the need to blast the air conditioning, potentially saving fuel.
- Enhanced Privacy: Tinted windows make it more difficult for people to see inside your car, protecting your privacy and deterring potential theft by keeping valuables out of sight.
- Improved Aesthetics: Window tinting can dramatically improve the look of your car, giving it a sleek, custom appearance. Different shades and types of tint allow you to personalize your vehicle’s style.
- Safety Benefit: In the event of an accident, tinted windows can help hold shattered glass together, reducing the risk of injury to passengers from flying glass shards.
Preparing to Tint Your Windows: Essential Steps
Before you start applying tint, proper preparation is crucial for a successful outcome. Here’s what you need to do:
- Understand Local Tint Laws: ❗Crucially important!❗ Before purchasing any tint film, familiarize yourself with the window tint laws in your region or state. Regulations vary significantly and often specify limits on how dark window tint can be (usually measured as Visible Light Transmission or VLT). Exceeding legal tint limits can result in fines or the need to remove the tint. Always prioritize legal compliance to avoid issues.
- Choose the Right Type of Window Tint Film: There are various types of car window tint films available, including dyed, metalized, ceramic, and carbon films. Each type offers different benefits in terms of heat rejection, UV protection, and appearance. Research and select a tint film that meets your needs and preferences, considering factors like cost, durability, and performance.
- Gather All Necessary Tinting Supplies: To tint your car windows effectively, you’ll need to assemble the right tools and materials. This typically includes:
- High-Quality Glass Cleaner: For thoroughly cleaning the windows before application.
- Window Tint Film: Choose your desired type and shade, ensuring you have enough to cover all windows.
- Spray Bottle: For applying slip solution (tint gel mixed with water).
- Slip Solution/Tint Gel: This solution helps position the tint film and reduce friction during application.
- Squeegee: For smoothing out the tint film and removing air bubbles and excess solution.
- Razor Blade or Sharp Knife: For trimming the tint film precisely.
- Heat Gun (or Hair Dryer): To help shrink and conform the tint film to curved window surfaces and aid adhesion.
- Microfiber Cloths: For cleaning and wiping surfaces.
- Measuring Tape and Cutting Surface: For accurate film measurement and cutting.
Step-by-Step Guide: How to Apply Car Window Tint
Once you’ve prepared and gathered your supplies, follow these steps to tint your car windows:
Step 1: Thoroughly Clean the Car Window
Cleanliness is paramount for successful tint application. Any dirt or debris left on the window will be trapped under the tint, resulting in imperfections.
- Spray the inside of the window generously with a glass cleaner.
- Use a squeegee to thoroughly clean the glass, working from top to bottom and overlapping each stroke.
- For stubborn dirt or adhesive residue, carefully use a new razor blade at a shallow angle to gently scrape the surface. Be cautious not to scratch the glass.
- Wipe the window edges and seals clean with a microfiber cloth.
- Ensure the window is completely dry and free of any streaks or residue before proceeding. For optimal results, consider using a specialized automotive glass cleaner like BadBoys Glass Cleaner Foam.
Step 2: Measure and Cut the Window Tint Film
Accurate measuring and cutting of the tint film are crucial for a seamless fit.
- Position the tint film on the outside of the window (with the backing liner still on). The outside is used for measuring and shaping because it’s easier to access and trim.
- Leave a border of extra film around all edges of the window, approximately one to two inches. This excess allows for adjustments and precise trimming later.
- Using a sharp razor blade or knife, carefully cut the tint film to the approximate shape of the window. Follow the window’s edge as a guide, but remember to leave the extra border.
Step 3: Spray the Window with Slip Solution
The slip solution (tint gel diluted with water as per product instructions) is essential for allowing the tint film to be positioned and adjusted on the glass.
- Fill a spray bottle with the prepared slip solution.
- Liberally spray the inside of the cleaned car window, ensuring the entire surface is wet. The more solution, the easier it will be to move the film.
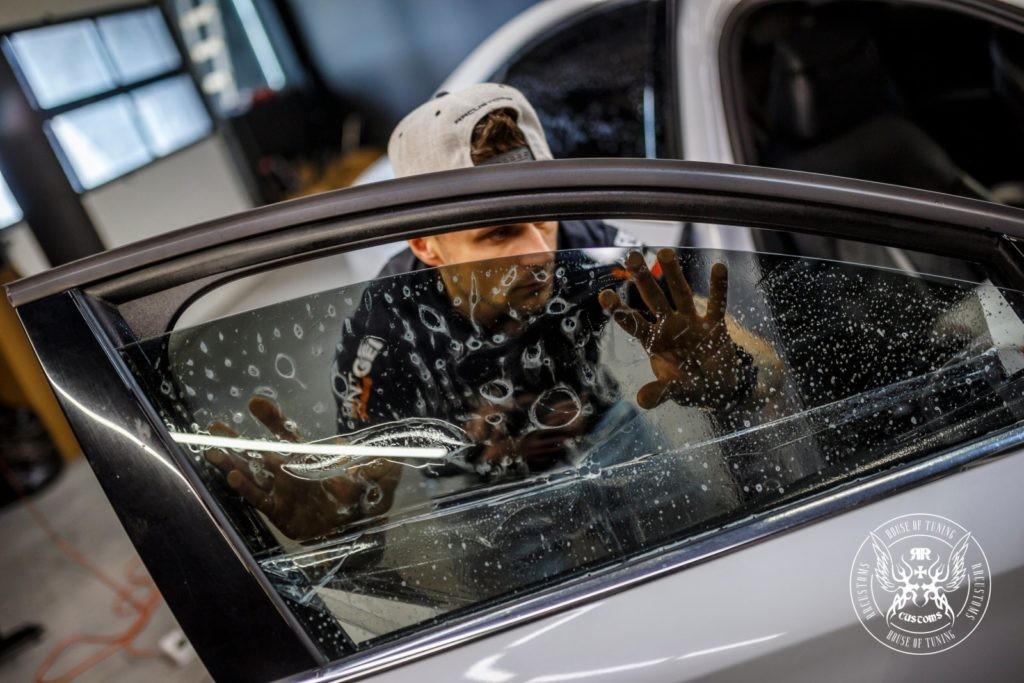
Step 4: Apply the Tint Film to the Window
This step requires care and patience.
- Carefully peel the backing liner away from the adhesive side of the tint film, starting from a corner. As you peel, spray the exposed adhesive side of the film with the slip solution. This prevents static cling and helps with positioning.
- Immediately apply the adhesive side of the tint film to the wet window surface. Start from the top edge of the window and gently align the film.
- Use your hands to roughly position the film on the window. Don’t worry about bubbles or wrinkles at this stage. The slip solution allows you to reposition the film as needed.
Step 5: Squeegee Out the Slip Solution and Trim the Film
Squeegeeing removes the slip solution and air bubbles, adhering the tint film to the window. Trimming creates a clean, finished edge.
- Working from the center of the window outwards, use a squeegee to firmly press out the slip solution and air bubbles. Overlap each squeegee stroke for complete coverage.
- Work your way to the edges of the window. Use firm, consistent pressure.
- Once most of the solution and bubbles are removed, use a sharp razor blade to carefully trim the excess film around the window edges. Leave a tiny gap (about 1/16 inch) between the tint and the window edge for a clean look and to prevent peeling.
- For curved window edges, you may need to use a heat gun (or hair dryer) on low heat to gently shrink the film and make it conform to the curve before trimming. Be careful not to overheat the film.
Step 6: Final Squeegee and Heat Setting
Ensure complete adhesion and a smooth finish.
- After trimming, perform a final squeegee pass over the entire tinted window to remove any remaining slip solution and ensure firm adhesion.
- Use a heat gun (or hair dryer) on low heat to gently heat the edges of the tinted window. This helps to activate the adhesive and ensures the edges are securely bonded, preventing lifting. Avoid overheating, which can damage the tint.
Step 7: Allow the Tint to Cure
Curing time is essential for the tint adhesive to fully set.
- ❗Important: Do not roll down your tinted windows for at least 24 to 72 hours after application.❗ This allows the tint to properly adhere to the glass and prevents premature peeling or damage.
- Avoid washing the inside of the tinted windows for at least a week to allow full curing.
Essential Tips for Achieving a Perfect Window Tint
To ensure your DIY window tint job looks professional and lasts, keep these tips in mind:
- Patience is Key: Window tinting requires patience and attention to detail. Don’t rush the process. Take your time with each step, especially during cleaning and squeegeeing.
- Practice Makes Perfect: If you’re new to window tinting, consider practicing on a smaller, less visible window first, like a rear side window. This will help you get a feel for handling the film and using the tools.
- Choose Quality Tint Film: Investing in a higher quality tint film will make the application process easier and provide better results in terms of appearance, heat rejection, and longevity.
- Work in a Clean Environment: Apply window tint in a clean, indoor space, away from direct sunlight and wind. This minimizes dust and debris contamination.
- Inspect for Bubbles: After application and during the curing period, regularly check your tinted windows for any remaining bubbles. Small bubbles may disappear as the tint cures, but larger bubbles should be addressed. Use a squeegee or a pin (for very tiny bubbles) to carefully work them out.
- Gentle Cleaning: Once the tint is fully cured, clean the inside of your tinted windows with a gentle, ammonia-free glass cleaner and a soft microfiber cloth. Avoid abrasive cleaners or paper towels that can scratch the tint.
- Re-check Local Laws: Before and after tinting, double-check your local tint laws to ensure compliance, especially if regulations have changed.
- Consider Professional Installation: If you’re uncomfortable with DIY or want guaranteed professional results, consider having your car windows tinted by a professional window tinting service. They have the expertise, tools, and environment to ensure a flawless application.
Don’ts to Remember When Tinting Car Windows
Avoid these common mistakes to ensure a successful and long-lasting tint job:
- Don’t Exceed Legal Tint Limits: Always adhere to your local window tint laws regarding VLT percentages.
- Don’t Roll Down Windows Too Soon: Wait the recommended curing time (at least 24-72 hours) before rolling down your tinted windows.
- Don’t Clean Windows Immediately After Application: Allow the tint to cure for at least a week before cleaning the inside of the tinted windows.
- Don’t Use Harsh Cleaners: Avoid ammonia-based glass cleaners or abrasive materials on tinted windows.
- Don’t Rush the Process: Take your time and be patient with each step for the best results.
Thank you for reading our guide on how to tint car windows. We hope this information empowers you to successfully tint your own vehicle windows or make an informed decision about professional tinting.
For all your car care and detailing needs, including high-quality window tint films and application tools, visit our online store: https://shop.rrcustoms.com/en/menu/wrap-tint-2767.html