Bringing home a Nuna PIPA car seat is a moment of relief, knowing your baby will travel safely and comfortably. However, babies are wonderfully messy, and car seats often bear the brunt of spills, spit-up, and unexpected accidents. If you’re wondering how to wash your Nuna PIPA car seat, you’re not alone. Many parents find themselves needing to clean their car seat to keep it fresh and hygienic. The good news is that cleaning your Nuna PIPA is surprisingly straightforward. Whether you have the PIPA, PIPA RX, PIPA URBN, or another model in the PIPA series, this guide will walk you through the process step-by-step, ensuring your car seat is clean and ready for your next journey. We’ll cover everything from disassembly to reassembly, making it a painless experience.
Step-by-Step Guide to Cleaning Your Nuna PIPA Car Seat
Let’s dive into how to get your Nuna PIPA car seat sparkling clean. For those who prefer visual guidance, we’ve also included video references to help you along the way.
Prefer a video guide? Here’s a video demonstrating how to clean the Nuna PIPA Car Seat:
[Link to Nuna PIPA Cleaning Video – Placeholder, consider embedding a relevant YouTube video if available and appropriate]
And here is a video specifically for cleaning the Nuna PIPA URBN, which has slight differences from other PIPA models:
[Link to Nuna PIPA URBN Cleaning Video – Placeholder, consider embedding a relevant YouTube video if available and appropriate]
Having personally used the Nuna PIPA RX with the RELX base for both my children, I can attest to its durability and user-friendly design. Its lightweight nature is a huge plus, and with consistent, simple cleaning, it has maintained its like-new condition.
Parenting is full of surprises, and unfortunately, many of those surprises can end up in the car seat. From minor spit-up incidents to major diaper blowouts, your car seat can quickly become a place you’d rather not think about. Fortunately, cleaning your Nuna PIPA car seat doesn’t have to be a daunting task.
In my experience, full washes of the car seat cover are not always necessary. For minor messes, especially in the early months when using the infant insert, spot cleaning and washing the infant insert and strap covers might suffice. However, for those inevitable bigger messes, removing and washing the entire cover is essential.
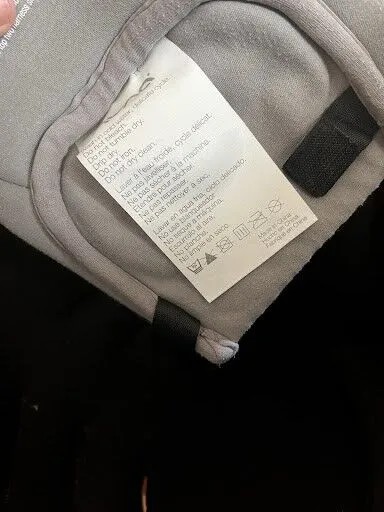
It’s worth noting that these instructions are broadly applicable across the Nuna PIPA range, including PIPA, PIPA RX, PIPA Lite, PIPA Lite R, Nuna PIPA Lite LX, PIPA Lite RX, and PIPA urbn. However, always double-check your car seat’s manual and the fabric care tags for model-specific instructions to ensure you’re following the best practices for your particular Nuna PIPA car seat.
A common question for new parents is whether you should pre-wash your Nuna PIPA car seat before first use. The answer is yes, it’s a good idea. Washing it before your baby’s first ride home from the hospital or birthing center is a recommended step.
Nuna car seats are GreenGuard certified and free from flame retardants, which is reassuring. If you didn’t manage to wash it beforehand, don’t worry! It’s just generally recommended to clean all baby items before their initial use.
Step One: Disassembling Your Nuna PIPA Car Seat for Washing
Let’s start by taking apart the Nuna PIPA car seat to prepare it for cleaning.
Begin by removing the infant insert. This is designed to be easily removable. The head support is attached with a Velcro strap, as shown below, and the lower insert simply slides out through the crotch buckle area.
Next, detach the shoulder straps. Each strap is secured with two snaps. Simply undo these snaps to release the straps.
The lower crotch buckle cover is fitted with a small tab that is threaded through the buckle. You’ll need to feed this tab through from the underside of the buckle to remove it. It might seem a bit tricky at first, but this design is actually quite beneficial. Unlike some car seats where the buckle cover easily falls off, the Nuna PIPA’s design ensures it stays in place, making the initial figuring-out process worthwhile.
Moving to the car seat cover, start from the bottom edge. Pull out the plastic edging that is tucked under the bottom rim of the car seat shell. Repeat this step for the top edge of the cover. You’ll also need to detach the Velcro that secures the cover to the canopy frame.
Begin to pull the cover upwards. You will then need to stretch the fabric around the strap release button, which is located at the front of the seat. This fabric might be a little taut the first few times you remove it.
Continue by feeding the bottom buckle strap through the cover. As you work your way upwards, you’ll encounter two more plastic clips to detach, and the canopy snaps on both sides of the car seat.
Turn the car seat over to access the back. Unhook the top ends of the shoulder straps from the metal claw-like fasteners.
Then, feed the top shoulder straps through the designated slots in the car seat shell.
Now, for what many find slightly challenging initially: the release buttons located near the canopy hinges. You’ll need to stretch the fabric of the cover over each of these buttons. This step requires a bit of pulling and tugging.
Finally, feed the metal buckle and the plastic chest clip through the bottommost hole in the main cover. You might need to orient the plastic buckle vertically to get it to fit through the opening.
If you also want to wash the canopy fabric, it’s easily removable as well. Simply locate the small plastic button at the base of the canopy on both sides, press them, and pull the canopy frame out. The fabric will then slide off the frame, ready to be washed with the rest of the car seat fabrics.
Step Two: Washing the Nuna PIPA Car Seat Fabrics
With all the fabric components removed, you’re now ready to wash them. Nuna’s official website recommends washing the Nuna PIPA car seat fabrics on a delicate cycle using a mild detergent. It’s also important to note that dry cleaning any Nuna products is not advised. For detergent, I personally recommend brands like Molly’s Suds or Branch Basics, known for their gentle yet effective cleaning power. Interestingly, many “baby” branded laundry detergents aren’t always the safest or gentlest options for your baby’s sensitive skin.
Set your washing machine to a delicate cycle with cold water. Once the wash cycle is finished, it’s crucial to air dry all the fabrics. You can use a drying rack, or if you don’t have one, kitchen chairs work just as well. I usually let the car seat fabrics air dry overnight to ensure they are completely dry before reassembling the car seat.
Step Three: Cleaning the Car Seat Shell and Harness Straps
For cleaning the hard parts of the car seat—the shell, harness straps, and buckles—avoid submerging them in water or using harsh chemicals. The best approach is to use a damp cloth. For tougher spots, you can use a mild all-purpose cleaner like Branch Basics cleaner and wipe down the surfaces with paper towels or a microfiber cloth. If you’re dealing with crumbs or dry debris, especially if you have an older baby who snacks in the car, a handheld vacuum cleaner, like the Shark handheld vacuum, is incredibly useful for quick cleanups. I’ve been using this type of vacuum for years and highly recommend it for car seat maintenance. And yes, sometimes even the family dog can be a surprisingly effective pre-cleaner!
The most important rule to remember when cleaning any part of the Nuna PIPA car seat is to never use bleach or harsh chemicals. These can damage the car seat materials and compromise its safety integrity.
Step Four: Cleaning the Nuna PIPA Base
Cleaning the car seat base is also simple. You can use a damp cloth or a mild soapy solution (again, Branch Basics All-Purpose cleaner works well). For removing crumbs and loose dirt, a handheld vacuum is very effective. You don’t need to detach the base from your car to clean it; just ensure it’s stable while you’re wiping it down.
Step Five: Reassembling the Nuna PIPA Car Seat
Once all the washed fabrics are completely air-dried, you’re ready to put your Nuna PIPA car seat back together.
Start by positioning the main cover over the car seat shell. Begin at the bottom, securing the plastic pieces by clipping or tucking them into their respective slots along the bottom edge. Then, gradually work your way up the car seat.
Turn the car seat to the front again and maneuver the fabric padding around the strap release button. This can be a bit fiddly the first time, but it becomes easier with practice. If you’re struggling, it might be helpful to start with this step before tucking in the bottom plastic edges, allowing you more flexibility to focus on fitting the fabric around the button. Feed the crotch buckle through the correct hole in the cover. For newborns, you’ll likely use the innermost hole, closest to where the baby will sit.
Thread the top shoulder straps through the appropriate slots in the cover. Remember to pass the chest clip sideways to fit it through the entry holes. If you have a newborn, you’ll likely use the lowest strap settings. If you’re adjusting for an older child, it’s a good idea to note the previous strap height setting on both the back of the car seat and the cover before disassembly to ensure you reassemble it correctly.
Flip the car seat over again and reconnect the shoulder straps to the metal claw fasteners at the back. Ensure the straps are not twisted and are correctly positioned under the metal bars.
Turn the car seat back to the front and continue reassembling by fitting the fabric cover around the two release buttons near the canopy hinges. You’ll probably need to stretch the fabric a bit to get it to fit over these buttons—this also becomes easier with repetition. Then, reattach any clips under the car seat that you detached earlier.
Lastly, tuck the plastic edge of the cover into the top section of the car seat shell to secure the upper part of the cover.
If you washed the canopy, slide the front edge of the canopy fabric through the plastic piece on the canopy frame and then clip the canopy back onto the car seat frame. It should slide on smoothly and easily.
Reattach the snaps on both sides of the canopy to fully secure it.
Finally, stretch the canopy fabric upwards to the top of the canopy frame and re-engage the Velcro to fasten it in place.
For the final touches, reattach the covers for the shoulder straps and the crotch buckle. The crotch buckle cover has a ribbon that needs to be threaded through the buckle, and the shoulder strap covers simply snap back on. Ensure the snaps on the shoulder strap covers are positioned away from your baby’s neck for comfort.
Now, replace the infant inserts if your baby still uses them, and your Nuna PIPA car seat is clean, fresh, and ready for use. While it might seem like a lot of steps initially, you’ll become much quicker at it after doing it just once or twice. I hope this guide has been helpful! For more parenting tips and product reviews, you can find me on YouTube and Instagram!
If you’re also a Nuna stroller owner, you might find my review of the Nuna Stroller Cup Holder useful as well.
Frequently Asked Questions About Washing the Nuna PIPA Car Seat (FAQ)
Can I machine wash the Nuna PIPA car seat cover?
Yes, the Nuna PIPA car seat cover is indeed machine washable. It’s important to use a gentle detergent, select a delicate wash cycle, and use cold water to protect the fabric and integrity of the cover.
Can I use any detergent to clean my Nuna PIPA car seat fabrics?
No, it’s crucial to use a mild detergent when washing your Nuna PIPA car seat fabrics. Avoid using harsh chemicals, bleach, or strong detergents as these can damage the materials of the car seat. Mild options like Molly’s Suds are recommended.
How often should I clean my Nuna PIPA car seat?
Regular cleaning of your car seat is recommended to prevent the buildup of dirt, grime, and bacteria over time. Plus, let’s face it, babies can be messy, so cleaning your car seat regularly helps maintain a hygienic environment for your child.
Can I remove the infant insert from the car seat for washing?
Yes, the infant insert of the Nuna PIPA car seat is designed to be removed and washed separately. Always refer to the manufacturer’s instructions for specific guidance on cleaning the infant insert.
Is it okay to use a dryer to dry the car seat cover after washing?
No, it is not recommended to put the Nuna PIPA car seat cover in a dryer. High heat can damage the fabric and potentially shrink or warp the cover. Instead, always air dry the cover by hanging it or laying it flat to dry.
