Upgrading your car’s sound system can dramatically improve your driving experience, turning mundane commutes into immersive audio journeys. However, the heart of any high-performance car audio system lies in its wiring. Knowing How To Wire Car Sound System components correctly is crucial for optimal performance, longevity, and safety. Improper wiring can lead to diminished sound quality, system malfunctions, or even dangerous electrical issues. This comprehensive guide will walk you through the essential dos and don’ts of car audio wiring, ensuring your installation is both professional and reliable.
The Do’s of Car Audio Wiring: Best Practices for Success
1. Meticulously Plan Your Wiring Layout
- Do: Before you even pick up a wire, create a detailed plan. Sketch out a wiring diagram that clearly illustrates the location of each component—head unit, amplifiers, speakers, subwoofers—and how they will interconnect. Consider the routes your wires will take throughout the vehicle, noting any potential obstacles or areas requiring extra protection.
- Reason: A well-thought-out wiring layout is the foundation of a successful installation. It not only ensures a clean and organized final product but also minimizes potential problems down the line. Planning prevents haphazard wiring, reduces the risk of errors, and simplifies troubleshooting should any issues arise. Knowing your wire paths beforehand also allows you to accurately estimate the length of wire needed, saving time and cost.
2. Invest in High-Quality Wiring and Components
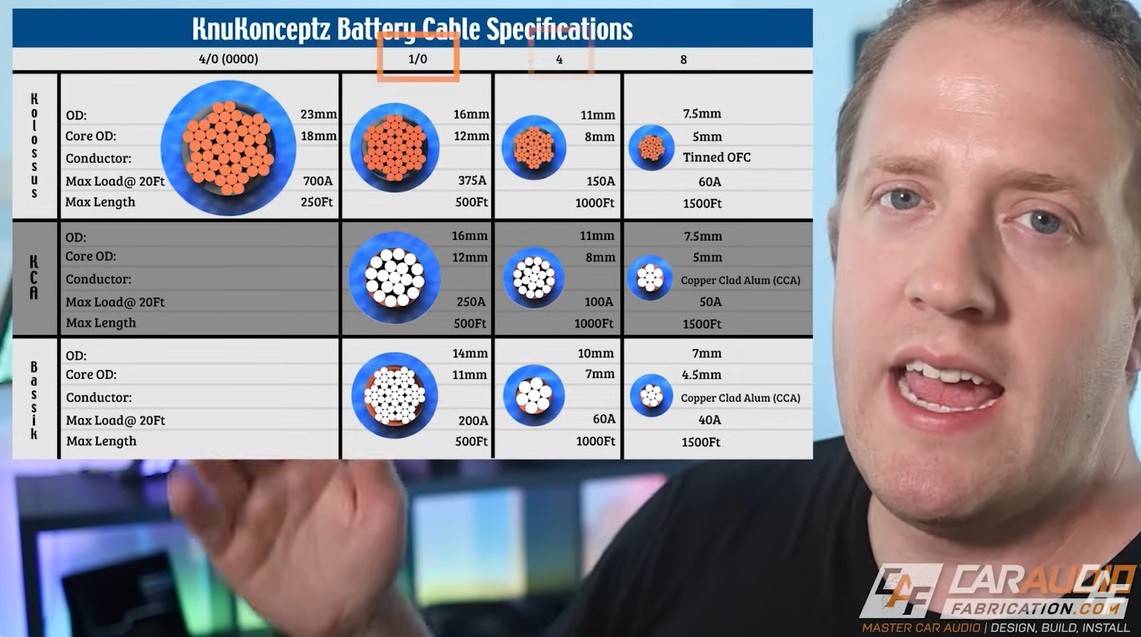
- Do: Don’t compromise on quality when it comes to wiring, connectors, and other essential components. Opt for oxygen-free copper (OFC) wires for power, ground, and speaker connections. For signal transmission, use shielded RCA cables to minimize interference.
- Reason: The quality of your wiring directly impacts the performance and lifespan of your car audio system. High-quality materials like OFC offer superior conductivity, meaning less power loss and a cleaner signal transfer. OFC wires are also more resistant to corrosion and fatigue, ensuring long-lasting reliability compared to cheaper alternatives like copper-clad aluminum (CCA). While CCA might seem cost-effective initially, its inferior conductivity and durability can lead to performance issues and the need for premature replacement.
3. Accurately Size Your Wires with the Correct Gauge
- Do: Selecting the correct wire gauge (AWG – American Wire Gauge) is paramount. Use thicker gauge wires for power and ground connections, especially for high-power amplifiers. Refer to amplifier manufacturer recommendations and wire gauge charts based on amperage and wire length. Speaker wires also need to be appropriately sized for the power they will carry to prevent signal degradation.
- Reason: Undersized wires are a common cause of problems in car audio systems. They can lead to significant voltage drops, meaning your components don’t receive the power they need to operate efficiently. This can result in weak output, distortion, overheating wires, and even damage to your equipment. Using the correct gauge ensures efficient power delivery and prevents potential hazards.
4. Protect Your System with Proper Fusing
- Do: Install fuses as close as possible to the car battery on every power wire leading to your amplifiers and other powered components. Choose fuses with a rating slightly higher than the component’s maximum current draw.
- Reason: Fuses are your car audio system’s first line of defense against short circuits and electrical overloads. They are designed to blow and break the circuit if excessive current flows through them, preventing fires, damage to your car’s electrical system, and harm to your audio equipment. Proper fusing is not just about performance; it’s about safety.
5. Establish Solid Grounding Points
- Do: Ground all components to a clean, bare metal surface on the car’s chassis. Choose grounding points that are as close as possible to the components being grounded and free from paint, rust, or corrosion. Sand down the area to ensure a direct metal-to-metal contact.
- Reason: A robust and clean ground connection is essential for minimizing noise and ensuring the reliable operation of your car audio system. Poor grounding is a major contributor to ground loops, which manifest as unwanted hums, hisses, or engine noise coming through your speakers. A good ground provides a stable reference point for electrical signals, reducing interference and optimizing sound quality.
6. Isolate Power and Signal Wires
- Do: Physically separate power wires from low-level signal cables (RCA cables) throughout your installation. Run them on opposite sides of the vehicle whenever feasible. If they must cross, do so at a 90-degree angle to minimize electromagnetic interference.
- Reason: Power wires carry significant electrical current, which can generate electromagnetic fields. If signal wires run parallel and close to power wires, these fields can induce noise into the audio signal, leading to unwanted static, buzzing, or distortion. Keeping them separated is a fundamental technique for achieving a clean and noise-free audio signal.
7. Secure and Protect Wires Effectively
- Do: Use zip ties, wire loom (split tubing), and grommets to secure and protect all wiring runs. Route wires away from sharp edges, heat sources (like the engine or exhaust), and moving parts (seat tracks, pedals). Use grommets when passing wires through metal panels to prevent chafing and shorts.
- Reason: Properly securing and protecting wires is crucial for both safety and longevity. Loose wires can vibrate, chafe against metal, or get caught in moving parts, leading to damage, short circuits, and potential system failures. Wire loom provides a protective layer against abrasion and heat, while grommets prevent wires from being cut or damaged at panel pass-through points. Organized and secured wiring also contributes to a cleaner, more professional-looking installation.
8. Clearly Label Every Wire
- Do: Label both ends of every wire run with its function (e.g., “Amp Power,” “Front Left Speaker +,” “Head Unit Ground”). Use wire labels or masking tape and a permanent marker.
- Reason: Labeling might seem tedious during installation, but it’s an invaluable practice for future troubleshooting, upgrades, or system modifications. When problems arise, or if you decide to make changes later, clear labels allow you to quickly identify each wire’s purpose without having to trace them, saving significant time and frustration.
9. Employ Soldered Connections for Reliability
- Do: Whenever possible, especially for speaker wire splices and RCA connections, opt for soldering connections. Ensure clean solder joints and proper insulation afterward.
- Reason: Soldered connections are the gold standard for electrical conductivity and mechanical strength in car audio wiring. They provide a permanent, low-resistance connection that is highly resistant to corrosion and vibration, common issues in automotive environments. Soldered connections are far more reliable than crimp connectors, which can loosen over time or develop corrosion, leading to signal loss or intermittent problems.
10. Insulate Connections with Heat Shrink Tubing
- Do: After soldering or making any bare wire connections, use heat shrink tubing to insulate them. Choose heat shrink tubing that is appropriately sized for the wire gauge and connection.
- Reason: Heat shrink tubing provides a clean, professional, and highly effective insulation for wire connections. It shrinks tightly around the connection when heated, creating a secure, moisture-resistant seal that protects against short circuits, corrosion, and physical damage. Heat shrink tubing enhances both the reliability and appearance of your wiring.
11. Thoroughly Test Before Final Assembly
- Do: Before buttoning up panels and completing the final assembly, thoroughly test your entire car audio system. Power it on, check all speakers for output, and listen for any distortion, noise, or imbalances. Test all functions of your head unit and amplifiers.
- Reason: Testing before final assembly is a crucial step that can save you significant time and effort. It allows you to identify and rectify any wiring errors or component malfunctions while everything is still accessible. Catching a mistake at this stage is far easier than having to disassemble parts of your interior later to troubleshoot.
12. Adhere to Manufacturer Guidelines
- Do: Always consult and follow the installation instructions and recommendations provided by the manufacturers of your car audio components. Pay close attention to wiring diagrams, impedance matching, and recommended settings.
- Reason: Manufacturers design their products to work optimally within specific parameters. Adhering to their guidelines ensures that you are using the correct wiring techniques, settings, and configurations for your specific components. This maximizes performance, ensures compatibility, and can be critical for maintaining warranties.
The Don’ts of Car Audio Wiring: Mistakes to Avoid
1. Don’t Use Undersized Wiring
- Don’t: Never use wires that are too thin or have an insufficient gauge for the current demands of your audio components, especially amplifiers.
- Reason: Undersized wires are a major cause of voltage drops, which starve your components of power, leading to weak performance, distortion, overheating, and potential damage or fire hazards. Always err on the side of using a slightly larger gauge wire than calculated to ensure adequate power delivery.
2. Don’t Overload Existing Vehicle Circuits
- Don’t: Avoid tapping into pre-existing circuits in your car, such as headlight or ignition circuits, to power your audio components.
- Reason: Car circuits are designed to handle specific loads. Overloading them by adding power-hungry audio equipment can cause circuit failures, blown fuses, damage to your vehicle’s electrical system, and even create fire risks. Always run dedicated power wires directly from the battery for amplifiers and other high-current components, using appropriate fuses.
3. Don’t Neglect Proper Grounding
- Don’t: Never underestimate the importance of a solid, clean ground connection. Avoid grounding components to painted surfaces, plastic, or different points on the chassis without careful consideration.
- Reason: Poor or inconsistent grounding is a primary source of noise and interference in car audio systems. Multiple ground points can create ground loops, leading to audible hums and engine noise. A poor ground connection can also cause components to malfunction or perform erratically.
4. Don’t Route Wires Carelessly
- Don’t: Avoid running wires haphazardly across sharp edges, near hot components, or in areas where they can be pinched, crushed, or damaged by moving parts.
- Reason: Careless wire routing is a recipe for future problems. Damaged wires can lead to short circuits, system failures, intermittent issues, and even safety hazards like fires. Always take the time to route wires neatly and protect them from potential damage.
5. Don’t Use Inadequate Wire Connectors Like T-Taps or Scotch Locks
- Don’t: Avoid using low-quality or unreliable wire connectors such as T-taps or Scotch locks for splicing wires.
- Reason: These types of connectors often create weak and unreliable connections that can loosen over time due to vibration and temperature changes in a vehicle. They are prone to corrosion and can lead to intermittent signal loss or complete connection failure. Soldering or high-quality crimp connectors are far superior and more reliable choices.
6. Don’t Disregard Speaker Impedance Compatibility
- Don’t: Never connect speakers with an impedance rating that is too low for your amplifier to handle.
- Reason: Mismatched speaker impedance can put excessive strain on your amplifier. Connecting speakers with too low impedance can cause the amplifier to overheat, go into protection mode (shut down), or even suffer permanent damage. Always ensure that your speaker impedance is within the amplifier’s recommended operating range.
7. Don’t Bundle Power and Signal Wires Together
- Don’t: Avoid running power wires and signal (RCA) cables in close proximity or bundling them together, even if they are within wire loom.
- Reason: Bundling power and signal wires increases the risk of electromagnetic interference. Power wires can induce noise into the sensitive audio signals carried by RCA cables, degrading sound quality. Maintain physical separation to minimize this risk.
8. Don’t Ignore Potential Voltage Drops
- Don’t: Don’t overlook the potential for voltage drops, especially in long power wire runs or when using high-current components like powerful amplifiers.
- Reason: Voltage drops can significantly reduce the power available to your audio components, leading to underperformance or even system shutdowns. Use appropriately sized wires, minimize wire lengths where possible, and consider upgrading your vehicle’s electrical system (e.g., battery, alternator) if necessary for very high-power systems.
9. Don’t Neglect Ventilation for Heat-Generating Components
- Don’t: Avoid installing amplifiers and other heat-generating components in enclosed, poorly ventilated spaces.
- Reason: Amplifiers generate heat during operation. Insufficient ventilation can lead to overheating, causing thermal shutdowns, reduced performance, and potentially permanent damage to the components. Ensure adequate airflow around amplifiers and other heat-sensitive equipment to maintain safe operating temperatures.
10. Don’t Assume Fuse Ratings Are Interchangeable
- Don’t: Never use just any fuse you find lying around. Always match the fuse rating to the current draw requirements of the connected component and the wire gauge used.
- Reason: Incorrect fuse ratings compromise the protection of your system. A fuse with too high a rating won’t blow when it should, failing to protect against overcurrent conditions. A fuse with too low a rating will blow prematurely and frequently, causing unnecessary disruptions.
11. Don’t Overlook Connector Quality
- Don’t: Avoid using cheap, low-quality connectors for any part of your car audio wiring, including power, ground, speaker, and signal connections.
- Reason: Low-quality connectors are often made from inferior materials that can lead to poor conductivity, corrosion, and eventual connection failures. Invest in high-quality connectors that are designed for automotive environments to ensure reliable performance and longevity.
12. Don’t Forget to Check for Short Circuits Before Powering Up
- Don’t: Never skip the crucial step of checking for shorts in your wiring with a multimeter before applying power to the system for the first time.
- Reason: Short circuits can cause significant damage to your components, blow fuses immediately, or even start a fire. Checking for shorts with a multimeter is a vital safety precaution that can prevent costly repairs and potential hazards.
Conclusion: Wiring Your Way to Superior Sound
Mastering how to wire car sound system components correctly is an investment in audio quality, system reliability, and vehicle safety. By diligently following these do’s and meticulously avoiding the don’ts, you can confidently install a car audio system that delivers exceptional sound for years to come. From meticulous planning and using quality materials to securing connections and prioritizing safety, every step in the wiring process contributes to the final result. Take your time, pay attention to detail, and enjoy the rewarding experience of a professionally wired and outstanding sounding car audio system.