Are you a fan of the Disney Pixar movie “Cars” and love to crochet? Then you’re in for a treat! We’re excited to share a free crochet pattern to create your very own Lightning Mcqueen Car. This fun and engaging project is perfect for intermediate crocheters looking to bring their favorite movie character to life. Get ready to rev up your crochet hooks and create a charming Lightning McQueen that’s sure to delight kids and “Cars” enthusiasts of all ages!
This pattern is presented in two parts, and today we’re focusing on building the basic car structure – Part 1. For a visual guide, be sure to check out the accompanying video tutorial on our YouTube channel. Let’s get started on crafting this iconic race car!
***Watch the video:
PATTERN NOTES:
This Lightning McQueen car pattern is an advanced project, and while it hasn’t been tested a second time yet, we’ve strived to make the instructions as clear and easy to follow as possible. Intermediate crocheters should find this project achievable with careful attention to the instructions. We encourage you to take your time and enjoy the process of bringing this beloved character to life, stitch by stitch.
Materials You’ll Need:
To crochet your Lightning McQueen car, gather these materials:
Himalaya Dolphin Baby (HDB): (Bulky/Weight 5 yarn)
- Red No. 318: 3 skeins (Main color for Lightning McQueen’s body)
- Dark Grey No. 320: 2 skeins (For windows and PVC pipe tubes)
- White No. 301: 1 skein (For the front windshield)
- Black No. 311: 1 skein (For tires and details)
Yarn Art Jeans (YAJ): (Sport/Weight 2 yarn)
- Black and Blue: Small amount (For the car’s eyes)
- White: Small amount (For the car’s headlights)
- Dark Grey: Small amount (For the small lightning bolt details)
- Black: Small amount (For edging the lightning bolt)
Madame Tricote Paris – Merino Gold Batik No. 835: (Fingering/Weight 1 yarn)
- 1 skein (For the flame details – or use colors of your choice)
Crochet Hooks:
- 4 mm hook: For Himalaya Dolphin Baby yarn (main car body)
- 2 mm hook: For YarnArt Jeans and Madame Tricote yarn (details and smaller parts)
- 2.5 mm hook: For the number “95” on top (to make them slightly larger)
Additional Supplies:
- Thick Felt (4 mm thickness): Dark grey for the car bottom, black for the wheels; Size approximately 16 cm x 40 cm (adjust to fit your car size)
- PVC Pipe: 20 mm diameter, 8 cm long (for structural support)
- Electrical Tape: To wrap around the PVC pipe ends for safety
- Tapestry Needle: For sewing pieces together and weaving in ends
- Stitch Markers: Or pieces of yarn to mark specific points
- Stuffing: Fiberfill to give your car shape
- Scissors: For cutting yarn and felt
- Felting Needle: For attaching felt details
- Yellow Felting Wool: For the “Rust-eze” lettering on the hood
Finished Size of the Toy:
- Length: Approximately 45 cm / 17.72 inches
- Height: Approximately 20 cm / 7.87 inches
CROCHET ABBREVIATIONS (US Terms):
- st = stitch
- sl st = slip stitch
- ch = chain
- tch = turning chain (at the end of a row)
- sc = single crochet
- inc = increase (2 sc in one st)
- dec = decrease (sc2tog – single crochet two together)
- (..) = repeat the pattern within parentheses a specific number of times
- [..] = total number of stitches in the round/row
- rnd = round
- R = row(s)
- BLO = back loop only
- FLO = front loop only
- color – change to the specified yarn color
Part 1: Basic Car Body Crochet Pattern
Let’s start crocheting the main body parts of our Lightning McQueen car. Follow these detailed instructions for each section.
TOP PART
First, we’ll crochet the red CAR HOOD.
Yarn: Red HDB
Hook: 4mm
Work in rows. Chain 1 at the end of each row to turn, unless otherwise noted.
Row 1: Ch 27, starting in the 2nd ch from the hook, sc in each ch across [26 sts]
Rows 2-38: Sc in each st across [26 sts]
Now, switch to white yarn to create THE WINDSHIELD section.
Yarn: White HDB
Hook: 4mm
Row 39: White, BLO sc in each st across [26 sts]
Row 40: Dec, sc 22, dec [24 sts]
Row 41: Sc in each st across [24 sts]
Row 42: Dec, sc 20, dec [22 sts]
Row 43: Sc in each st across [22 sts]
Row 44: Dec, sc 18, dec [20 sts]
Row 45: Sc in each st across [20 sts]
Row 46: Dec, sc 16, dec [18 sts]
Change back to red yarn to crochet THE ROOF section.
Yarn: Red HDB
Hook: 4mm
Row 47: Red, BLO sc in each st across [18 sts]
Rows 48-66: Sc in each st across [18 sts]
Switch to grey yarn for THE BACK WINDOW section.
Yarn: Grey HDB
Hook: 4mm
Row 67: Grey, BLO sc in each st across [18 sts]
Rows 68-78: Sc in each st across [18 sts]
Change back to red yarn for THE TRUNK section.
Yarn: Red HDB
Hook: 4mm
Row 79: Red, BLO sc in each st across [18 sts]
Rows 80-85: Sc in each st across [18 sts]
Row 86: Sc in each st across [18 sts], ch 5
Row 87: Starting in the 2nd ch from the hook, sc 4 in chains, sc in each st across [18 sts], ch 5
Row 88: Starting in the 2nd ch from the hook, sc 4 in chains, sc in each st across [22 sts] [26 sts]
Rows 89-90: Sc in each st across [26 sts]
Row 91: Dec, sc 22, dec [24 sts]
Row 92: FLO, Inc, sc 22, inc [26 sts] (This row creates a folding line for a sticking part later)
Rows 93-96: Sc in each st across [26 sts]
Row 97: BLO, Inc, sc 24, inc [28 sts]
Row 98: Sc in each st across [28 sts]
Row 99: Inc, sc 26, inc [30 sts]
Rows 100-108: Sc in each st across [30 sts]
(Note: Rows 103-108 were added after the initial photos were taken to slightly extend the trunk length.)
SIDE (Make 2)
Now, we’ll crochet the side panels of the Lightning McQueen car. Make two of these, as they are for both the left and right sides.
Yarn: Red HDB
Hook: 4mm
Work in rows from top to bottom. Chain 1 at the end of each row to turn.
Row 1: Ch 67, starting in the 2nd ch from the hook, sc in each ch across [66 sts]
Row 2: Sc in each st across [66 sts]
From the 3rd row, we’ll divide the stitches into three sections using markers: 24 sc (front fender – Part I), 28 sc (doors – Part II), 14 sc (back fender – Part III).
PART I: Front Fender
Yarn: Red HDB
Hook: 4mm
Row 3: Inc, sc 4 [6 sts]
Row 4: Sc in each st across [6 sts]
Row 5: Inc, sc 3, dec [6 sts]
Row 6: Sc in each st across [6 sts]
Row 7: Inc, sc 3, dec [6 sts]
Rows 8-10: Sc in each st across [6 sts]
Row 11: Dec, sc 3, inc [6 sts]
Row 12: Sc in each st across [6 sts]
Row 13: Sc 5, inc [7 sts]
Row 14: Sc in each st across [7 sts]
PART II: Doors
Yarn: Red HDB
Hook: 4mm
Skip 10 stitches from Part I and Part III (marked with pins). Join yarn at the stitch marked with the pink marker.
Row 3: Sc in each of the next 32 sts [32 sts]
Row 4: Dec, sc 28, dec [30 sts]
Row 5: Sc in each st across [30 sts]
Row 6: Dec, sc 26, dec [28 sts]
Row 7: Sc in each st across [28 sts]
Row 8: Dec, sc 24, dec [26 sts]
Row 9: Sc in each st across [26 sts]
Row 10: Dec, sc 22, dec [24 sts]
Rows 11-14: Sc in each st across [24 sts]
PART III: Back Fender
Yarn: Red HDB
Hook: 4mm
Start on the wrong side from the edge.
Row 3: Sc in each of the next 10 sts [10 sts]
Row 4: Dec, sc 8 [9 sts]
Row 5: Sc in each st across [9 sts]
Row 6: Dec, sc 7 [8 sts]
Row 7: Sc in each st across [8 sts]
Row 8: Dec, sc 4, dec [6 sts]
Row 9: Dec, sc 4 [5 sts]
Row 10: Dec, sc 1, dec [3 sts]
Row 11: Dec, sc 1 [2 sts]
After completing the sides, we’ll add additional rows to raise the back section.
Additional Rows for Back Height (Both Sides)
Yarn: Red HDB
Hook: 4mm
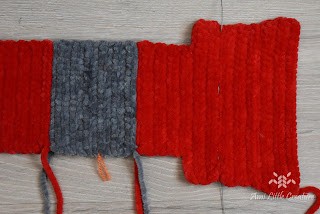
Start at the point near the windshield (marked by the brown yarn marker in the photo).
Row 1: Sc 42, ch 1, turn [42 sts]
Row 2: Sc 22, sl st, do not ch, turn
Row 3: Skip the first st, sc 21, ch 1, turn
Row 4: Inc, sc 13, sl st, do not ch, turn
Row 5: Skip the first st, sc 14, ch 1, turn
Row 6: Sc 8, sl st. Fasten off and cut yarn.
Repeat these additional rows on the other side panel, starting from the wrong side near the windshield.
Joining Top and Sides
Now, we’ll join the top part of the car with the side panels (Parts I and III of the sides, leaving out the middle door section for now). Use slip stitches on the wrong side to create a neat seam.
To ensure proper alignment, find common points for joining. Count 14 rows from the front of the side panel (Part I) and the hood to find the first joining point. Use safety pins to temporarily hold these points together.
For the back part, align the center of the back window with the middle “stair” step of Part III on the side panel.
SIDE WINDOW
Now we will crochet the side windows for our Lightning McQueen car.
Window for the Left Side
Yarn: Grey HDB
Hook: 4mm
Join yarn at the common point where the side (Part III) meets the back of the car (orange yarn marker in photos).
Row 1: BLO, sc 28, ch 1, turn.
Row 2: Dec, sc 24, sl st (leave last st unworked), do not ch, turn [26 sts]
Row 3: Skip first st, sc 25, ch 1, turn
Row 4: Dec, sc 21, sl st (leave last st unworked), do not ch, turn [23 sts]
Row 5: Skip first st, sc 22, ch 1, turn
Row 6: Dec, sc 18, sl st (leave last st unworked), do not ch, turn [20 sts]
Row 7: Skip first st, sc 19, ch 1, turn
Row 8: Dec, sc 15, sl st [17 sts]
Now, join the edge of the window to the roof. In the last row of the window, there are 17 sts. Count 17 sts from the beginning of the roof and mark the point for joining.
Join with single crochet stitches from right to left, moving upwards towards the windshield (segment “a” to “b”). Adjust the number of stitches along segment “a” to match the diagonal edge of the window and roof. You may need to insert the hook twice into the same stitch to align correctly.
Join segment “c” at the front of the windshield to create a clean seam.
Window for the Right Side
Yarn: Grey HDB
Hook: 4mm
Start on the wrong side, mirroring the left side window, and work in FLO. The pattern is the same as for the left side window.
Join the Trunk Parts
Yarn: Red HDB
Hook: 4mm
Join the trunk parts using slip stitches along the folding line created in Row 92 of the Top Part.
WHEEL ARCH
Next, we’ll crochet the wheel arches for our Lightning McQueen car.
Front Stripe (Make 2)
Yarn: Dark Grey HDB
Hook: 4mm
Row 1: Ch 7, starting in the 2nd ch from the hook, sc in each ch across [6 sts]
Rows 2-34: Sc in each st across [6 sts]
Back Stripe (Make 2)
Yarn: Dark Grey HDB
Hook: 4mm
Row 1: Ch 7, starting in the 2nd ch from the hook, sc in each ch across [6 sts]
Rows 2-31: Sc in each st across [6 sts]
Join the wheel arches to the sides of the car using red HDB yarn and single crochet stitches.
THE WHEEL (Make 4)
Let’s crochet the wheels for our Lightning McQueen car. You will need to make four wheels.
Yarn: Red and Black HDB
Hook: 4mm
Start with red HDB. Stuff as you crochet and prepare felt inserts (approx. 10cm diameter) to add inside.
Rnd 1: 6 sc in a magic ring [6 sts]
Rnd 2: Inc in each st around [12 sts]
Rnd 3: (Sc 1, inc) repeat 6 times [18 sts]
Rnd 4: (Sc 1, inc, sc 1) repeat 6 times [24 sts]
Rnd 5: (Sc 3, inc) repeat 6 times [30 sts]
Rnd 6: Sc in each st around [30 sts]
Change to black yarn.
Rnd 7: Black, (Sc 2, inc, sc 2) repeat 6 times [36 sts]
Rnd 8: (Sc 5, inc) repeat 6 times [42 sts]
Rnd 9: (Sc 3, inc, sc 3) repeat 6 times [48 sts]
Rnd 10: BLO, sc in each st around [48 sts]
Rnds 11-12: Sc in each st around [48 sts]
Rnd 13: BLO, (Sc 3, dec, sc 3) repeat 6 times [42 sts]
Add felt insert and continue stuffing firmly.
Rnd 14: (Sc 5, dec) repeat 6 times [36 sts]
Rnd 15: (Sc 2, dec, sc 2) repeat 6 times [30 sts]
Change to red yarn (or continue with black if preferred).
Rnd 16: Red, (Sc 3, dec) repeat 6 times [24 sts]
Rnd 17: (Sc 2, dec) repeat 6 times [18 sts]
Rnd 18: (Sc 1, dec) repeat 6 times [12 sts]
Rnd 19: Dec in each st around [6 sts]
Rnd 20: Dec 3 times [3 sts] Fasten off and close the remaining opening.
Pin the wheels to the dark grey wheel arches.
Chain 14 between both sides to maintain shape and measure for the PVC pipe placement between the wheels (approximately 8cm pipe length).
THE TUBE FOR PVC PIPE (Make 2)
We will now create tubes to hold the PVC pipe, providing structure to our Lightning McQueen car. Make two tubes.
Yarn: Dark Grey HDB
Hook: 4mm
The PVC pipe should be 2 cm in diameter and 8 cm long.
Rnd 1: 6 sc in a magic ring [6 sts]
Rnd 2: Inc in each st around [12 sts]
Rnds 3-16: Sc in each st around [12 sts]
Insert the PVC pipe into the tube.
Rnd 17: Dec in each st around [6 sts] Fasten off and close the opening.
Sew the tubes with PVC pipes to the wheels for structural support.
THE BOTTOM PART
Finally, we’ll crochet the bottom part of the Lightning McQueen car using dark grey yarn.
Yarn: Dark Grey HDB
Hook: 4mm
Refer to the images below for the shape of the bottom part and felt insert.
Work in rows for the bottom part.
PART A:
Row 1: Ch 27, starting in the 2nd ch from the hook, sc in each ch across [26 sts]
Rows 2-7: Sc in each st across [26 sts] Fasten off.
PART B:
Starting in the 7th stitch from the edge of PART A:
Rows 1-13: Sc 14 [14 sts]
Row 14: Sc 14, ch 7
Row 15: Starting in the 2nd ch from the hook, sc 20, ch 7
Row 16: Starting in the 2nd ch from the hook, sc 26
PART C:
Rows 17-39: Sc 26. Fasten off.
PART D:
Repeat PART B (rows 1-13).
Row 14: Sc 14, ch 9
Row 15: Starting in the 2nd ch from the hook, sc 22, ch 9
Row 16: Starting in the 2nd ch from the hook, sc 30
Join the bottom part to the sides of the car using single crochet stitches all around. Sew the wheel arches to the bottom part. Stuff the car firmly before closing the final opening.
Congratulations! The basic car body of your Lightning McQueen car is now complete.
Join us next time for Part 2, where we’ll add all the exciting details to bring your Lightning McQueen to life!
ATTENTION! This pattern is for personal use only and cannot be sold. If you share your finished project, please credit the source with a link to our blog and YouTube channel, and use the hashtag #amilittlecreature. We appreciate your support and understanding as we work hard to provide free patterns and tutorials for your enjoyment.
Thank you for crocheting with us!