As a content creator for cars.edu.vn and your resident auto expert, I’ve seen my fair share of vehicle engineering, but sometimes the most fascinating projects come in miniature form. If you’re facing the challenge of building a Mousetrap Car for science class, you’re in the right place. My kids recently tackled this project, and after some initial setbacks and a lot of learning, we engineered a mousetrap car that not only worked but exceeded the project requirements, traveling over 6 meters!
Initially, like many, we thought lighter was better and recycled bottle caps would make ideal wheels. We quickly learned that building a successful mousetrap car involves more than just slapping materials together. It’s about understanding basic mechanics, experimenting, and refining your design. This guide shares our journey, the mistakes we made, and the steps we took to build a mousetrap car that goes the distance. Whether you’re a student, parent, or educator, this breakdown will equip you to construct a high-performing mousetrap car and understand the science behind it.
Essential Elements for an Effective Mousetrap Car: Learning from Our Mistakes
Before diving into the construction, let’s discuss crucial “don’ts” that we discovered firsthand. These insights will save you time and frustration, guiding you toward a more efficient build.
Common Pitfalls to Avoid
- Don’t prioritize lightness over stability: Our first instinct was to make the car as light as possible, assuming it would equate to speed and distance. We were wrong. A super light car is prone to flipping or losing traction, especially when the mousetrap springs into action. Adding some weight, strategically placed, provides stability and keeps the wheels grounded.
- Avoid short wheelbases: Thinking a compact design was better, we initially built a shorter car. However, a longer car provides a crucial advantage: a longer lever arm. This longer lever arm translates to a greater distance traveled for each release of the mousetrap, propelling your car further.
- Steer clear of bottle cap wheels: Recycled materials are great, and we attempted to use bottle caps and even milk jug wheels. Despite our efforts, they simply didn’t work. The reasons could be varied – inconsistent shape, lack of grip, or improper weight distribution. Whatever the cause, these wheels hindered our car’s performance significantly.
By understanding these common mistakes, you’re already ahead of the curve. Now, let’s move on to the components and steps that will lead to a successful mousetrap car.
Gathering Your Supplies: What You’ll Need
For a mousetrap car that travels over 6 meters, you’ll need specific materials that balance lightweight design with robust functionality. Here’s a comprehensive list:
- Standard Mousetrap: The power source for your vehicle.
- Wood Base: A rectangular piece of lightweight wood like plywood provides a sturdy chassis.
- Popsicle Sticks: Versatile and lightweight, perfect for reinforcing structures and creating lever arms.
- Wooden Dowel Rods (1/4″ diameter): Essential for axles. You can use one long rod to cut down, or purchase pre-cut lengths.
- Hot Glue: Your primary adhesive. Don’t underestimate the amount you’ll need!
- Washers: Choose washers with a snug fit to your dowel rods. They help secure wheels and reduce friction.
- String or Cord: To transfer the mousetrap’s energy to the axle.
- Eye Screw: To anchor the string to the lever arm.
- Straws: Specifically, straws that fit snugly over your dowel rods but still allow for free rotation. We found that certain drink straws (like those sometimes used for thicker beverages) are ideal.
- Electrical Tape: For securing elements and potentially adding grip if needed.
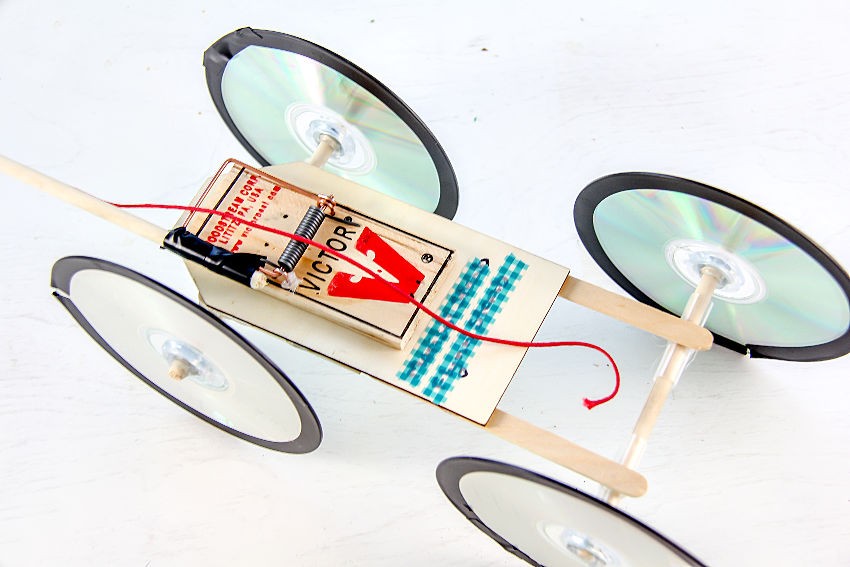
- CDs or DVDs: Excellent for wheels – lightweight, uniform, and readily available.
Step-by-Step Mousetrap Car Construction
Follow these instructions to assemble your high-performance mousetrap car. Refer to the images and video for visual guidance.
-
Prepare the Base: Cut your wood rectangle to your desired length (remember, longer is better). Attach the mousetrap firmly to one end of the base using hot glue. Ensure it’s securely mounted as this is the engine of your car.
-
Create Axle Mounts: Use popsicle sticks to build supports for your axles. Hot glue these supports to the underside of your wood base, positioned to hold the axles and wheels in place. Ensure the supports allow the axles to rotate freely.
-
Assemble the Axles and Wheels: Cut your dowel rods to the appropriate lengths for your front and rear axles. Slide a straw piece onto each axle where it will pass through the popsicle stick supports – this acts as a low-friction bearing. Attach washers on either side of the straw on the axle to keep the wheels aligned and reduce wobble. Finally, attach your CD/DVD wheels to the ends of the axles, securing them with hot glue and ensuring they are centered for a smooth ride.
-
Construct the Lever Arm: Extend the mousetrap’s lever arm using popsicle sticks. Hot glue popsicle sticks together to create a longer lever. The length of this lever arm will influence the distance your car travels – a longer lever arm generally translates to greater distance. Attach the extended lever arm securely to the original mousetrap lever.
-
Attach the String and Eye Screw: Screw the eye screw into the end of your extended lever arm. Tie one end of your string to the eye screw. The other end of the string will be attached to the rear axle.
-
Wrap the String around the Axle: Carefully wrap the string several times around the rear axle. Experiment with the number of wraps – this affects the torque and distance. You want enough wraps to pull the axle effectively as the mousetrap snaps shut.
-
Fine-Tuning and Adjustments: This is crucial. Test your car! Place it on the floor, release the mousetrap lever, and observe its performance.
- Straight Line Issues: If your car veers to one side, check wheel alignment and axle straightness. Minor adjustments to the wheel positions or axle mounts can make a big difference.
- Distance Issues: Adjust the lever arm length or the number of string wraps around the axle to optimize for distance. Experimentation is key here.
- Flipping: If your car flips, add weight to the base, closer to the front axle. This will improve stability.
The secret to our success was refining the axle and wheel system. We realized the importance of minimizing friction for smooth rotation. The straws acted as excellent bearings, allowing the axles to spin freely. This, combined with the larger CD wheels and a longer lever arm, propelled our mousetrap car well beyond the 6-meter mark.
Watch it in Action:
[Video Demonstration of Mousetrap Car (Link to a relevant YouTube video about mousetrap car construction would be inserted here if available)]
(Ideally, embed a short video here demonstrating a mousetrap car running)
Conclusion: Engineering Success
Building a mousetrap car is a fantastic hands-on project that blends engineering principles with fun experimentation. By avoiding common mistakes, utilizing the right materials, and following these steps, you can create a mousetrap car that’s not just functional but a top performer. Remember, the key is in the iterative process – test, analyze, and refine your design. Embrace the challenges, and you’ll not only build a successful mousetrap car but also gain valuable insights into physics and engineering along the way. Good luck, and happy building!